
User's Manual


C2929M (5/06) 5
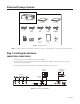
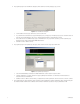
CONNECTING BOTH PMVC4 AND PMVR2 UNITS
In cascading PMVC4 multiviewers with PMVR2 multiviewers, remember to loop from a multiviewer with the lower ID to a multiviewer with a
higher ID. Begin with PMVC4 multiviewers and then PMVR2 multiviewers. Follow the instructions for connecting multiple units.
Figure 6.
Connecting PMVC4s and a PMVR2
Step 2: Installing the Manager Software
1. Insert the resource CD in your PC. A splash screen appears.
2. Click in the splash screen. The program will be extracted into a folder, and a shortcut called Pelco Multiviewer Manager will be added to
the desktop.
3. Locate the Pelco Multiviewer Manager shortcut on the desktop. Click it to launch the application. The program displays the Scan All Online
Modules dialog box.
Click Next. If the software does not find anything, it will not let you go further. Click Rescan in this situation to make sure the software can
detect all your multiviewers.
0
1
2
3
4
6
7
8
9
A
B
C
D
E
F
5
DVI 1
VGA 1
DVI 2
VGA 2
VGA Out 100-240 VAC
COM IN
COM OUT
Cascade In
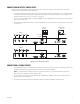
Unit ID
Cascade/DVI Out
PMVR2 ID2
DISPLAY
MONITOR
DX8000
VMX300
PC AND CONTROL
MONITOR
VGA OR DVI
OUTPUT
PMVC4 ID0
CAMERAS
CAMERAS
0
1
2
3
4
6
7
8
9
A
B
C
D
E
F
5
100-240 VAC
VGA Out
Cascade In
Unit ID
COM IN
COM OUT
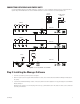
Video 1 Video 2 Video 3 Video 4
Cascade/DVI Out
PMVC4 ID1
0
1
2
3
4
6
7
8
9
A
B
C
D
E
F
5
100-240 VAC
VGA Out
Cascade In
Unit ID
COM IN
COM OUT
Video 1 Video 2 Video 3 Video 4
Cascade/DVI Out