INSTALLATION/OPERATION DF5S Series Fixed Mount Dome C1475M-C (9/08)
Important Safety Instructions Prior to installation and use of this product, the following WARNINGS should be observed. 1. Installation and servicing should be done only by qualified service personnel and conform to all local codes. 2. Unless the unit is specifically marked as a NEMA Type 3, 3R, 3S, 4, 4X, 6, or 6P enclosure, it is designed for indoor use only and it must not be installed where exposed to rain and moisture. 3. Only use replacement parts recommended by Pelco. 4.
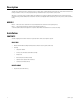
Description The DF5S Series fixed mount dome is designed for indoor use where there is limited space above the ceiling. The dome can be installed in hard ceilings or standard 2 x 2 ft (61 x 61 cm) suspended ceilings. The back box requires only 2.75 inches (7 cm) of room. When there is not enough room to install the DF5S Series back box in the ceiling, the back box can be attached to the surface of the ceiling. A special trim ring, the DF5S-SMKIT, hides the back box.
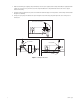
Hard Ceiling Installation 1. Locate the center point of the mounting location. Drill a hole in the ceiling using a 3/32-inch drill. Insert the compass tool into the hole. Use a pencil and the compass tool to draw a circle on the ceiling. Carefully cut out the circle. Figure 1.
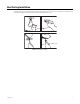
2. Attach a conduit fitting (not supplied), safety chain bracket, and lock nut (not supplied). Install a safety chain/cable (not supplied) that will support up to 16 pounds (7.3 kg). Install one end of the safety chain/cable to the safety chain bracket and the other end to a support structure in the ceiling. 3. Prepare the wiring for camera and lens power; refer to Table A and Table B on page 8 for wiring distances. Pull the wiring into the back box through the conduit fitting. 4.
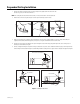
Suspended Ceiling Installation 1. Remove the ceiling tile from the ceiling. Insert the compass tool (supplied) into the center of the tile. (If necessary, use a 3/32-inch bit to drill a hole.) NOTE: The ceiling tile cannot be thinner than 0.50-inch (1.27 cm) or thicker than 1.75 inches (4.45 cm). 2. Draw a circle on the tile using the compass tool and a pencil. Carefully cut out the circle. Figure 3. Preparing the Ceiling Tile 3.
Table A. Video Coaxial Wiring Distances Cable Type* Maximum Distance RG59/U 750 ft (299 m) RG6/U 1,000 ft (305 m) RG11/U 1,500 ft (457 m) *Cable requirements: 75-ohm impedance All-copper center conductor All-copper braide shield with 95% braid coverage Table B shows the recommended maximum distances for 24 VAC with a 10 percent voltage drop. (Ten percent is generally the maximum allowable voltage drop for AC-powered devices.) Table B.
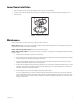
Lower Dome Installation 1. Snap the clip, located on the end of the trim ring leash, into the hole on the lip of the back box. 2. Line up the snaps on the trim ring with the mounting screws on the back box. Snap the trim ring into the plastic snap washers on the mounting screws. Figure 6. Installing the Lower Dome Maintenance Clean the acrylic dome as needed. Be careful not to scratch the surfaces of the dome.
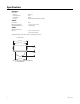
Specifications MECHANICAL Construction Back Box Mounting Bracket Lower Dome Trim Ring Aluminum Steel Acrylic Eggshell white molded plastic, UL94V0 GENERAL Environment Indoor Operating Temperature 32° to 122°F (0° to 50°C) Weight (without camera) 1.75 lb (0.80 kg) CAMERA Maximum Camera and Lens Size 5.00" L x 2.75" W x 2.75" H (12.70 x 6.99 x 6.99 cm) (Design and product specifications subject to change without notice.) IN-CEILING DOME 7.25 (18.41) 6.60 (16.76) 2.75 (6.99) 3.25 (8.26) 5.90 (14.
PRODUCT WARRANTY AND RETURN INFORMATION WARRANTY Pelco will repair or replace, without charge, any merchandise proved defective in material or workmanship for a period of one year after the date of shipment. Exceptions to this warranty are as noted below: • Five years on fiber optic products and TW3000 Series unshielded twisted pair (UTP) transmission products. • Three years on Spectra® IV products. • Three years on Genex® Series products (multiplexers, server, and keyboard).
Worldwide Headquarters 3500 Pelco Way Clovis, California 93612 USA USA & Canada Tel: (800) 289-9100 Fax: (800) 289-9150 International Tel: +1 (559) 292-1981 Fax: +1 (559) 348-1120 www.pelco.