
User's Manual


66 C1553M-B (4/05)
Looping output on an external monitor device allows the device to function as a source device. Refer to Devices - Switching a Device in the
VMX300(-E) Client Manual for information on source and destination devices. To enable looping output complete the following steps:
1. Click Looping Output.
2. Add an analog video connection to the server configuration for this device. Refer to the Connections section for information on analog video
connections.
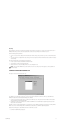
Use the icon animation portion of the Properties tab to configure the animation settings of external monitor icons viewed on maps in the
VMX300(-E) client. Click Choose next to each condition to select the color settings for that condition. Note that you can configure a different color
setting for each monitor.
Screen color: When the device’s Alarm property equals False, device icons in the client display a monitor screen in the color specified here.
Each external monitor device can use a different screen color for its icons.
Border color: When the device’s Alarm property equals False, device icons in the client display a border in the color specified here. Each exter-
nal monitor device can use a different border color for its icons.
Alarm state: When the monitor’s Alarm property equals True, the icon flashes alternately between Color 1 and Color 2. Note, however, that
flashing icons can increase the CPU workload. To reduce the overall workload, set Color 1 and Color 2 to the same color.
ADD A DX8000 DVR
The DX8000 device driver controls Pelco DX8000 Series digital video recorders (DVRs). In this document, the term “DX8000 DVR” is used to refer
to any DVR in the DX8000 series that is supported by the DX8000 driver. Note that the VMX300(-E) supports DX8000 software version level
1.1.00.1121 only.
A DX8000 DVR is a specialized PC that runs the Windows operating system. If your system has more than one DX8000 DVR, each one must be
configured.
PREPARING TO CONFIGURE THE DX8000 DVR
DX8000 recorders are password-protected. To access a DX8000 recorder, each client workstation and the DX8000 driver must have an account
defined in the Power User group on the recorder. For information on setting up Power User accounts, refer to the DX8000 documentation.
Add Accounts to the Power User Group for Client Workstations
For each client workstation that will retrieve video from the recorder, add a Power User account with the following settings:
• USER NAME: The user name must be the computer name of the client workstation. The user name is at least 4 characters in length, and is
case sensitive. If the computer name is less than 4 characters in length, change the computer name to a name that is 4 or more characters
long, or you will not be able to use the computer to access video from a DX8000 recorder.
• PASSWORD: Each client workstation account and the device driver account must all use the same password. The password must be 6 - 11
characters in length. The password is case sensitive.
Add an Account to the Power User Group for the Device Driver
Add a Power User account for the DX8000 driver:
• USER NAME: Define a user name of your choosing. The user name is at least 4 characters in length, and is case sensitive. Do not use the
name of any computer visible over the network, as computer names are reserved for client accounts. Enter the user name on the Communi-
cations tab when you configure the DX8000 recorder, as described in the Configure the Communications Tab section.
• PASSWORD: The password for the device driver account must be the same as the password for the client workstations accounts. The
password must be 6 - 11 characters in length. The password is case sensitive. Enter the password on the Communications tab when you
configure the DX8000 driver as described in the Configure the Communications Tab section.
ADD A DX8000 DVR TO THE SERVER CONFIGURATION
Before you can add a device to the server configuration, you must first start the device driver—either on the server workstation or on the
network—and then add the driver to the server configuration. Refer to the Device Drivers section for instructions.
NOTE: When starting the DX8000 driver, click “Start the driver as an executable.” The option to run the DX8000 driver as a service is
reserved for future use.