Q U I C K S T A R T IX and IXE Series Network Camera Sarix™ Technology C2951M-C (12/09)
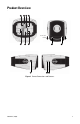
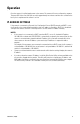
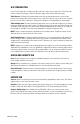
ACT Product Overview 24V~ RELAY ALARM ACC RESET LINK PoE R1 A1 (FRONT COVER OPENED) F V Figure 1.
ì RJ-45 Network Port: Connects the camera to the network. Also supplies power to the camera through the network using Power over Ethernet (PoE). If PoE is not available, the camera is prewired for 24 VAC. î Ethernet Activity LED: Flashes green to indicate that data is being transmitted/received by the camera. ï Ethernet Link LED: Glows solid amber to indicate that a live connection is established. ñ Accessory Port: For use with compatible Pelco accessories.
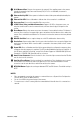
Installation NOTES: • For detailed instructions, refer to the IX Series Installation/Operation manual or the IXE Series Installation/Operation manual. Both are available on the resource disc. • Megapixel lenses are designed and tested to deliver optimal image quality to the IX Series and IXE Series megapixel cameras. A standard definition lens installed on a megapixel camera will limit the resolution of the camera and create poor image quality. 1. Install the lens: a. Remove the cover from the lens mount.
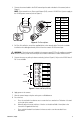
3. Connect the network cable to the RJ-45 network port located at the back of the camera (refer to Figure 3). NOTE: If the network has no Power over Ethernet (PoE), connect a 24 VAC Class 2 power supply to the 24 VAC power connector (refer to Figure 4). 1 8 87 8 65 43 21 1 2 3 4 5 6 7 8 1 2 3 4 6 7 8 Function 1 TX+ 2 TX– 3 RX+ 4 PoE 1-2 5 PoE 1-2 6 RX– 7 PoE 3-4 8 PoE 3-4 8 5 1 Pin 7 6 5 4 3 2 1 Figure 3. Pin Descriptions 4.
Operation Once the camera is installed, apply power to the camera. The camera will start a configuration sequence. The green LED flashes five times per second for approximately two minutes and then turns solid after the boot cycle is complete and the camera is on line.
MINIMUM SYSTEM REQUIREMENTS IX SERIES Processor: Intel® Pentium® 4 microprocessor, 1.6 GHz Operating System: Microsoft® Windows® XP, Windows Vista®, or Mac® OS X 10.4 (or later) Memory: 512 MB RAM Network Interface Card: 100 megabits (or greater) Monitor: Minimum of 1024 x 768 resolution, 16- or 32-bit pixel color resolution Web Browser: Internet Explorer® 7.0 (or later) or Mozilla® Firefox® 3.0 (or later) NOTE: Internet Explorer is not supported by Mac OS X 10.4. Media Player: QuickTime® 7.6.
LIVE PAGE ICONS Viewable icons are based on group permissions. The camera has two predefined groups: Public and Admin. Public: This defined group can be modified or deleted. The default permissions for this group are single stream view, stream selection, and API access. Admin: This is the only defined group that cannot be deleted; however, the administrator password can be changed. For security purposes, it is important that you change your password after you log on to the device for the first time.
SYSTEM TAB General Settings: Includes programmable fields for the device name, time server, and text overlay settings. You can also use the General Settings page to turn the camera’s power LED on or off and to configure the Simple Mail Transfer Protocol (SMTP) server to send an email notification when an event handler is activated. System Information: Includes read-only fields for the firmware version, hardware version, model number, and serial number of the system.
A/V STREAMS TAB Use the A/V Streams tab to configure the video and audio streams for the camera. The A/V Streams tab includes a Video Presets page, a Video Configuration page, and an Audio Configuration page. Video Presets: The Video Preset page includes three fully-configured video presets, which include primary and secondary video stream settings for easy setup. These presets may also be used as a starting point for a custom video configuration. These preset configurations vary depending on camera model.
PRODUCT WARRANTY AND RETURN INFORMATION WARRANTY Pelco will repair or replace, without charge, any merchandise proved defective in material or workmanship for a period of one year after the date of shipment.
www.pelco.com Pelco, Inc.