9100 SERIES VIEWSTATION AND RECORDER Quick Start Guide
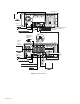
DX9100 Series A basic DX9100 system consists of a DX9100VS viewstation and a DX9100 recorder. The recorder has an internal storage unit. The DX9116H models record at a maximum of 15 ips with a hard drive between 500 GB and 1,500 GB. The DX9116F models record at a maximum of 30 ips with a hard drive between 500 GB and 1,500 GB. You can connect up to 16 cameras to the 16 video input coaxial connectors on the back of the recorder.
VIEWSTATION POWER CONNECTION 10/100/1000 BASE-T ETHERNET INTERFACE: ALLOWS MULTIPLE VIEWSTATIONS AND RECORDERS RJ-45 STRAIGHT CABLES MAXIMUM OF 16 CAMERA INPUTS (VIDEO IN) Term Loop 1 4 75 HI-Z LOOPING VIDEO SOURCE (VIDEO OUT) RECORDER FOR FUTURE USE POWER CONNECTION HASP KEY (INTO THE BOTTOM RIGHT USB PORT) CM9760-REL CM9760-ALM CM9760-DT RS-232 Figure 2.
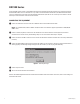
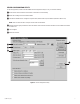
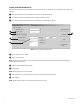
SETTING DATE/TIME PROPERTIES Follow these steps to set the Date/Time Properties on the recorder and the viewstation. Make sure you close all applications on the recorder and viewstation. Double-click the time on the system tray. The following page appears. Figure 3. Date and Time Page Set the date and time and then click Apply. Click Time Zone. The following page appears. Figure 4. Time Zone Page Select your time zone from the drop-down box.
SERVER CONFIGURATION UTILITY To open this application, double-click the DX9000 Server Configuration Utility icon on your recorder’s desktop. Set the frame rate and resolution. The number of channels is set automatically. Select the recording format. The default is NTSC. Click Server Identification to change the computer name (default is Pelco1) and IP address (default is 100.0.0.101). NOTE: Each recorder must have a unique recorder name and IP address. Enter the multicast group number.
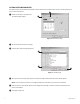
CLIENT CONFIGURATION UTILITY You can find this application on the viewstation. With this application you can build a list of local servers and export them to the recorders. Make sure that the recorder and viewstation are connected to the network switch. Go to Start > Programs > DX9000 Viewstation > Client Configuration Utility. Log in. The default user name and password is admin/admin. The following page appears. Figure 6.
TIME SYNCHRONIZATION Go back to the Server Configuration Utility on the recorder to complete time synchronization. Click Suggest to see a list of the recorders that were exported in the Client Configuration Utility. Click Configure. NOTE: Repeat steps 1 and 2 on each physical recorder. Restart all recorders and viewstations. Figure 7. Define Time Synchronization The materials used in the manufacture of this document and its components are compliant to the requirements of Directive 2002/95/EC.
www.pelco.com Pelco, Inc.