® HS4000TW Series High-Security Camera Enclosure Installation/Operation Manual C492M-D (1/96) Pelco • 3500 Pelco Way • Clovis, CA 93612-5699 • USA • www.pelco.
TABLE OF CONTENTS Section Page 1.0 WARNINGS ........................................................................................................................................ 1 2.0 SCOPE ...............................................................................................................................................2 3.0 DESCRIPTION ...................................................................................................................................2 3.1 MODELS .......
INSTALLATION/OPERATION MANUAL HS4000TW SERIES HIGH-SECURITY CAMERA ENCLOSURES 1.0 WARNINGS Prior to installation and use of this product, the following WARNINGS should be observed. 1. Installation and servicing should only be done by Qualified Service Personnel and conform to all Local codes. 2. Unless the unit is specifically marked as a NEMA Type 3, 3R, 3S, 4, 4X, 6, or 6P enclosure, it is designed for indoor use only and it must not be installed where exposed to rain and moisture. 3.
2.0 SCOPE 3.1 MODELS The information within this manual covers the installation of the HS4000TW Series High Security Camera Enclosure. HS4000TWS High security ceiling/wall enclosure with tilt down, straight viewing angle constructed of heavy gauge steel, designed for installations such as prisons, detention cells, etc., requiring maximum protection from vandalism. (UL) HS4000TWR Same as HS4000TWS except with tilt down, right viewing angle.
4.0 SPECIFICATIONS ELECTRICAL MECHANICAL Cable Entry: Two (2) cable knock-out holes on rear plate Tamper Switch: 1/4" (.63 cm) quick connect. N.O./N.C. clearly marked on switch body. 10A, maximum switching current 125V, maximum switching voltage. Window: Camera Mounting: Maximum Camera/Lens Size: 1/2" (1.27 cm) thick impact and abrasion resistant Lexan Multiple holes on camera sled Accepts camera/lens combinations (including BNC connector) up to: 15.0" L x 6.0" W x 4.75" H (38.10 cm x 15.
5.0 INSTALLATION 5.2 TAMPER SWITCH INSTALLATION Before installing the HS4000TW Series enclosure in a wall or ceiling, make certain that the mounting surface is able to support the full weight of the enclosure plus the camera and lens. The HS4000TW High-Security enclosures come stanmdard from the factory with a tamper switch mounted on the secure access cover.
6.0 CARE AND MAINTENANCE Maintenance performed at regularly scheduled intervals will help prolong the operational life and appearance of the equipment. Clean the Lexan window with a mild non-abrasive detergent in water and a soft cloth regularly to help maintain picture clarity. For a heavily soiled window, use vinyl cleaner.
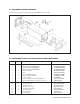
7.0 EXPLODED ASSEMBLY DIAGRAM See Figure 3 for exploded assembly diagram of HS4000TW Series enclosure. Figure 3. HS4000TW Series Enclosure Exploded Assembly Diagram 8.0 MECHANICAL PARTS LIST FOR HS4000TW SERIES ENCLOSURE Item No. Qty 1 2 1 1 3 4 5 6 7 8 9 A B C D E F G 6 Description Part Number 2 1 1 2 2 8 1 Window, Lexan, 5.75" x 4" x 0 .
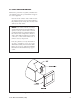
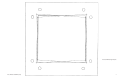
HS4000TW Mounting Template Pelco Manual C492M-D (1/96) 7
(This page intentionally left blank.
9.0 WARRANTY AND RETURN INFORMATION WARRANTY RETURNS Pelco will repair or replace, without charge, any merchandise proved defective in material or workmanship for a period of one year after the date of shipment. Exceptions to this warranty are as noted below: In order to expedite parts returned to the factory for repair or credit, please call the factory at (800) 289-9100 or (559) 292-1981 to obtain an authorization number (CA number if returned for credit, and RA number if returned for repair).
® World Headquarters 3500 Pelco Way Clovis, California 93612 USA USA & Canada Tel: 800/289-9100 Fax: 800/289-9150 International Tel: 1-559/292-1981 Fax: 1-559/348-1120 www.pelco.