® SS30/SS3000/ SS3002 Dome Enclosures Installation/ Operation Manual C428M-B (2/98) UL ® LISTED Pelco • 300 W. Pontiac Way, Clovis • CA 93612-5699 USA • Pelco Online @ http://www.pelco.
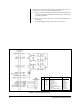
CONTENTS Section Page 1.0 GENERAL .................................................................................................. 3 1.1 IMPORTANT SAFEGUARDS AND WARNINGS ............................... 3 2.0 DESCRIPTION .......................................................................................... 4 2.1 MODELS ............................................................................................ 4 2.2 OPTIONS ............................................................................
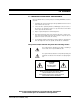
1.0 GENERAL 1.1 IMPORTANT SAFEGUARDS AND WARNINGS Prior to installation and use of this product, the following WARNINGS should be observed. 1. Installation and servicing should only be done by Qualified Service Personnel and conform to all Local codes. 2. Unless the unit is specifically marked as a NEMA Type 3, 3R, 3S, 4, 4X, 6, or 6P enclosure, it is designed for indoor use only and it must not be installed where exposed to rain and moisture. 3. Only use replacement parts recommended by Pelco. 4.
2.0 DESCRIPTION Pelco’s SS30/SS3000 series is a full-sphere, discreet surveillance enclosure designed to be suspended from a ceiling and to complement the interior decor of businesses, hotels, and offices. The smoked finished lower dome effectively camouflages a CTTV security/ surveillance system without compromising the quality of the video picture. An optional mirrored lower dome (SS3002) is available. The SS3000 Series has been engineered for ease of installation, serviceability, and relocation.
3.0 INSTALLATION Save the shipping carton and plastic packing in case the unit has to be returned for credit or repair. 3.
Cable distances should not exceed the distances specified in Section 3.1. The following are some recommended common installation practices. 1. Always use jacketed stranded multi-conductor interconnecting cable between the control and the pan/tilt, with additional conductors than needed for future servicing and/or additions. 2. Always use color-coded conductors for ease of wiring and to identify functions at a later date. 3. Keep a wiring diagram with the system for later use and reference.
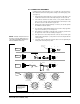
3.3 CONNECTOR ASSEMBLY Installation and/or testing will require you to assemble the connector parts provided. Fabricate the interconnecting cable according to the following steps (reference Figure 2). NOTE: Contacts cannot be removed from the connector without the use of the appropriate AMP extraction tool which is available from Pelco. 1. Slide part A of the cable clamp (item 1) over the end of the cable (item 1, part C) with the threaded end of the cable clamp facing the connector (item 5). 2.
3.4 MOUNTING The SS3000 enclosure is designed to be suspended from a suitable length of 1-1/2" pipe threaded at both ends. This pipe can be interfaced to either a Pelco MRWA wall adapter, MRCA ceiling adapter, or coupled to a longer length of pipe (see Figure 3). Figure 3.
3.4.1 Ceiling/Wall Mounting NOTE: The “Schneider” ring referred to in these instructions is a 10-inch black aluminum ring designed to fit around the square portion of the upper dome. Use of this ring helps to camouflage movement of the dome. 1. Select an appropriate length of 1-1/2" NPT pipe for the mount you have selected. Once the mount is installed, insert and tighten the pipe to approximately 30 ft lb, then tighten the 8-32 screw in the pipe nut to lock the pipe threads.
CAUTION: The lower dome will shatter if dropped. Always operate with the safety chain attached. Do not rotate pan/ tilt by hand. Rotate by controller only. 9. Turn the system on and rotate the pan/tilt. Check for cable interference. Tilt the camera up and down and check for clearance of all moving parts. 10. After all tests have been done and the system is functioning properly, attach the safety chain to the upper dome with the fasteners provided.
3.5 ADJUSTMENTS CAUTION: Do not attempt to adjust limit stops when pan/tilt is in operation. Damage to the equipment can result. Also, do not operate equipment without limit stops. Do not remove or reposition fixed limit stop on the PT28024P pan/tilt. DAMAGE WILL OCCUR. To adjust the pan/tilt limits, perform the following steps. Refer to Figure 6 for limit stop locations. 1. Factory pan limits are set to 0-355° and tilt limits at ±45°.
4.0 MAINTENANCE Clean the acrylic lower dome as necessary to maintain a clear picture. Be careful not to scratch the surfaces of the dome. Exterior Surface - Clean the dome's exterior surface with a nonabrasive cleaning cloth and cleaning agent that is safe for acrylic plastic. Either liquid or spray cleaner/ wax suitable for fine furniture is acceptable. Interior Surface (Except Chrome) - Clean the same as the exterior surface.
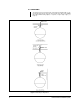
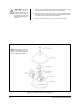
5.0 MECHANICAL PARTS LIST Table A. SS3000 Exploded Assembly Diagram (Corresponds to Figure 5) Item No.
6.0 SPECIFICATIONS ELECTRICAL Input voltage: 24 VAC required for pan/tilt Power Requirements Pan: Tilt: Running Starting .31 amp (7.5 vA) .47 amp (11.2 vA) .38 amp (9.2 vA) .56 amp (13.5 vA) Connectors Pan/Tilt: Lens: Video: Camera Power: AMP CPC type (mate supplied) Hirschmann MAB6100 BNC Spade lugs Motors: Two-phase induction type, instantaneous reversing Limit Switches: 5 amp, external adjustment Conductor Requirements: See Section 3.
GENERAL Construction: Upper dome: Lower dome: Black, U.L. 94HB rated ABS plastic Acrylic hemisphere with distortion free viewing window with light attenuation factor of 1 f-stop (SS30/SS3000) or mirrored lower dome with 2 f-stop (SS3002). Rotates with pan and tilt, camera, and lens Environment: Indoor; 32° to 120°F (0° to 48.89°C) Unit Weight: 6 lb (2.72 kg) approximate Dimensions: See Figure 7 (Design and product specifications subject to change without notice.) Figure 7.
7.0 WARRANTY AND RETURN INFORMATION WARRANTY Pelco will repair or replace, without charge, any merchandise proved defective in material or workmanship for a period of one year after the date of shipment. Exceptions to this warranty are as noted below: • • • • • Two years on all standard motorized and fixed focal length lenses. Two years on Legacy®, Intercept®, PV1000 Series, CM6700/CM8500/CM9500/ CM9750/CM9760 Matrix, Spectra™, DF5 Series and DF8 Fixed Dome products.