
Security Camera User Manual


C3463M-B (2/11) 45
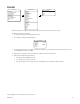
4. Set the alarm action:
a. Use the joystick to position the cursor beside ALARM ACTION.
b. Press Iris Open. The cursor moves to the right.
c. Move the joystick up or down to view the available selections. The following are the settings for alarm action:
NONE: No action when alarm is triggered.
AUTO SCAN: Dome starts auto scan operation when alarm is triggered.
FRAME SCAN: Dome starts frame scan operation when alarm is triggered.
RANDOM SCAN: Dome starts random scan operation when alarm is triggered.
PRESET: Dome goes to the preset that is the same as the alarm number. For example, Preset 1 will go to Alarm 1.
PATTERN 1: Dome runs pattern 1 when an alarm is triggered.
PATTERN 2: Dome runs pattern 2 when an alarm is triggered.
PATTERN 3: Dome runs pattern 3 when an alarm is triggered.
PATTERN 4: Dome runs pattern 4 when an alarm is triggered.
PATTERN 5: Dome runs pattern 5 when an alarm is triggered.
PATTERN 6: Dome runs pattern 6 when an alarm is triggered.
PATTERN 7: Dome runs pattern 7 when an alarm is triggered.
PATTERN 8: Dome runs pattern 8 when an alarm is triggered.
d. Press Iris Open to enter selection.
5. Set the auxiliary to activate:
a. Use the joystick to position the cursor beside ACTIVATE AUX.
b. Press Iris Open. The cursor moves to the right.
c. Move the joystick up or down to view the following available selections.
NO (default): Not activated.
1: An alarm action will close AUX 1.
2: An alarm action will close AUX 2.
d. Press Iris Open to enter selection.
NOTE: The AUX 1/AUX2 will stop when all the alarms assigned to it have cleared. If the AUX1/AUX is set up as momentary, then it will be
activated each time a new alarm is activated.
6. Set the alarm contact:
a. Use the joystick to position the cursor beside ALARM CONTACT.
b. Press Iris Open. The cursor moves to the right.
c. Move the joystick up or down to view the following available selections.
N/O (default): Normally open.
N/C: Normally closed.
d. Press Iris Open to enter selection.
NOTE: The alarm contact feature is functional and available for 23X models only if the dome drive is installed in a Spectra III SE or
Spectra IV SE back box.
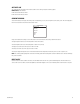
7. To edit the alarm schedule:
The Edit Schedule menu is a duplicate of the Edit Event menu (refer to Event on page 53) with the following exceptions. In the Edit Schedule
menu, the event type cannot be changed. Also, the Holiday feature cannot be accessed from the Edit Schedule menu.
For instructions on changing the features in the Edit Schedule menu, refer to Edit Event on page 54.