I N S T A L L A T I O N Spectra III™ EVS In-Ceiling Back Box C2494M (12/05)
Important Safety Instructions 1. Read these instructions. 2. Keep these instructions. 3. Heed all warnings. 4. Follow all instructions. 5. Do not use this apparatus near water. 6. Clean only with dry cloth. 7. Do not block any ventilation openings. Install in accordance with the manufacturer’s instructions. 8. Do not install near any heat sources such as radiators, heat registers, stoves, or other apparatus (including amplifiers) that produce heat. 9.
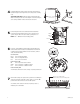
Installation 1 Locate the center point of the mounting location and insert the compass tool. Draw a circle. Cut the circle out of the ceiling. 2 Attach the conduit fitting, safety chain bracket, and lock nut. Install a safety chain/cable (not supplied) that will support up to 16 pounds (7.3 kg). 3 Open the hinged door to the back box. Push the tab lock towards the wall of the unit and lift the door open. Pull power, alarm/auxiliary, and network cable into the back box.
Install the back box by compressing the spring clips and pushing the back box through the hole. Tighten the screws until you hear a clicking noise. Suspended Ceiling Only: Install the ceiling tile with the back box. Attach a T-rail clip on each side of the ceiling tile to hold the ceiling tile secure during installation of the dome drive and lower dome. 5 Connect the power wires to the circuit board inside the back box. Connect any alarm and auxiliary circuits. Turn on the power to the system.
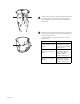
A B 8 Install the dome drive. Line up the blue (A) and red (B) tabs with the blue (A) and red (B) labels. Push in the tabs. Insert one side and then the other side. Continue pushing on the ends of the tabs until both sides click into place. 9 Install the lower dome. Snap the clip of the lower trim ring leash into the hole on the lip of the back box. Snap the trim ring into the plastic snap washers on the mounting screws.
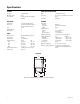
Specifications SYSTEM Processor Operating System User Interface VIDEO ACTIVITY DETECTION PowerPC® 405EP Linux® Remote operation via WS5050 or VCD5000 Zones Zone Types Sensitivity ELECTRICAL Input Voltage Input Power Fuse Auxiliary Outputs Alarm Inputs GENERAL 18-30 VAC; 24 VAC nominal 36 VA nominal (without heaters) 88 VA nominal (with heaters) 1.
PRODUCT WARRANTY AND RETURN INFORMATION WARRANTY Pelco will repair or replace, without charge, any merchandise proved defective in material or workmanship for a period of one year after the date of shipment. Exceptions to this warranty are as noted below: • Five years on FR/FT/FS Series fiber optic products and TW3000 Series unshielded twisted pair transmission products. • Three years on Genex® Series products (multiplexers, server, and keyboard).
Worldwide Headquarters 3500 Pelco Way Clovis, California 93612 USA USA & Canada Tel: 800/289-9100 Fax: 800/289-9150 International Tel: 1-559/292-1981 Fax: 1-559/348-1120 www.pelco.