
User Manual

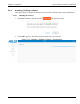
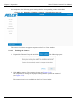

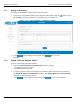
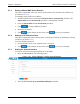
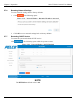
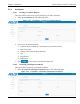

Table Of Contents
- 1. Important Notices
- 2. Overview
- 3. Safety
- 4. Installation
- 4.1 Unpacking
- 4.2 Camera Installation
- 4.2.1 Installation Guidelines and Preparation
- 4.2.1.1 Cable wires between camera and DC/PoE power supply should be 20-22AWG.
- 4.2.1.2 Both the camera ant the end-equipment connected to it should be permanently connected to protective earth, using screw and washers. Wires should be made of cupper. Minimal grounding cable is 14AWG.
- 4.2.1.3 In case of using DC power supply:
- 4.2.1.4 Power supply (either POE injector or DC power supply) should be safety approved for local regulations.
- 4.2.1.5 Install the Ferrite on the operational cable as close as possible , max 5cm, from the system.
- 4.2.2 Mechanical Interface Preparation
- 4.2.3 Wall Mount Configuration
- 4.2.4 Pole Mount Configuration
- 4.2.5 Electrical ICD IP PoE Cable
- 4.2.1 Installation Guidelines and Preparation
- 5. Operation
- 5.1 First Time Credentials Setup
- 5.2 Logging Into Sarix TI Camera Web GUI
- 5.3 Changing Your Password
- 5.4 Main Window Overview
- 5.5 Live View Window
- 5.6 Status Window
- 5.7 Network Window
- 5.8 Streaming Window
- 5.9 Image Processing Window
- 5.10 Analytics Window
- 5.11 System Window
- 5.12 Logging Out from the Web GUI
- 6. Maintenance
- 7. Ordering Information
- 8. Index

Chapter 5: Operation Sarix TI Series Camera User Manual
5-17
5.7.3 Setting a Manual DNS Server Address
This option is applicable when you wish to synchronize the time and date with a DNS server
(see Section 5.11.3.2).
To manually select a DNS server address:
1. Enable the DNS area by selecting the Obtain IP address automatically checkbox. The
Obtain DNS servers automatically checkbox is automatically selected.
2. Clear the Obtain DNS servers automatically checkbox.
3. Click . An empty DNS line is added.
4. Determine the address.
5. Click for the changes to take effect (click to revert your changes).
5.7.4 Settings of HTTPS Connection
This option is applicable when selecting either a self-signed certificate or uploading an existing
certificate (see Section 5.7.7).
To set the HTTPS connection:
1. Set the HTTPS Port bar to the required value (1 to 65535).
2. Click for the changes to take effect (click to revert your changes).
5.7.5 Setting the Network Interface
To have the network interface permanently set to 100 Mbps:
1. Select the Advanced tab. The following opens:
Figure 5-18: Network Window - Setting Network Interface
2. Select the Fix network speed to 100Mbit full duplex checkbox.