CKV720 CKB740 plak hier het toestel-identificatieplaatje placez ici la plaque d'identification de l'appareil kleben Sie hier das Gerätetypenschild ein stick the appliance identification card here Dit plaatje bevindt zich aan de bovenzijde van het toestel. Cette plaque se trouve sur le dessus de l'appareil. Dieses Schild befindet sich an der Oberseite des Gerätes. This card is located on the top of the appliance.
uw keramische kookplaat Inhoud 3 uw keramische kookplaat uw keramische kookplaat Beschrijving . . . . . . . . . . . . . . . . . . . . . . . . . . . . . . . . . . . . . . . . . . . . . . . . . . 4 NL Inleiding . . . . . . . . . . . . . . . . . . . . . . . . . . . . . . . . . . . . . . . . . . . . . . . . . . . . 5 Gebruiksaanwijzing . . . . . . . . . . . . . . . . . . . . . . . . . . . . . . . . . . . . . . . . 3 – 14 Installatievoorschrift . . . . . . . . . . . . . . . . . . . . . . . . . . . . .
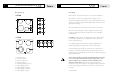
4 uw keramische kookplaat 5 uw keramische kookplaat Beschrijving Inleiding CKB740 Deze keramische kookplaat is ontworpen voor de echte kookliefhebber. 2 3 De kookplaat is voorzien van Cooklight elementen. Dit zijn zeer snel 8 opwarmende stralingselementen die een hoog rendement hebben, wat zeer gunstig is voor de aankooktijd. Bovendien hebben deze elementen een zeer 7 1 4 goede warmteverdeling. De ruime afstanden tussen de kookzones maken het koken comfortabel.
6 veiligheid 7 veiligheid Waar u op moet letten Open nooit de behuizing van het toestel Flambeer nooit onder een afzuigkap Zorg voor voldoende ventilatie tijdens het gebruik ■ ■ Houd natuurlijke ventilatieopeningen open. Wanneer er zich een lade onder de kookplaat bevindt ■ Zorg voor voldoende afstand tussen de kookplaat en de inhoud van de lade. ■ Leg geen brandbare voorwerpen in de lade. afzuigkap.
bediening 9 comfortabel koken Instellen De kookplaat optimaal gebruiken Algemeen ■ Gebruik geen pannen die kleiner zijn dan de kookzone. Hiermee voorkomt u dat Op het glazen werkoppervlak worden de vier kookzones aangeduid door voedselresten op de gloeiend hete kookzone terechtkomen. Ingebrande middel van een cirkel. De diameter van de panbodem moet zoveel mogelijk voedselresten zijn moeilijk te verwijderen. Bovendien kunnen de handgrepen te overeenkomen met de diameter van de kookzone.
10 comfortabel koken 11 comfortabel koken Kooktabel De onderstaande tabel is uitsluitend bedoeld als leidraad, omdat de Gebruik de middelste standen voor: instelwaarde afhankelijk is van de hoeveelheid en samenstelling van het gerecht ■ doorkoken van grote hoeveelheden; en de pan. ■ ontdooien van harde groenten, bijvoorbeeld sperziebonen.
12 onderhoud 13 storingen Algemeen Tabel Reinig de kookplaat steeds na gebruik. U kunt hiervoor een mild Wanneer het toestel niet goed werkt, betekent dit niet altijd dat het defect is. reinigingsmiddel, bijvoorbeeld afwasmiddel gebruiken. Speciale Probeer het euvel eerst zelf te verhelpen.
14 milieuaspecten 15 installatievoorschrift Verpakking en toestel afvoeren Algemeen Bij de vervaardiging van dit toestel is gebruik gemaakt van duurzame Dit toestel voldoet aan de relevante CE richtlijnen. materialen. Dit toestel moet aan het eind van zijn levenscyclus op verantwoorde wijze worden afgevoerd. De overheid kan u hieromtrent informatie verschaffen. Op het gegevensplaatje aan de onderzijde van het toestel worden de totale aansluitwaarde, de vereiste spanning en de frequentie aangegeven.
16 installatievoorschrift Inbouwen 17 installatievoorschrift Benodigde vrije ruimte rondom (CKV720) afzuigkap Elektrische aansluiting min. 600 mm kast De energievoorziening naar de kookplaat vindt plaats via de oven of het separate bedieningspaneel. Zie hiervoor het installatievoorschrift van de min. 650 mm desbetreffende oven of het bedieningspaneel. min. 450 mm Vermogenstabel min. 40 mm min.
18 installatievoorschrift 19 installatievoorschrift Inbouwen (CKB740) Keer de kookplaat om en laat het toestel in de Elektrische aansluiting uitsparing zakken. Gebruik voor het aansluiten een goedgekeurde kabel, afhankelijk van de voorschriften. De kabelommanteling moet van rubber zijn. Aan de onderzijde van het toestel bevindt zich een etiket met daarop de aansluitschema's. De aansluitklemmen zijn bereikbaar nadat u het aansluitkastje aan de onderzijde hebt geopend.
20 installatievoorschrift Het toestel kan op de volgende manieren worden aangesloten: 21 installatievoorschrift 2 fasen met 1 nul aansluiting (2 1N a.c. 400 V / 50 Hz): De spanning tussen de fasen en de nul is 230 V ac. Tussen de fasen staat een 1 fase aansluiting (1 1N a.c. 230 V / 50 Hz): spanning van 400 V. Wanneer er geen spanning van 400 V tussen de fasen De spanning tussen de fase en de nul is 230 V a.c.
22 installatievoorschrift 23 installatievoorschrift 3 fasen aansluiting (3 a.c. 230 V / 50 Hz): Uitsparing in werkblad zagen De spanning tussen de fasen is 230 V a.c. Zaag de uitsparing in het werkblad. Doe dit zeer nauwkeurig (zie tabel). Zaag Breng een verbindingsbrug aan tussen de aansluitpunten 4-5. ook eventueel aanwezige tussenschotten uit. Uw groepen moeten afgezekerd zijn met minimaal 16 A (3x).
24 installatievoorschrift 25 installatievoorschrift Kookplaat plaatsen Boven een 90 cm oven of een oven van een ander merk die niet is Boven een lade of vaste blende. Boven een 60 cm Pelgrim oven of boven voorzien van mantelkoeling. een oven van een ander merk die is voorzien van mantelkoeling. Monteer een hittebestendige (85 °C) plaat ter Zorg voor een ruimte van minimaal 10 mm tussen een lade en de kookplaat. Let afscherming van de kookplaat.
26 27 votre plaque de cuisson céramique votre plaque de cuisson céramique Description . . . . . . . . . . . . . . . . . . . . . . . . . . . . . . . . . . . . . . . . . . . . . . . . . 28 Introduction . . . . . . . . . . . . . . . . . . . . . . . . . . . . . . . . . . . . . . . . . . . . . . . . . 29 securité Les points qui méritent votre attention . . . . . . . . . . . . . . . . . . . . . . . 30 – 31 commande Régler . . . . . . . . . . . . . . . . . . . . . . . . . . . . . . . . . . . . . . . . . . . .
28 votre plaque de cuisson céramique 29 votre plaque de cuisson céramique Description Introduction CKB740 La présente plaque de cuisson céramique à été conçue pour le véritable amateur de cuisine. 2 3 8 La plaque de cuisson est équipée d'éléments Cooklight. Ce sont des éléments radiants offrant une montée ultrarapide de la température et un haut 7 rendement, ce qui est très intéressant pour le temps de cuisson. En outre, ces éléments assurent une parfaite distribution de la chaleur.
30 sécurité 31 sécurité les points qui méritent votre attention N'ouvrez jamais le logement de l'appareil. Ne flambez jamais sous une hotte Veillez à une bonne aération pendant l'utilisation ■ ■ Maintenez les points d'aération naturels ouverts. En cas de tiroir sous la plaque de cuisson ■ Respectez une distance appropriée entre la plaque de cuisson et le contenu du est éteint. Utilisation de la surface de cuisson ■ tiroir. ■ Ne mettez pas d'objets inflammables dans le tiroir.
commande 33 cuisiner confortablement Régler Arrêt Généralités Tournez le bouton de réglage de manière à ce qu'il se retrouve sur la position Les 4 zones de cuisson sont représentées par des cercles sur la plaque de verre. zéro. Lors de la prochaine utilisation de la zone de cuisson, seule la zone de Le diamètre du fond de la casserole doit correspondre le plus possible au cuisson interne s'enclenchera. diamètre de la zone de cuisson. Vous ne pouvez pas utiliser la zone de cuisson externe seule.
34 cuisiner confortablement 35 cuisiner confortablement Utilisez une position un peu plus basse pour : ■ ■ ■ Ne posez sur la surface de cuisson que des casseroles qui ont un fond sec et ■ faire revenir de la viande ; propre. De cette manière, vous n'aurez pas le problème d'éliminer des tâches ■ cuire un poisson plat, des darnes fines ou du filet ; difficiles.
36 entretien 37 pannes Généralités Tableau Nettoyez toujours la plaque de cuisson après utilisation. Vous pouvez utiliser Si l'appareil ne fonctionne pas bien, ceci ne veut pas dire forcément qu'il est en dans ce cas un produit d'entretien doux, par exemple, un produit pour la panne. Essayez de résoudre d'abord le problème vous-même comme suit. vaisselle. Les produits d'entretien spéciaux pour plaques de cuisson en Téléphonez au service après-vente si les indications suivantes restent vaines.
38 environnement 39 instructions d'installation Que faire de l'emballage et de l'appareil usé Généralités Des matériaux solides ont été utilisés pour fabriquer cet appareil. L'appareil Le présent appareil répond à toutes les directives importantes de la CE. doit être évacué correctement à la fin de son cycle de vie. L'administration peut vous fournir des informations sur ce sujet.
40 instructions d'installation Encastrement 41 instructions d'installation Espace libre qui est nécessaire autour (CKV720) hotte d’aspiration Branchement électrique min. 600 mm le boîtier C'est par le four ou un panneau de commande séparé que la plaque de cuisson est alimentée en énergie. Voir à cet effet la consigne d'installation du four en min. 650 mm question ou le panneau de commande. min. 450 mm Tableau des puissances Type de plaque de cuisson Cooklight Branchement électrique min.
42 instructions d'installation 43 instructions d'installation Encastrement (CKB740) Retournez la plaque de cuisson et placez Branchement électrique l'appareil dans l'évidement. L'appareil doit toujours être mis à la terre. Utilisez pour la connexion un câble agréé, en fonction des consignes.L'enveloppe des câbles doit être en caoutchouc. En bas de l'appareil, vous trouverez une étiquette présentant le schéma de connexion.
44 instructions d'installation Les méthodes pour connecter l'appareil sont énoncées ci-dessous : 45 instructions d'installation Connexion 2 phases avec 1 neutre (2 1N ca 400 V / 50 Hz) : Entre les phases, une tension de 400 V est présente. Lorsque la tension de Branchement à 1 phase (1 1N a.c. 230 V / 50 Hz): 400 V n'est pas présente entre les phases, c'est que dans l'armoire La tension entre la phase et le neutre est de 230 V ca.
46 instructions d'installation 47 instructions d'installation Connexion 3 phases (3 ca 230 V / 50 Hz) : Scier un trou dans le plan de travail. Entre les phases, une tension de 230 V est présente. Sciez le trou dans le plan de travail. Effectuez cette opération avec précision Placez des ponts de liaison entre les points de connexion 4-5. Vos groupes (voir tableau). Sciez éventuellement les cloisons qui sont présentes. Les doivent avoir au minimum des fusibles de 16 A (3x).
48 instructions d'installation 49 instructions d'installation Placer la plaque de cuisson Au-dessus d'un four de 90 cm ou d'un four d'une autre marque qui n'est Au-dessus d'un tiroir ou d'un mixeur fixe. Au-dessus d'un four Pelgrim de pas pourvu d'une double enveloppe. 60 cm. Au-dessus d'un four d'une autre marque, équipé d'une double enveloppe Installez une plaque thermorésistante (85 °C) pour protéger le réfrigérateur.
50 51 Ihr Glaskeramik-Kochfeld Ihr Glaskeramik-Kochfeld Beschreibung . . . . . . . . . . . . . . . . . . . . . . . . . . . . . . . . . . . . . . . . . . . . . . . 52 Einführung . . . . . . . . . . . . . . . . . . . . . . . . . . . . . . . . . . . . . . . . . . . . . . . . . . 53 Sicherheit Worauf Sie achten müssen . . . . . . . . . . . . . . . . . . . . . . . . . . . . . . . . . 54 – 55 Bedienung Einstellen . . . . . . . . . . . . . . . . . . . . . . . . . . . . . . . . . . . . . . . . . . . . . . . .
52 Ihr Glaskeramik-Kochfeld 53 Ihr Glaskeramik-Kochfeld Beschreibung Einführung CKB740 Dieses Glaskeramik-Kochfeld wurde für den echten Hobbykoch entworfen. 2 3 Das Kochfeld ist mit “Cook-Light-Elementen ausgestattet. Das sind 8 Strahlungselemente mit schneller Wärmeabgabe und hohem Wirkungsgrad, sich günstig auf die Ankochzeit auswirkt. Zudem haben diese Elemente eine 7 1 4 sehr gute Wärmeverteilung. Der große Abstand zwischen den Kochzonen macht das Kochen bequem.
54 Sicherheit 55 Sicherheit Worauf Sie achten müssen Sorgen Sie für ausreichende Lüftung bei Benutzung des Gerätes ■ Sorgen Sie dafür, dass natürliche Lüftungsöffnungen offen sind. Flambieren Sie nie unter einer Dunstabzugshaube ■ Die hohen Flammen können Brand verursachen. Auch bei ausgeschaltetem Ventilator. Wenn sich eine Schublade unter dem Kochfeld befindet ■ ■ Sorgen Sie für genug Abstand zwischen dem Kochfeld und dem Benutzung der Kochfläche Schubladeninhalt.
Bedienung 57 Bequem kochen Einstellen Die optimale Benutzung der Kochmulde Allgemeines ■ Benutzen Sie keine Töpfe, die kleiner als die Kochzone sind. Damit wird Auf der gläsernen Kochfläche sind die vier Kochzonen in Form eines Zirkels vermieden, daß Speisereste auf die glühend heiße Kochzone fallen. angedeutet. Der Topfboden-Durchmesser sollte möglichst dem Eingebrannte Speisereste lassen sich schwer entfernen. Außerdem können die Kochzonendurchmesser entsprechen.
58 Bequem kochen 59 Bequem kochen Kochtabelle Die nachstehende Tabelle gilt nur als Leitfaden, weil der Einstellwert von der Benutzen Sie die mittlere Stufe zum: Menge und Zusammensetzung des Gerichts und vom Topf abhängt. ■ Garen von großen Mengen; ■ Harte Gemüsesorten auftauen, z.B. grüne Bohnen.
60 Pflege 61 Störungen Allgemeines Tabelle Reinigen Sie die Kochplatte stets nach Gebrauch. Sie können hierzu ein Wenn das Gerät nicht einwandfrei funktioniert, heißt das nicht immer, daß es Spülmittel verwenden. Reinigen Sie die Kochfläche nach jedem Gebrauch. defekt ist. Versuchen Sie erst, die Störung selbst zu beheben. Verwenden Sie hierzu ein mildes Reinigungsmittel, zum Beispiel Geschirrspülmittel.
62 Umweltaspekte 63 Installationsanweisung Verpackung und Gerät entsorgen Allgemeines Bei der Herstellung dieses Gerätes wurden dauerhafte Werkstoffe verwendet. Dieses Gerät entspricht allen relevanten CE-Richtlinien. Dieses Gerät muss bei Lebenslaufende ordnungsgemäß entsorgt werden. Die Behörden können für entsprechende Informationen sorgen. Auf dem Typenschild an der Unterseite des Gerätes stehen der Gesamtanschlusswert, die erforderliche Netzspannung und die Frequenz.
64 Installationsanweisung Einbau 65 Installationsanweisung Benötigter Freiraum (CKV720) Dunstabzugshaube Elektrischer Anschluß min. 600 mm Küchenschrank Die Stromversorgung zum Kochfeld erfolgt über den Backofen oder die gesonderte Bedienungsblende. Siehe hierzu die Installationsanweisung des min. 650 mm betreffenden Backofens oder der Bedienungsblende. min. 450 mm Leistungstabelle Kochplattentyp Cooklight Elektrischer Anschluss min.
66 Installationsanweisung 67 Installationsanweisung Einbau (CKB740) Drehen Sie das Kochfeld um und lassen Sie das Elektrischer Anschluß Gerät in den Ausschnitt sinken. Das Gerät muss immer geerdet sein. Zum Anschluss ein vorschriftsmäßiges Kabel verwenden. Die Kabelhülle muss aus Gummi sein. An der Unterseite des Gerätes befindet sich ein Etikett mit den Schaltbildern. Die Anschlussklemmen sind nach Öffnen des Anschlusskastens an der Unterseite erreichbar.
68 Installationsanweisung Das Gerät kann wie folgt angeschlossen werden: 69 Installationsanweisung 2-Phasen-Netzanschluss mit 1 Nullleiter (2 1N Wechselstrom 400 V / 50 Hz): Die Spannung zwischen den Phasen und dem Nullleiter ist 230 V Wechselstrom. 1 Phasenanschluß (1 1N Wechselstrom 230 V / 50 Hz): Zwischen den Phasen steht eine Spannung von 400 V. Wenn keine Spannung von Die Spannung zwischen Phase und Null ist 230 V Wechselstrom.
70 Installationsanweisung 71 Installationsanweisung 3-Phasen-Netzanschluss (3 Phasen Wechselstrom 230 V / 50 Hz): Ausschnitt in die Arbeitsplatte sägen Die Spannung zwischen den Phasen und dem Nullleiter ist 230 V Wechselstrom. Sägen Sie den Ausschnitt in die Arbeitsplatte. Verfahren Sie dabei sorgfältig Sorgen Sie für Verbindungsbrücken zwischen den Anschlussstellen 4-5. Ihre (siehe Tabelle). Sägen Sie eventuell vorhandene Trennwände auch aus.
72 Installationsanweisung 73 Installationsanweisung Kochfeld einsetzen Über einem Backofen von 90 cm oder einem Backofen einer anderen Über einer Schublade oder festen Blende. Über einem Pelgrim-Backofen Marke, der nicht mit Mantelkühlung ausgestattet ist. von 60 cm. Über einem Backofen einer anderen Marke, die mit einer Mantelkühlung ausgestattet ist. Eine hitzebeständige (85 °C) Platte zum Schutz des Für einen Mindestabstand von 10 mm zwischen Schublade und Kochfeld Kochfeldes montieren.
74 75 your ceramic hob your ceramic hob Description . . . . . . . . . . . . . . . . . . . . . . . . . . . . . . . . . . . . . . . . . . . . . . . . . 76 Introduction . . . . . . . . . . . . . . . . . . . . . . . . . . . . . . . . . . . . . . . . . . . . . . . . . 77 safety What you should pay attention . . . . . . . . . . . . . . . . . . . . . . . . . . . . . 78 – 79 use Setting . . . . . . . . . . . . . . . . . . . . . . . . . . . . . . . . . . . . . . . . . . . . . . . . . . . . .
76 your ceramic hob 77 your ceramic hob Description Introduction CKB740 This ceramic hob has been designed for the real lover of cooking. 2 3 The hob is equipped with 'Cooklight' elements. These are very rapid-heating, 8 radiant elements with a high efficiency, which is very favourable for heating-up times. What's more, these elements also have very good heat distribution. 7 The ample space between the cooking zones makes cooking comfortable.
78 safety 79 safety What you should pay attention to Never open the casing of the appliance Never flambé under an extractor hood Ensure that there is adequate ventilation during use ■ ■ The high flames can cause fire. Even if the ventilator is switched off. Keep natural ventilation openings open.
use 81 comfortable cooking Setting Optimal use of the hob General ■ Do not use pans that are smaller than the cooking zone. This will prevent food On the glass work surface the 4 cooking zones are indicated by a circle. The remains ending up on the red-hot cooking zone. Burnt-on food remains are diameter of the base of the pan should correspond as closely as possible with the difficult to remove. In addition, the handles may become too hot and a lot of diameter of the cooking zone.
82 comfortable cooking 83 comfortable cooking Cooking table The table below is intended solely as a guide, because the heat setting Use the medium settings for: depends on the quantity of food and the composition of the pan. ■ completing the cooking of large quantities; ■ defrosting firm vegetables (French beans, for example).
84 maintenance 85 faults General Table Clean the cooking appliance after each use. You can use a mild cleaning agent If the appliance does not work properly, this does not always mean that it is for this - for example, washing-up liquid. Always clean the hobs after use. You defective. Try to deal with the problem yourself first. can use a mild cleaning agent, such as washing-up liquid, for this purpose.
86 environmental aspects 87 installation guide Disposal of packaging / appliance General In the manufacturing of this appliance use has been made of durable materials. This appliance meets all relevant CE guidelines. At the end of its lifecycle this appliance must be disposed of in a responsible manner. The authorities can advise you on this. The data plate on the underside of the appliance indicates the total nominal load, the required voltage and the frequency.
88 installation guide Built in 89 installation guide Space to be left free around the appliance (CKV720) cooker hood Electrical connection min. 600 mm cabinet The power supply to the hob is via the oven or the separate operating panel. Refer to the installation instructions for the oven concerned or the operating min. 650 mm panel. min. 450 mm Power setting table min. 40 mm min.
90 installation guide 91 installation guide Built in (CKB740) Turn the hob over and allow the appliance to Electrical connection sink into the opening. For the connection, use an approved cable, in accordance with the regulations. The cable casing should be of rubber. There is a label on the underside of the appliance with the wiring diagrams. The connection terminals are accessible once you have opened the junction box on the underneath. The junction box cover can be opened with a screwdriver.
92 installation guide The appliance can be connected in the following ways: 93 installation guide 2 lives with 1 neutral connection (2 1N a.c. 400 V / 50 Hz): The voltage between the phases and the neutral is 230 V a.c. Between the lives 1 phase connection (1 1N a.c. 230 V / 50 Hz): there is a voltage of 400 V. If there is not a voltage of 400 V between the The voltage between live and neutral is 230 V a.c.
94 installation guide 95 installation guide 3-phase connection (3 a.c. 230 V / 50 Hz): Cut opening in worktop The voltage between the phases and the neutral is 230 V a.c. Saw the opening in the worktop. This should be done very accurately (see Install connecting bridges between the connection points 4-5. Your groups table). Also saw out any partitions that may be present. must be fused with at least 16 A (3x).
96 installation guide 97 installation guide Fitting the hob Above a 90 cm ATAG oven or an oven of another make without casing Above a drawer or fixed decorative trim. Above a 60 cm Pelgrim oven. cooling. Above an oven of another make with casing cooling. Fit a heat-resistant (85 °C) plate to screen off the Ensure that there is a space of at least 10 mm between a drawer and the hob. hob.