Handleiding Manual Anleitung 88014055 Notice d’utilisation DOMINO
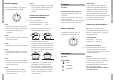
3 4 5 6 fig. 1 fig. 2 1 3 2 Friteuse Braadplaat (fig. 1) (fig. 5) 1 Opklapbaar verwarmingselement 1 Geribbelde keramische glasplaat 2 R.v.s. deksel 2 Restwarmtesignaallampje 3 R.v.s. morsblad 3 Bedrijfssignaallampje 4 Temperatuurschakelaar 4 Temperatuurschakelaar 5 Thermostaatsignaallampje 6 Bedrijfssignaallampje 4 Gaskookplaat (fig. 6) Elektrokookplaat (fig.
Afvoeren verpakking en toestel Introductie Inhoud De verpakking van het toestel is recyclebaar. Als u deze gebruiksaanwijzing doorleest, bent ■ Gebruikt zijn: u snel op de hoogte van alle mogelijkheden – karton die dit toestel u biedt. U vindt informatie voor – poly-ethyleenfolie (PE) uw veiligheid en over het onderhoud van het – CFK-vrij polystyreen (PS-hard-schuim) toestel. Verder vindt u milieutips en – polypropyleen banden om de doos aanwijzingen om energie te besparen.
Ventilatie ■ Peilhoogte Friteuse ■ Deze toestellen worden niet aangesloten op Wie sluit het toestel aan? een rookgasafvoerkanaal; besteedt dus extra Frituren twee peilmerken aangebracht voor de ■ aandacht aan de ventilatie van de keuken. ■ min. stand (2 ltr olie) en de max. stand Laat het toestel aansluiten door een erkend Korf op de bodem van de friteuse plaatsen. installateur (zie hoofdstuk "INSTALLATIE"). VEILIGHEID Op de binnenwand van de friteusebak zijn Stroom en gas afsluiten.
■ Gebruik regelknop De beste resultaten voor het bereiden van Grilleren met kruiden bepaalde gerechten (frietjes) bereikt u door Eerst de lavasteentjes met de grill rood eerst voor te bakken op 160 °C en daarna verhitten, vervolgens de schakelaar uit zetten. De Keramische kookplaat is uitgevoerd met korter dan 10 min., nadat het gerecht eerst gaar te bakken op 180 °C. Strooi wat kruiden op de hete lavasteentjes. een regelknop met 11 standen (fig. 9).
Stand 0 ■ De elektrische kookplaat is uitgevoerd met korter dan 10 min., nadat het gerecht eerst een regelknop met 6 standen (fig. 10). op een hogere stand aan de kook is 1 DOMINO 6 Pannen voor elektrische en keramische kookplaten 2 5 4 3 fig. 10 Stand 6 ■ De bedieningsknop van de betreffende Het gebruik kookbrander ingedrukt linksom draaien en gelijktijdig de knop van de vonkontsteking gebracht. 0 De beste bodemdikte is: Gerechten bereiden direkt op de plaat indrukken.
Beschadigingen door suikerhoudende gerechten ONDERHOUD Gas en stroom uitschakelen! Installatie van de gaskookplaat Installatie van de overige domino-toestellen De installateur moet bevoegd zijn om het Deze kunt u grotendeels voorkomen door de toestel aan te sluiten.
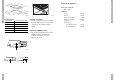
elektrische aansluiting: INSTALLATIE 230 V - 50 Hz vermogens: Doks fig. 15 zaagmaat/nismaat aantal domino’s breedte x diepte (mm) fig.
2 3 4 5 6 fig. 1 fig. 2 1 3 2 Deep fryer Baking sheet (fig. 1) (fig. 5) 1 Raisable heating element 1 Corrugated ceramic glass plate 2 Stainless steel lid 2 Residual heat indicator 3 Stainless steel splash tray 3 Control light 4 Temperature switch 4 Temperature switch 5 Thermostat indicator 6 Control light 4 APPLIANCE INFORMATION Appliance information 1 Gashob (fig. 6) Electric hob (fig.
Introduction Contents When you have read these instructions for ■ The packaging of the appliance is recyclable. use, you will quickly be aware of all the It is made up off: facilities the appliance can offer you. You can – cardboard read about safety and how you should look – polyethylene after the appliance. In addition you will find – CFC free polystyrene (PS rigid foam) environmental tips and instructions that can – polypropylene straps around the box help to save energy. Safety . . .
Chemical waste ■ Who is to connect the appliance? SAFETY ■ waste. Have the appliance connected by a qualified fitter. (see section Stubborn stains "INSTALLATION"). ■ ■ of the deep-fryer pan to show the minimum ■ level (2 l. oil) and the maximum level Place the basket on the bottom of the pan. (2.7 l. oil).
DOMINO ■ Using the control switch The best results for certain foods Grilling with spices (e.g. chips) are achieved by pre-frying them First grill the lava stones until they are red hot at 160 °C and then frying them until cooked and then switch off. Sprinkle some spices on The ceramic hob has a control switch with cooking time, once it has first been brought at 180 °C. the lava stones. settings from 0 - 11 (fig. 9). to the boil at a higher setting.
Setting 0 ■ The electric hob has a control switch with cooking time, once it has first been brought settings from 0 - 6 (fig. 10). to the boil at a higher setting. 0 DOMINO 2 5 4 3 fig. 10 Press and turn the control knob for the Using the grill relevant burner to the left and at the same time press the spark ignition. Sparks will fly to Pans for electric and ceramic hobs 1 6 Spark ignition Grill Simmering food requiring less than 10 mins.
Damage due to foods with a high sugar content MAINTENANCE Disconnect gas and electricity! Installation of the gashob Installation of the other domino appliances The installation and gas connection must be This can be largely prevented by regularly carried out by a registered CORGI-Gasfitter. The other DOMINO appliances are electrical Hot soapy water treating the hob with Collo Profi.
INSTALLATION power requirements: 230 V - 50 Hz connecting value: Doks fig. 15 fig. 18 deep fryer 2,3 kW barbeque 2,4 kW ceramic hob 2,9 kW saw measures/recess measures Sealing of worktop electric hob 3,5 kW number of domino’s ■ Before placing the appliance in the grill 1,5 kW gas hob: width x depth (mm) 1 268 x 490 worktop, apply the supplied sealing kit on 2 566 x 490 the underside of the appliance.
2 3 4 5 6 fig. 1 fig. 2 1 3 2 Friteuse Rôtissoire (fig. 1) (fig. 5) 1 Elément chauffant rabattable 1 Taque vitro-céramique côtelée (rainurée) 2 Couvercle inox 2 Voyant de chaleur résiduelle 3 Bord anti-souillure 2 Voyant marche/arrêt 4 Sélecteur de température 4 Sélecteur de température 5 Voyant du thermostat 6 Voyant marche/arrêt 4 Plaque de cuisson á gaz (fig. 6) INFORMATION SUR L'APPAREIL Informations sur l’appareil 1 Plaque Électrique (fig.
Introduction Index Ce manuel est un aperçu des possibilités ■ L’emballage de l’appareil est recyclable. Il offertes par cet appareil. Il vous fournira des contient: renseignements précieux sur le plan de la - du carton sécurité et de l'entretien ainsi que des - une feuille de polyéthylène (PE) conseils en matière d'environnement et - du polystyrène exempt de CFC ( mousse d'économie d'énergie. Domino friteuse . . . . . . . . . . . . . . . . . . . . 31 L’utilisation . . . . . . . . . . . . . . .
Par conséquent, veillez à assurer une Jauge Friteuse ■ ventilation suffisante pendant la cuisson. Raccordement de l'appareil SECURITE ■ Faites raccorder l'appareil par un installateur Déchets chimiques agréé (voir chapitre "INSTALLATION"). ■ de la cuve de la friteuse, l'un ■ correspondant à la position min. (2 l En cas de réparation ou de nettoyage, ôtez la Taches coriaces fiche de la prise ou coupez le compteur. ■ Fermez le robinet de la conduite de gaz.
L'utilisation du sélecteur Les meilleurs résultats pour la préparation Griller aux épices de certains plats (par exemple des frites) On chauffera d'abord les pierres de lave à sont obtenus par une première cuisson à blanc avant de débrancher. Saupoudrez Le plan de cuisson vitrocéramique est équipé viandes à l'étuvée. Pour garder au chaud. 160 °C et ensuite à 180 °C. ensuite quelques épices sur les pierres de d'un sélecteur à 11 positions (fig. 9).
Position 0 ■ nécessitant un temps de cuisson inférieur d'un sélecteur à 6 positions (fig. 10). à 10 minutes après avoir au préalable porté 1 6 DOMINO Pivotez vers la gauche le bouton de La plaque de cuisson électrique est équipée 0 2 5 L'utilisation commande du brûleur concerné en l'enfonçant et enfoncez en même temps le à ébullition en utilisant une position Préparer les mets directement sur la plaque. bouton de l'allumage piézo-électrique à supérieure.
Détériorations à la suite de souillures contenant du sucre Installation plaque de cuisson á gaz Installation des autres appareils Domino Celles-ci peuvent être évitées en grande L’installateur doit être agréé pour raccorder Les autres appareils DOMINO sont des Fermer le robinet à gaz, débrancher ENTRETIEN l'appareil ! partie en traitant régulièrement le plan de un plan de cuisson au gaz. L’installation du appareils électriques et ils doivent être Une lessive tiède cuisson avec du Collo Profi.
raccordement électrique : 230 V - 50 Hz puissances : friteuse Doks fig. 15 fig.
2 3 4 5 6 Abb. 1 Abb. 2 1 3 2 Friteuse Grill/Bratplatte (Abb. 1) (Abb. 5) 1 Aufklappbares Heizelement 1 Keramische Glasplatte mit Rillen 2 Edelstahldeckel 2 Restwärmesignallampe 3 Edelstahl Überlaufmulde 3 Betriebssignallampe 4 Temperaturschalter 4 Temperaturschalter 5 Thermostatsignallampe 6 Betriebssignallampe 4 GERATEINFORMATION Geräteinformation 1 Gaskochmulde (Abb. 6) Elektro-Kochplatte (Abb.
Einleitung Inhalt Wenn Sie diese Gebrauchsanleitung lesen, ■ Die Verpackung des Geräts ist recycelbar. Als sind Sie rasch über alle Möglichkeiten Verpackungsmaterial werden gebraucht: informiert, die dieses Gerät Ihnen bieten kann. - Karton Sie können sich über Sicherheit und Pflege - Polyethylenfolie (PE) des Gerätes informieren. Außerdem finden Sie - FCKW-freies Polystyrol (PS-Hardschaum) Umwelt- und Energiespartips.
Füllhöhe Friteuse ■ Schalten Sie deshalb die Dunstabzughaube Wer schließt das Gerät an? SICHERHEIT ■ ein, oder öffne ein Fenster. Lassen Sie das Gerät durch einen anerkannten Installateur anschließen. Chemischer Abfall (Siehe Kapitel "FÜR DEN INSTALLATEUR"). ■ Alte Öle gehören zu chemischem Abfall. Strom und Gas abschließen Schwer zu entfernende Flecken ■ ■ Bei Reparturen oder Reinigungen den Fritieren Markierungen angebracht für den min. ■ Stand 2 L Öl) und den max. Stand (2,7 L Öl).
DOMINO ■ Richtlinien zum Gebrauch des Regelknopfes Die besten Resultate zum Zubereiten Grillen mit Kräutern bestimmter Gerichte (Pommes Frites) erhält Erst die Lavasteine mit dem Grill rot erhitzen, man durch vorbacken auf 160 °C und danach den Barbecue ausschalten. Streuen danach gar backen auf 180 °C. Sie einige Kräuter auf die Lavasteine. Die Cerankochplatte ist mit einem Knopf Sie können am besten erst dann Krauter Behälter mit Wasser füllen ausgestattet, regelbar von 0 bis 11 (Abb. 9).
■ Kochzeit von weniger als 10 Minuten, ausgestattet, regelbar von 0 bis 6 (Abb. 10). 0 nachdem das Gericht erst bei einer 1 2 5 Reglerstellung 6 4 ■ 3 Abb.
Beschädigungen durch zuckerhaltige Gerichte WARTUNG Gas und Strom ausschalten! Installation der Gaskochplatte Installation der übrigen Domino-Geräte Der Installateur muß berechtigt sein, die GasDiese können Sie größtenteils verhindern, kochplatte anzuschließen.
INSTALLATION elektrischer Anschluß: 230 V - 50 Hz Leistung: Friteuse 2,3 kW Barbeque 2,4 kW Keramische Kochplatte 2,9 kW Abdichten Anrichte Elektrische Kochplatte 3,5 kW ■ Bevor Sie die Kochplatte in der Anrichte Grill/Bratplatte 1,5 kW Gaskochmulde: Doks Abb. 15 Sägemaß Nische Anzahl der Domino’s Breite x Tiefe (mm) Abb.