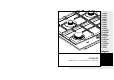
GKB410 GKB415 GKB416 GKB417 GKB425 GKB427 GKB428 GKB463 GKB465 GKB470W GKB472W GKB475 GKB475W GKB477 GKB477W GKB478 GKB478W GKB495 GKB497 manual ?????? handleiding - notice d'utilisation - anleitung
inhoud NL handleiding . . . . . . . . . . . . . . . . . . . . . . . . . . . . . . . . . . . . . . . . . . . . . . 3 – 16 3 inhoud uw gaskookplaat beschrijving . . . . . . . . . . . . . . . . . . . . . . . . . . . . . . . . . . . . . . . . . . . . . . . . . . 4 inleiding . . . . . . . . . . . . . . . . . . . . . . . . . . . . . . . . . . . . . . . . . . . . . . . . . . . . . 5 FR notice d'utilisation . . . . . . . . . . . . . . . . . . . . . . . . . . . . . . . . . . . . . . .
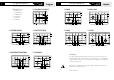
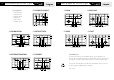
4 uw gaskookplaat 5 Beschrijving GKB410/415/416/417 uw gaskookplaat GKB428 GKB463/465 1. sterkbrander 2. normaalbrander 5 3. sudderbrander 2 4. wokbrander 2 5. vangschaal 1 6.
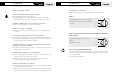
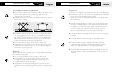
6 veiligheid Waar u op moet letten 7 bediening Ontsteken en instellen Elke brander kan traploos worden geregeld tussen vol- en kleinstand. Zorg voor voldoende ventilatie tijdens het gebruik ■ Houd natuurlijke ventilatieopeningen open. ■ Bij langdurig gebruik van de kookplaat is extra ventilatie noodzakelijk. Zet bijvoorbeeld een raam open of installeer een mechanische ventilator.
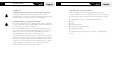
8 comfortabel koken De kookplaat optimaal gebruiken ■ ■ 9 onderhoud Algemeen Zorg er altijd voor dat de vlammen onder de pan blijven. Als vlammen om de Uw toestel is vervaardigd uit hoogwaardige materialen, die u eenvoudig reinigt. pan heen spelen gaat veel energie verloren. Bovendien kunnen de ■ Branderdelen mogen niet in de vaatwasser gereinigd worden. De onderdelen handgrepen dan te heet worden.
10 onderhoud 11 Algemeen Verpakking en toestel afvoeren Hardnekkige vlekken op email (roosters, branderdoppen, vangschalen) Bij de vervaardiging van dit toestel is gebruik gemaakt van duurzame Hardnekkige vlekken kunt u het beste verwijderen met een vloeibaar materialen. Dit toestel moet aan het eind van zijn levenscyclus op verantwoorde reinigingsmiddel of een kunststof schuursponsje. Gebruik nooit schuurpoeders, wijze worden afgevoerd. De overheid kan u hieromtrent informatie verschaffen.
12 installatievoorschrift Algemeen 13 installatievoorschrift Gasaansluiting RC 1/2˝ (ISO 7/1-RC 1/2) Dit toestel mag alleen door een erkend gastechnisch installateur aangesloten worden. Let op: De gassoort en het land waarvoor het toestel is ingericht staan vermeld op het Let op: ■ gegevensplaatje. Dit toestel wordt niet aangesloten op een rookgas-afvoerkanaal. Zorg dus voor voldoende ventilatie. De gasaansluiting moet voldoen aan de nationale en lokale voorschriften.
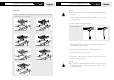
14 installatievoorschrift 15 Inbouwen installatievoorschrift Let op: ■ 1. Maak de uitsparing in het aanrechtblad. Zorg ervoor dat u voldoende ruimte De afstand tussen de kookplaat en de achterwand moet minimaal 50 mm bedragen. vrij laat aan de zij- en achterkant. 2. Maak een uitsparing in de zijwand van de keukenkast voor het doorvoeren 510 590 720 45 45 480 560 van de gasleiding. 522 560 min. 50 3. Laat de kookplaat in de uitsparing zakken. 480 min. 50 4. Zet de kookplaat vast.
installatievoorschrift 16 17 Gastechnische gegevens table des matières votre plaque de cuisson à gaz G25/25 mbar G20/20 mbar G25/20 mbar G30/29 mbar G31/29 mbar G31/37 mbar G30/50 mbar brandertype (kW) (kW) (kW) (kW / g/h) (kW / g/h) (kW / g/h) (kW / g/h) sudder 1.00 1.00 1.00 1.00 / 72 0.88 / 63.4 1.00 / 72 1.00 / 72 normaal 1.75 1.75 1.75 1.75 / 126 1.54 / 111 1.75 / 126 1.75 / 126 sterk 3.00 3.00 3.00 3.00 / 216 2.64 / 191 3.00 / 216 3.00 / 216 wok 3.50 3.50 3.
18 votre plaque de cuisson à gaz Description 19 votre plaque de cuisson à gaz GKB410/415/416/417 GKB428 GKB463/465 1. brûleur puissant 2. brûleur normal 5 3. brûleur à ralenti 2 4. brûleur wok 2 5. plan profond 1 6.
20 sécurité Les points qui méritent votre attention Veillez à une bonne aération pendant l’utilisation ■ Maintenez les points d’aération naturels ouverts. ■ En cas d’une utilisation prolongée de la plaque de cuisson, une aération supplémentaire est indispensable. Ouvrez, par exemple, une fenêtre ou installez une aération mécanique. N’utilisez la plaque de cuisson que pour préparer des mets ■ L’appareil n’est pas approprié pour chauffer des espaces.
22 cuisiner confortablement Utilisation optimale ■ 23 Généralités Veillez toujours à ce que les flammes se trouvent sous la casserole. Un grand Votre appareil comprend des matériaux de haute qualité qui se nettoient gaspillage d’énergie se produit en laissant tournoyer les flammes autour de facilement. la casserole. De plus, les poignées risquent de devenir trop chaudes. ■ Les éléments du brûleur ne peuvent pas être lavées dans le lave-vaisselle.
24 entretien 25 Généralités Qui faire de l'emballage et de l'appareil usé Tâches tenaces sur émail (grilles, chapeaux de brûleurs, plans profonds) Des matériaux solides ont été utilisés pour fabriquer cet appareil. L'appareil Elles s'enlèvent avec un abrasif liquide ou une éponge-grattoir synthétique. doit être évacué correctement à la fin de son cycle de vie.
26 instructions d'installation Généralités 27 Raccordement du gaz RC 1/2˝ (ISO 7/1-RC 1/2) Cet appareil ne peut être installé que par un technicien gazier agréé. Attention : Attention : ■ Cet appareil n'est pas relié à une hotte. Veillez donc à assurer une ventilation Le type de gaz et le pays auxquels l'appareil est destiné sont mentionnés sur la plaque d'identification. suffisante. Le branchement au gaz doit satisfaire aux prescriptions nationales et locales.
28 instructions d'installation 29 Encastrement Attention : ■ 1. Pratiquer la découpe dans le plan de travail. La distance entre la plaque de cuisson et la paroi arrière doit être au minimum de 50 mm. Veiller à laisser suffisamment d'espace sur le(s) côté(s) et à l'arrière. 2. Ménager un évidement dans la paroi latérale de l'élément pour la conduite 510 590 720 45 45 560 480 560 de gaz. 522 3. Insérer la table de cuisson dans la découpe. 480 min. 50 min. 50 4. Fixer la table de cuisson.
instructions d'installation 30 31 Donnees pour le gaz Inhalt Ihre Gaskochmulde Beschreibung . . . . . . . . . . . . . . . . . . . . . . . . . . . . . . . . . . . . . . . . . . . . . . . 32 G25/25 mbar G20/20 mbar G25/20 mbar G30/29 mbar G31/29 mbar G31/37 mbar G30/50 mbar Einleitung . . . . . . . . . . . . . . . . . . . . . . . . . . . . . . . . . . . . . . . . . . . . . . . . . . 33 type de brûleur (kW) (kW) (kW) (kW / g/h) (kW / g/h) (kW / g/h) à ralenti 1.00 1.00 1.00 1.00 / 72 0.
32 Ihre Gaskochmulde Beschreibung 33 GKB410/415/416/417 Ihre Gaskochmulde GKB428 GKB463/465 1. Starkbrenner 2. Normalbrenner 5 3. Sparbrenner 2 4. Wokbrenner 2 5. Kochmulde 1 6.
34 Sicherheit Worauf Sie achten müssen 35 Bedienung Zünden und Einstellen Jeder Brenner ist stufenlos zwischen Groß- und Kleinstellung einstellbar. Sorgen Sie für ausreichende Lüftung bei Benutzung des Gerätes ■ Sorgen Sie dafür, dass natürliche Lüftungsöffnungen offen sind. ■ Bei längerer Benutzung der Kochmulde ist zusätzliche Lüftung erforderlich. GKB410 Öffnen Sie zum Beispiel ein Fenster oder installieren Sie ein mechanisches Den Bedienungsknopf des Brenners Gebläse.
36 Bequem kochen Die optimale Benutzung der Kochmulde ■ 37 Allgemeines Sorgen Sie immer dafür, dass die Flammen unter dem Topf bleiben. Wenn Ihr Gerät ist aus hochwertigen Materialien hergestellt und lässt sich einfach die Flammen um den Topf züngeln, geht viel Energie verloren. Zudem reinigen. können die Griffe zu heiß werden. ■ Brennerteile dürfen nicht im Geschirrspüler gereinigt werden. Die Teile Benutzen Sie keine Töpfe mit kleinerem Bodendurchmesser als 12 cm.
38 Pflege 39 Allgemeines Verpackung und Gerät entsorgen Hartnäckige Flecken auf Email (Roste, Brennerdeckel, Mulden) Bei der Herstellung dieses Gerätes wurden dauerhafte Werkstoffe verwendet. Hartnäckige Flecken mit flüssigem Scheuerpulver oder Scheuerschwamm aus Dieses Gerät muss bei Lebenslaufende ordnungsgemäß entsorgt werden. Die Kunststof entfernen. Verwenden Sie keine Scheuermittel, Scheuerkissen, spitze Behörden können für entsprechende Informationen sorgen.
40 Installationsanweisung Algemeines 41 Gasanschluß RC 1/2˝ (ISO 7/1-RC 1/2) Dieses Gerät darf nur von einem qualifizierten Gasinstallateur angeschlossen werden. Achtung: Gasart und Land, wofür sich das Gerät eignet, sind auf dem Typenschild Achtung: ■ angegeben. Dieses Gerät wird nicht an einen Rauchgas-Abzugsschacht angeschlossen. Achten Sie also auf ausreichende Entlüftung. Der Gasanschluß muß den nationalen und kommunalen Vorschriften entsprechen. Diese besagen u.a.
42 Installationsanweisung 43 Einbauen Achtung: ■ 1. Aussparung in die Anrichte sägen. Der Abstand zwischen dem Kochfeld und der Rückwand muss mindestens 50 mm betragen. Seitlich und an der Rückseite für ausreichen-den Spielraum sorgen. 2. Aussparung in der Seitenwand des Küchenschranks zum Durchführen der 510 590 720 45 45 480 560 Gasleitung aussägen. 522 560 3. Lassen Sie die Kochmulde in die Aussparung ein. 480 min. 50 min. 50 4. Befestigen Sie die Kochmulde.
Installationsanweisung 44 45 Gastechnische Daten contents your gas hob G25/25 mbar G20/20 mbar G25/20 mbar G30/29 mbar G31/29 mbar G31/37 mbar G30/50 mbar Brennertyp (kW) (kW) (kW) (kW / g/h) (kW / g/h) (kW / g/h) (kW / g/h) Sparbrenner 1.00 1.00 1.00 1.00 / 72 0.88 / 63.4 1.00 / 72 1.00 / 72 Normalbr. 1.75 1.75 1.75 1.75 / 126 1.54 / 111 1.75 / 126 1.75 / 126 Starkbrenner 3.00 3.00 3.00 3.00 / 216 2.64 / 191 3.00 / 216 3.00 / 216 Wokbrenner 3.50 3.50 3.50 3.
46 your gas hob 47 Description GKB410/415/416/417 your gas hob GKB428 GKB463/465 1. rapid burner 2. semi-rapid burner 5 3. simmer burner 2 4. wok burner 2 5. spillage well 1 6.
48 safety What you should pay attention to 49 controls Igniting and adjusting Each burner can be adjusted continuously between the full and low positions. Ensure that there is adequate ventilation during use ■ Keep natural ventilation openings open. ■ When using the hob for long periods, extra ventilation is necessary. Open a window for instance or install a mechanical fan.
50 comfortable cooking Optimal use of the hob ■ ■ 51 General Always ensure that the flames remain below the pan. If flames play around Your appliance has been manufactured from high-grade materials, which are the pan, a lot of energy is lost. In addition, the handles can get too hot. easy for you to clean. Do not use pans with a base diameter less than 12 cm. Smaller pans will not ■ be stable. Burner parts should not be cleaned in the dishwasher.
52 maintenance 53 General Disposal of packaging and appliance Stubborn stains on enamel (pan supports, burner caps, spillage wells) In the manufacturing of this appliance use has been made of durable materials. Remove with a non-abrasive cream or a soft sponge. Never use scouring At the end of its lifecycle this appliance must be disposed of in a responsible powder, scouring pads, sharp objects or aggressive cleansing agents. manner. The authorities can advise you on this.
54 installation instructions General 55 Gasconnection RC 1/2˝ (ISO 7/1-RC 1/2) The fitting of the appliance should only be carried out by a registered Corgi gas fitter. Please note: The type of gas and the country for which the appliance has been designed are Please note: ■ indicated on the ratings plate. This appliance is not connected to a flue duct. Take care to ensure that there is sufficient ventilation. The gas connection must comply with national and local regulations.
56 installation instructions 57 building in Please note: ■ The distance between the hob and the rear wall must be at least 50 mm. 1. Make the cut-out in the work surface. Ensure that there is sufficient space allowed at the sides and at the back. 2. Make a hole in the side of the kitchen cabinet to enable the gas pipe to be passed through. 510 590 720 522 45 45 480 560 560 3. Place the appliance in the cut-out. 480 4. Secure the appliance in position. min. 50 min.
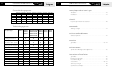
installation instructions 58 59 Gas information G25/25 mbar G20/20 mbar G25/20 mbar G30/29 mbar G31/29 mbar G31/37 mbar G30/50 mbar burner type (kW) (kW) (kW) (kW / g/h) (kW / g/h) (kW / g/h) (kW / g/h) simmer 1.00 1.00 1.00 1.00 / 72 0.88 / 63.4 1.00 / 72 1.00 / 72 normal 1.75 1.75 1.75 1.75 / 126 1.54 / 111 1.75 / 126 1.75 / 126 strong 3.00 3.00 3.00 3.00 / 216 2.64 / 191 3.00 / 216 3.00 / 216 wok 3.50 3.50 3.50 3.50 / 252 3.08 / 222 3.50 / 252 3.