GKB6... GKV1...
inhoud NL handleiding . . . . . . . . . . . . . . . . . . . . . . . . . . . . . . . . . . . . . . . . . . . . . . 3 – 22 3 inhoud uw gaskookplaat beschrijving . . . . . . . . . . . . . . . . . . . . . . . . . . . . . . . . . . . . . . . . . . . . . . . . . . 4 inleiding . . . . . . . . . . . . . . . . . . . . . . . . . . . . . . . . . . . . . . . . . . . . . . . . . . . . . 5 FR notice d'utilisation . . . . . . . . . . . . . . . . . . . . . . . . . . . . . . . . . . . . . . .
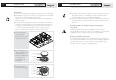
uw gaskookplaat 4 5 GKB672/3 GKB677W/8W uw gaskookplaat Inleiding Deze gaskookplaat is ontworpen voor de echte kookliefhebber. De verschillen 6 7 6 7 in brandercapaciteit zorgen ervoor dat u ieder gerecht kunt bereiden. Dankzij de in de knoppen geïntegreerde vonkontsteking ontsteekt èn bedient u de branders met één hand. Dit toestel voldoet aan alle eisen die gelden voor het Kookkeurmerk. Dit betekent dat de gaskookplaat hoog rendement koppelt aan een minimum aan onvolledige verbrandingsgassen.
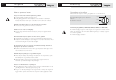
6 veiligheid Waar u op moet letten 7 bediening Ontsteken en instellen Elke brander kan traploos worden geregeld tussen vol- en kleinstand. Zorg voor voldoende ventilatie tijdens het gebruik 0-stand ■ Houd natuurlijke ventilatieopeningen open. Druk de bedieningsknop in en draai hem ■ Bij langdurig gebruik van de kookplaat is extra ventilatie noodzakelijk. linksom. Zet bijvoorbeeld een raam open of installeer een mechanische ventilator. De brander ontsteekt.
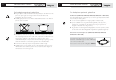
8 comfortabel koken De kookplaat optimaal gebruiken ■ ■ 9 comfortabel koken De kookplaat optimaal gebruiken Zorg er altijd voor dat de vlammen onder de pan blijven. Als vlammen om de pan heen spelen gaat veel energie verloren. Bovendien kunnen de Wokbrander (GKB677W, GKB678W, GKB635W, GKB636W en GKV135W) handgrepen dan te heet worden. Met de wokbrander kunt u gerechten op een zeer hoge temperatuur bereiden. Gebruik geen pannen met een kleinere bodemdiameter dan 12 cm.
10 onderhoud 11 onderhoud Algemeen Uw toestel is vervaardigd uit hoogwaardige materialen, die u eenvoudig reinigt. ■ Regelmatig onderhoud direct na gebruik voorkomt dat overgekookt voedsel lange tijd kan inwerken en hardnekkige, moeilijk te verwijderen vlekken kunnen door het vaatwasmiddel aangetast worden! veroorzaakt. Gebruik hiervoor een mild reinigingsmiddel.
12 onderhoud storingen 13 Tabel Algemeen Wanneer het toestel niet goed werkt, betekent dit niet altijd dat het defect is. Hardnekkige vlekken op roestvaststaal (vangschalen) Probeer het euvel eerst zelf te verhelpen. Bel de servicedienst wanneer Met name overgekookte rode kool, rode bieten, ketjap, appelmoes, rabarber onderstaande adviezen niet helpen.
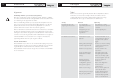
storingen 14 15 Tabel milieuaspecten Verpakking en toestel afvoeren Bij de vervaardiging van dit toestel is gebruik gemaakt van duurzame Storing Oorzaak Oplossing materialen. Dit toestel moet aan het eind van zijn levenscyclus op verantwoorde De brander brandt niet egaal. - Branderdelen niet juist - Zet de branderdelen via de wijze worden afgevoerd. De overheid kan u hieromtrent informatie verschaffen. geplaatst. - Branderdelen vervuild/vochtig.
16 installatievoorschrift 17 installatievoorschrift Algemeen Elektrische aansluiting Dit toestel mag alleen door een erkend gastechnisch installateur worden 230 V - 50 Hz - 0,6 VA. (alleen voor toestellen met vonkontsteking) aangesloten. De elektrische aansluiting moet voldoen aan de nationale en lokale Let op voorschriften. De gassoort en het land waarvoor het toestel is ingericht staan vermeld op het gegevensplaatje. Wandcontactdoos en stekker moeten te allen tijde bereikbaar blijven.
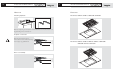
18 installatievoorschrift 19 installatievoorschrift Inbouwen Inbouwen Inbouwmogelijkheden Inbouwmaten GKB672 / GKB673 / GKB677W / GKB678W 52 6 710 43 Maak een uitsparing in de zijwand van de keukenkast voor het doorvoeren van 560 de gasleiding en het aansluitsnoer. 490 50 Kookplaat voorbereiden Maak de gasaansluiting op het kooktoestel. Controleer de aansluiting met zeepsop op gasdichtheid.
20 installatievoorschrift 21 Inbouwen Gastechnische gegevens Benodigde vrije ruimte rondom Toestel ombouwen naar andere gassoort Een gaskookplaat ontwikkelt warmte. Laat voldoende ruimte vrij tot niet Dit toestel is ingesteld voor aardgas. Het toestel kan door middel van een hittebestendige materialen. conversieset ingesteld worden voor andere gassoorten en -drukken. U kunt de set bestellen bij de verkoop- en serviceorganisatie. Het ombouwvoorschrift wordt met de set meegeleverd. min.
22 23 contenu votre plaque de cuisson au gaz description . . . . . . . . . . . . . . . . . . . . . . . . . . . . . . . . . . . . . . . . . . . . . . . . . 24 introduction . . . . . . . . . . . . . . . . . . . . . . . . . . . . . . . . . . . . . . . . . . . . . . . . . 25 sécurité les points qui méritent votre attention . . . . . . . . . . . . . . . . . . . . . . . . . . . 26 commande allumer et régler . . . . . . . . . . . . . . . . . . . . . . . . . . . . . . . . . . . . . . . . . . . . .
24 votre plaque de cuisson au gaz GKB672/3 25 GKB677W/8W votre plaque de cuisson au gaz Introduction La présente plaque de cuisson a été conçue pour le véritable amateur de 6 7 6 7 cuisine. Les brûleurs sont de puissances diverses, ce qui vous permet de préparer des mets divers. Grâce à l'allumage commandé et intégré dans les boutons, vous allumez et commandez d'une seule main les brûleurs. La plaque de cuisson au gaz allie un rendement élevé à un minimum de combustion imparfaite.
26 sécurité Les points qui méritent votre attention 27 commande Allumer et régler Chaque brûleur peut être réglé progressivement entre la position Haute et Veillez à une bonne aération pendant l’utilisation Basse. ■ Maintenez les points d’aération naturels ouverts. ■ En cas d’une utilisation prolongée de la plaque de cuisson, une aération Appuyez sur la touche de commande et supplémentaire est indispensable. Ouvrez, par exemple, une fenêtre ou tournez-la vers la gauche.
28 cuisiner confortablement Utilisation optimale ■ 29 cuisiner confortablement Utilisation optimale Veillez toujours à ce que les flammes se trouvent sous la casserole. Un grand gaspillage d’énergie se produit en laissant tournoyer les flammes autour de Brûleur Wok (GKB677W, GKB678W, GKB635W, GKB636W et GKV135W) la casserole. De plus, les poignées risquent de devenir trop chaudes.
30 entretien 31 entretien Généralités Votre appareil comprend des matériaux de haute qualité qui se nettoient ■ facilement. ■ à long terme et de provoquer des tâches tenaces, difficiles à supprimer. Les éléments du brûleur ne peuvent pas être lavées dans le lave-vaisselle. Les pièces risquent d’être attaquées par le produit vaisselle. N’utilisez pas trop ■ ■ Un entretien régulier et direct après utilisation évite aux aliments collés d’agir Utilisez de préférence un produit d'entretien doux.
32 entretien 33 pannes Tâches tenaces sur l’acier inoxydable (plans profonds) Tableau Les aliments qui ont débordé comme notamment le chou rouge, la betterave Si l'appareil ne fonctionne pas bien, ceci ne veut pas dire qu'il est en panne. rouge, le soya, la rhubarbe et d’autres aliments très sucrés ainsi que les liquides Essayez de résoudre d'abord vous-même le problème. Appelez le service acides peuvent provoquer une coloration de la surface.
pannes 34 35 Tableau environnement Qui faire de l'emballage et de l'appareil usé Des matériaux solides ont été utilisés pour fabriquer cet appareil. L'appareil Panne Cause Solution doit être évacué correctement à la fin de son cycle de vie. L'Administration Le brûleur ne brûle pas de - Les éléments du brûleur - Assemblez correctement les peut vous fournir des informations sur ce sujet. manière uniforme. n'ont pas été correctement éléments du brûleur via la assemblés.
36 instructions d'installation 37 instructions d'installation Généralités Branchement électrique Cet appareil ne peut être installé que par un technicien gazier agréé. allumage électrique) (uniquement pour les appareils avec 230 V - 50 Hz – 0,6 VA Attention : Le type de gaz et le pays auxquels l'appareil est destiné sont mentionnés sur la Le branchement électrique doit satisfaire aux prescriptions nationales et plaque d'identification. locales. C'est un appareil appartenant à la classe 3.
38 instructions d'installation 39 instructions d'installation Encastrement Encastrement Possibilités d'encastrement Dimensions hors tout GKB672 / GKB673 / GKB677W / GKB678W 52 6 710 43 Faites un trou dans la paroi latérale du placard de cuisine pour faire passer la 560 conduite de gaz et le cordon d'alimentation. 490 50 Préparation de la plaque de cuisson Raccordez le gaz à la cuisinière. Contrôlez à l'eau savonneuse s'il n'y a pas de fuite de gaz.
40 instructions d'installation 41 Encastrement Donnees pour le gaz Espace libre qui est nécessaire autour Convertir l'appareil vers d'autres types de gaz Une plaque de cuisson dégage de la chaleur. Observez un espace suffisant Cet appareil a été réglé pour fonctionner au gaz naturel. Il est possible de pour les matériaux craignant la chaleur. convertir l'appareil vers d'autres pressions et types de gaz à l'aide d'un set de conversion.
42 43 Inhalt Ihre Gaskochmulde Beschreibung . . . . . . . . . . . . . . . . . . . . . . . . . . . . . . . . . . . . . . . . . . . . . . . 44 Einleitung . . . . . . . . . . . . . . . . . . . . . . . . . . . . . . . . . . . . . . . . . . . . . . . . . . 45 Sicherheit Worauf Sie achten müssen . . . . . . . . . . . . . . . . . . . . . . . . . . . . . . . . . . . . . 46 Bedienung Zünden und Einstellen . . . . . . . . . . . . . . . . . . . . . . . . . . . . . . . . . . . . . . . .
Ihre Gaskochmulde 44 GKB672/3 45 GKB677W/8W Ihre Gaskochmulde Einleitung Diese Gaskochmulde wurde für die echten Hobbyköche entworfen. 6 7 6 7 Die unterschiedlichen Brennerleistungen sorgen dafür, dass Sie jedes Gericht zubereiten können. Durch die in den Bedienungsknöpfen integrierte Funkenzündung zünden und bedienen Sie die Knöpfe mit einer Hand. Dieses Gerät entspricht allen Anforderungen, die für das Kochgütezeichen gelten.
46 Sicherheit Worauf Sie achten müssen 47 Bedienung Zünden und Einstellen Jeder Brenner ist stufenlos zwischen Groß- und Kleinstellung einstellbar. Sorgen Sie für ausreichende Lüftung bei Benutzung des Gerätes 0-Stellung ■ Sorgen Sie dafür, dass natürliche Lüftungsöffnungen offen sind. Drücken Sie den entsprechenden Knebel ein ■ Bei längerer Benutzung der Kochmulde ist zusätzliche Lüftung erforderlich. und drehen Sie ihn nach links.
48 Bequem kochen Die optimale Benutzung der Kochmulde ■ 49 Bequem kochen Die optimale Benutzung der Kochmulde Sorgen Sie immer dafür, dass die Flammen unter dem Topf bleiben. Wenn die Flammen um den Topf züngeln, geht viel Energie verloren. Zudem Wokbrenner (GKB677W, GKB678W, GKB635W, GKB636W und GKV135W) können die Griffe zu heiß werden. Mit dem Wokbrenner können Gerichte bei sehr hoher Temperatur bereitet Benutzen Sie keine Töpfe mit kleinerem Bodendurchmesser als 12 cm. werden.
50 Pflege 51 Pflege Allgemeines Ihr Gerät ist aus hochwertigen Materialien hergestellt und lässt sich einfach ■ Regelmäßige Reinigung und Pflege sofort nach Benutzung des Gerätes reinigen. verhindert, dass übergekochte Essensreste lange einwirken können und – Brennerteile dürfen nicht im Geschirrspüler gereinigt werden. Die Teile hartnäckige, schwer zu entfernende Flecken verursachen.
52 Pflege Störungen 53 Hartnäckige Flecken auf Edelstahl (Mulden) Tabelle Vor allem übergekochter Rotkohl, rote Beete, Sojasoße, Apfelmus, Rhabarber Wenn das Gerät nicht einwandfrei funktioniert, heißt das nicht immer, daß es und sonstige, sehr zuckerhaltige Lebensmittel und saure Flüssigkeiten können defekt ist. Versuchen Sie erst, die Störung selbst zu beheben. Wenn nachsteh- Verfärbung der Oberfläche verursachen. ende Hinweise nicht helfen, rufen Sie dann den Kundendienst.
Störungen 54 55 Tabelle Umweltaspekte Verpackung und Gerät entsorgen Bei der Herstellung dieses Gerätes wurden dauerhafte Werkstoffe verwendet. Störung Ursache Abhilfe Dieses Gerät muss bei Lebenslaufende ordnungsgemäß entsorgt werden. Die Der Brenner brennt nicht egal. - Brennerteile nicht richtig - Setzen Sie die Brennerteile über Behörden können für entsprechende Informationen sorgen. aufgesetzt. die Zentriernocken zusammen und sorgen Sie dafür, dass sie flach aufeinander liegen.
56 Installationsanweisung 57 Installationsanweisung Allgemeines Stromversorgung Dieses Gerät darf nur von einem qualifizierten Gasinstallateur angeschlossen 230 V - 50 Hz - 0,6 VA (nur für Geräte mit elektrischer Zündung) werden. Der elektrische Anschluß muß den nationalen und kommunalen Vorschriften Achtung: entsprechen. Gasart und Land, wofür sich das Gerät eignet, sind auf dem Typenschild angegeben. Steckdose und Stecker müssen immer gut zugänglich sein. Dies ist ein Klasse-3-Gerät.
58 Installationsanweisung 59 Installationsanweisung Einbauen Einbauen Einbaumöglichkeiten Einbaumaße GKB672 / GKB673 / GKB677W / GKB678W 52 6 710 43 Eine Aussparung in der Seitenwand des Küchenschrankes zum Durchführen der 560 Gasleitung und elektrischen Anschluß aussägen. 490 50 Kochmulde vorbereiten Sorgen Sie für den Gasanschluß des Kochgerätes. Kontrollieren Sie die Anschlüsse mit Seifenlauge auf Gasdichtheit.
60 Installationsanweisung 61 Einbauen Gastechnische Daten Benötigter Freiraum Eine Gaskochmulde entwickelt Wärme. Sorgen Sie für ausreichenden Freiraum Gerät einstellen auf andere Gasart zu nicht-hitzebeständigen Materialien. Dieses Gerät ist für Erdgas eingestellt. Das Gerät kann mit Hilfe eines Umbausatzes auf andere Gasarten und Gasdrücke eingestellt werden. Der Konversionsatz kann bei der Verkaufs- und Serviceorganisation bestellt werden. Die Umbauvorschrift wird mit dem Satz mitgeliefert. min.
62 63 contents your gas hob description . . . . . . . . . . . . . . . . . . . . . . . . . . . . . . . . . . . . . . . . . . . . . . . . . 64 introduction . . . . . . . . . . . . . . . . . . . . . . . . . . . . . . . . . . . . . . . . . . . . . . . . . 65 safety what you should pay attention to . . . . . . . . . . . . . . . . . . . . . . . . . . . . . . . 66 controls igniting and adjusting . . . . . . . . . . . . . . . . . . . . . . . . . . . . . . . . . . . . . . . . .
your gas hob 64 65 GKB672/3 GKB677W/8W your gas hob Introduction This gas hob has been designed for the real lover of cooking. 6 7 6 7 The differences in burner capacity mean that you can cook any type of dish. Thanks to the integration of the spark ignition in the knobs, you can ignite and control the burners with one hand. The gas hob combines high efficiency with a minimum of incompletely burned combustion gases.
66 safety What you should pay attention to 67 controls Igniting and adjusting Each burner can be adjusted continuously between the full and low positions. Ensure that there is adequate ventilation during use 0-setting ■ Keep natural ventilation openings open. Press the control knob in and turn it anti- ■ When using the hob for long periods, extra ventilation is necessary. clockwise. Open a window for instance or install a mechanical fan. The burner ignites.
68 comfortable cooking Optimal use of the hob ■ 69 comfortable cooking Optimal use of the hob Always ensure that the flames remain below the pan. If flames play around the pan, a lot of energy is lost. In addition, the handles can get too hot. Wok burner (GKB677W, GKB678W, GKB635W, GKB636W and GKV135W) Do not use pans with a base diameter less than 12 cm. Smaller pans will not With the wok burner you can prepare dishes at a very high temperature. For be stable.
70 maintenance 71 maintenance General Your appliance has been manufactured from high-grade materials, which are ■ easy for you to clean. ■ Regular cleaning immediately after use prevents over-cooked food being able to become ingrained and cause stubborn stains that are difficult to Burner parts should not be cleaned in the dishwasher. The parts may be damaged by the dishwasher detergent! Do not use too much water as this can penetrate into the burner or remove. Use a mild cleaning agent.
72 maintenance faults 73 Stubborn stains on stainless steel (spillage wells) Table In particular boiled over red cabbage, red beetroot, soysauce, rhubarb and If the appliance does not work properly, it does not always mean that it is other foodstuffs with a high sugar content and acidic liquids can cause defective. Try to deal with the problem yourself first. Phone the service discoloration of the surface. department if the advice given below does not help.
faults 74 75 Table environmental aspects Disposal of packaging and appliance In the manufacturing of this appliance use has been made of durable materials. Fault Cause Solution At the end of its lifecycle this appliance must be disposed of in a responsible The burner does not burn - Burner parts incorrectly - Assemble the burner parts manner. The authorities can advise you on this. evenly. installed. - Burner parts dirty or damp. - Wrong type of gas used (where bottled gas is used).
76 installation instructions 77 installation instructions General Electrical connection The fitting of the appliance should only be carried out by a registered Corgi 230 V - 50 Hz – 0.6 VA (solely for appliances with a spark switch) gas fitter. The electrical connection must comply with national and local regulations. Please note: The type of gas and the country for which the appliance has been designed are Wall socket and plug must be accessible at all times. indicated on the ratings plate.
78 installation instructions 79 installation instructions Building in Building in Possibilities for building in Building in dimensions GKB672 / GKB673 / GKB677W / GKB678W 52 6 710 43 Make a hole in the side of the cupboard for the gas pipe and electricity supply. 560 490 50 Preparing the hob Connect the cooking appliance to the gas supply. Check the connection for leaks with soapy water.
80 installation instructions 81 Building in Gas information Space to be left free around the appliance A hob generates heat. Leave a sufficient distance between the appliance and Setting up the appliance for other gas types non heat-resistant materials. This appliance has been set up for natural gas. The appliance can be set up for other gas types and pressures by means of a conversion kit. You can order the kit from the sales and service organisation.
82 83 plak hier het toestel-identificatieplaatje placez ici la plaque d'identification de l'appareil kleben Sie hier das Gerätetypenschild ein stick the appliance identification card here Dit plaatje bevindt zich aan de bovenzijde van het toestel. Cette plaque se trouve sur le dessus de l'appareil. Dieses Schild befindet sich an der Oberseite des Gerätes. This card is located on the top of the appliance.