Handleiding Manual Notice d’utilisation gevelkachel wall-mounted heater radiateur gaz modulable 40 010 435 50/00 GWH 2/3/4/5
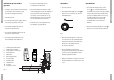
introductie inhoudsopgave 1 bedieningsklep Deze gevelkachel is speciaal ontwikkeld om Als u deze handleiding doorleest bent u snel inleiding 1 2 regelblok tegen een buitenmuur te plaatsen. De op de hoogte van de mogelijkheden die deze veiligheid 2 afvoergassen worden direct door de muur kachel u biedt. U vindt adviezen over de plaatsing 3 naar buiten gevoerd.
veiligheid ■ Mocht de kachel, door welke oorzaak dan gassoort en gasdruk ook, zijn uitgegaan, wacht dan minimaal Deze kachel mag uitsluitend worden 5 minuten voordat u het toestel weer Het toestel is afgesteld en verzegeld in de geplaatst en geïnstalleerd door een erkend ontsteekt. fabriek, overeenkomstig de op de kenplaat VEILIGHEID installateur. aangegeven categorie en op de juiste Gebruik een goedgekeurde aansluitkraan in nominale belasting.
INSTALLATIE Muurdikte: minimaal 70 mm Indien de kachel wordt geplaatst voor een ■ Steek nu de trekstangen door de hiervoor brandbare wand moet de diameter van de bestemde gaten in de montageplaat (de muurdoorvoer 180 mm zijn en dient over het uitlaat hoort boven) en zet het geheel met Lengte inlaatkoker: muurdikte + 10 mm. gehele oppervlak achter de montageplaat een de bijgeleverde moeren vast.
ombouwen op een andere gassoort ■ aansteken Vervang het instelplaatje door de ■ ■ Open de gaskraan. de onderdelen overeenkomen met de zoals wordt bijgeleverd met de ombouwset. waakvlam. Dit is tevens de vorstbeveiliging, waarden uit de bijgeleverde tabel. Let bij toestellen zonder drukregelaar druk deze in. Er stroomt nu gas naar de hetgeen wil zeggen dat de hoofdbrander speciaal op of de voordruk van een op waakvlambrander. pas ingeschakeld wordt bij een zeer lage Sluit de gaskraan.
storingen afvoeren verpakking en toestel De kachel dient jaarlijks te worden gereinigd Niet aangaan of uitgaan van de kachel. De verpakking van het toestel is recyclebaar. en gecontroleerd door een erkend installateur. Oorzaken: Gebruikt kunnen zijn: REINIGING - karton; Controle op: - Lucht in de toevoerleiding (na stilstand van - CFK-vrij schuim (zacht); - dichtheid van gascircuit; het toestel). - hout; - de juiste werking van de regelkraan, het > Ontluchten. - plastic; - papier.
introduction table of contents 1 control valve This wall-mounted heater has been specially If you read this manual, you will soon become introduction 1 2 control block developed for mounting on an external wall. acquainted with the possibilities this heater safety 2 The flue gases are vented directly to the offers. The manual contains advice on safe positioning 3 outside through the external wall.
■ This heater may only be positioned and gas type and pressure ■ installed by an authorised installer. Use an approved gas tap to connect the The hearth is set to the nominal load, in heater to the gas main. accordance with the category stated on the identification plate, and sealed at the factory. ■ The housing of this heater can reach high ■ SAFETY temperatures. Be careful therefore with The heater may only be repaired using The pilot light is set to the correct flow.
INSTALLATION Wall thickness: minimum 70 mm If the heater is installed against a wall made ■ Now insert the tensioning members through from combustible material, the diameter of the the holes provided for this purpose in the wall opening must be 180 mm and a sheet of mounting plate (the outlet should be at the Length of inlet pipe: as wall thickness. incombustible material, containing a 153 mm top) and secure with the nuts supplied.
■ Replace the settings plate with the settings lighting ■ CONVERSION ■ ■ switching off place from the conversion kit. Open the gas tap. If you turn the control knob to the position between components correspond with the values in supplied with the conversion kit. In the burn. This is also the frost-protection the accompanying table. case of appliances without pressure press it in. Gas will now flow to the pilot position, i.e.
maintenance and cleaning faults The heater should be cleaned and checked Heater fails to light or extinguish. annually by an authorised installer. Causes: Check that: - Air in supply pipe (after appliance has been disposing of the packaging and appliancel The appliance packaging is recyclable. The materials: -the gas supply is airtight; out of operation). - card board; -the regulator and the thermocouple circuit > Vent.
introduction contenu 1 soupape de commande Ce radiateur à gaz mural a été spécialement La lecture de ce mode d'emploi vous introduction 1 2 bloc de réglage conçu pour être placé contre un mur extérieur. permettra de recevoir une information rapide securité 2 Les gaz d'échappement vont directement vers sur les possibilités que ce radiateur peut vous positioning 3 l'extérieur en traversant le mur. offrir.
Securité ■ En cas d'un arrêt inattendu de l'appareil, type de gaz et pression du gaz attendez au moins 5 minutes avant de le Seul un installateur agréé est autorisé à remettre en route. faire le placement et l'installation de cet SECURITE appareil. ■ sur la charge ■ Le manteau de ce radiateur est une Utilisez un robinet à gaz agréé dans nominale appropriée, conformément à la l'arrivée du gaz pour le branchement de catégorie I2L indiquée sur l’immatriculation. Le l'appareil.
Au cas où le radiateur serait placé devant une paroi pouvant s'enflammer, le diamètre du ■ conduit d'évacuation mural doit être de 180 mm et une plaque en matériel ininflammable Épaisseur mur: min. 70 mm Longueur tuyau d'admission : égale à l'épaisseur du mur. Longueur tuyau d'échappement : épaisseur mur + 70 mm, longueur max. 600 mm. doit être placée.
raccord à la conduite de gaz ■ Remplacez l'injecteur pour la veilleuse par allumage mise hors service l'injecteur du jeu de conversion. Evitez toute tension sur le robinet de réglage en effectuant le raccord. Contrôlez ■ ■ le raccord au gaz (étanchéité). Contrôlez le par celle qui se trouve dans le jeu de fonctionnement de l'appareil et expliquez conversion.
panne L'appareil doit être nettoyé et contrôlé L'appareil ne s'enclenche pas / ne s'arrête pas. annuellement par un installateur agrée. Causes: Contrôle : - Présence d'air dans la conduite d'amenée élimination de l’emballage et de l’appareil L’emballage de l’appareil est recyclable. Il ENTRETIEN contient : - de l’étanchéité du circuit d’alimentation du gaz ; (après arrêt de l'appareil). - du polystyrène exempt de CFC (mousse douce) ; > Purger.
set kijkglas / sight glasses set / jeu vitre 20900081 waakvlam set / pilot unit set / jeu veilleuse 20900082 Eurosit 630 compleet / Eurosit 630 complete / Eurosit 630 complet 20900083 Uitlaat set / exhaust set / jeu échappement 20900084 brander GWH 2 / burner GWH 3 / brûleur GWH 2 20900085 set LPG NL GWH 2 / set LPG NL GWH 2 / jeu GPL NL GWH 2 20900086 set LPG eur GWH 2 / set LPG eur GWH 2 / jeu GPL eur GWH 2 20900087 set aardgas NL GWH 2 / set NG NL GWH 2 / jeu gaz naturel NL GWH 2 20900088
Technische gegevens / technical data / fiche technique GWH 2 Land / country/pays NL BE/FR DE DE/LU AT/ES/GB/ HU NL/HU NL BE/IT/PT/ES/FR/GB BE/ES/FR/ AT/DE IT/PT Soort gas en toevoerdruk/gastype-supply GB/IT/PT G25-25 G20-20 G20-20 G20-20 G20-20 G20-25 G31-30 G30-29 G30-29 G31-37 G30-50 Cat.
Technische gegevens / technical data / fiche technique GWH 3 Land / country/pays NL BE/FR DE DE/LU AT/ES/GB/ HU NL/HU NL BE/IT/PT/ES/FR/GB BE/ES/FR/ AT/DE IT/PT Soort gas en toevoerdruk/gastype-supply GB/IT/PT G25-25 G20-20 G20-20 G20-20 G20-20 G20-25 G31-30 G30-29 G30-29 G31-37 G30-50 Cat.
Technische gegevens / technical data / fiche technique GWH 4 Land / country/pays NL BE/FR DE DE/LU AT/ES/GB/ HU NL/HU NL BE/IT/PT/ES/FR/GB BE/ES/FR/ AT/DE IT/PT Soort gas en toevoerdruk/gastype-supply GB/IT/PT G25-25 G20-20 G20-20 G20-20 G20-20 G20-25 G31-30 G30-29 G30-29 G31-37 G30-50 Cat.
Technische gegevens / technical data / fiche technique GWH 5 Land / country/pays NL BE/FR DE DE/LU AT/ES/GB/ HU NL/HU NL BE/IT/PT/ES/FR/GB BE/ES/FR/ AT/DE IT/PT Soort gas en toevoerdruk/gastype-supply GB/IT/PT G25-25 G20-20 G20-20 G20-20 G20-20 G20-25 G31-30 G30-29 G30-29 G31-37 G30-50 Cat.