PRO-RO 6-Stage Reverse Osmosis System System tested and certified by NSF International against NSF/ANSI Standard 58 for the reduction of substances specified on the performance data sheet. Pelican Water Systems 877-842-1635, www.pelicanwater.
Please fill out the following information at the time of installation. Save for future reference. Model: Pelican PRO-RO Date Code: Install Date: Sold by: Installed By: Service Center Phone Number: .
Introduction to the PRO-RO Congratulations on your purchase of the PRO-RO six stage reverse osmosis system. The PRO-RO features a four-stage prefilter, membrane and postfilter housed in a single cartridge. The final two stages consist of a granular activated carbon polishing filter and a calcite remineralizing filter. When properly maintained, this system will provide you with years of trouble-free service.
Limited Warranty This Limited Warranty extends to the original purchaser of the system only. This warranty covers all Manufacturer-supplied items only that prove to be defective in material, workmanship or factory preparation. This warranty covers parts only; all labor is excluded from this warranty, including, but not limited to, services related to the removal, replacement, installation, adjustment, maintenance and/or repair of the unit or its components items.
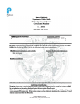
Performance Data Sheet System Performance This system has been tested according to NSF/ANSI 58 for reduction of the substances listed below. The concentration of the indicated substances in water leaving the system was reduced to a concentration less than or equal to the permissible limit for water leaving the system, as specified in NSF/ANSI 58. Do not use with water that is microbiologically unsafe or of unknown quality without adequate disinfection before or after the system.
Arsenic Fact Sheet Arsenic (AS) is a natually occuring contaminant found in many ground waters. Arsenic in water has no color, taste or odor. It must be measured by a lab test. Public water utilities must have their water tested for arsenic. You can get the results from your water utility. If you have your own well, you can have the water tested. The local health department or the state environmental health agency can provide a list of certified labs. The cost is typically $15 to $30.
Pelican PRO-RO TF50 (4 stage cartridge) Calcite/GAC (2 stage cartridge Pelican Water Systems 877-842-1635, www.pelicanwater.
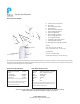
System Specifications Dimensions and Weight D G E I L F M H K A. B. C. D. E. F. G. H. I. J. K. L. M. Product water storage tank Tank valve Tank tubing (3/8” white) Air-gap faucet Drain connection assembly Drain tubing (3/8” white) Quick connect fitting Drain tubing (1/4” black) Faucet tubing (3/8” blue) Four-stage desalinator Feed water tubing (1/4” green) Inlet fitting with shut-off Two-stage remineralizing post-filter B C (not shown) Shipping Box 14.5"L x 11.25"W x 20"H (36.8 x 28.6 x 50.
Push Handle Airgap Faucet 1. Drill a 1 1/4" hole for installation of the air-gap faucet on your countertop. If you already have a hole large enough, please see step 2. 2. Place the RO unit underneath the sink in the area you plan on having it for the final installation. Installation Videos www.youtube.com/ pelicanwatertech 3. Pull the black, blue, and white tubing up through the faucet hole from underneath the sink. 4. Insert polished faucet base and rubber seal onto base of faucet. 5.
Feed and Drain Connection Feed Connection 1. Locate and turn off the angle stop valve on the cold water line feeding the sink. This valve will usually be located under the sink on the pipe coming out of the wall. 2. When the angle stop valve is closed, relieve pressure in the line by opening the cold water tap on the sink. 3. Disconnect the cold water faucet feed line at the angle stop valve. Installation Videos www.youtube.com/ pelicanwatertech 4. Install the feed adapter into the angle stop. (Fig. 1) 5.
System Activation and Flushing System Activation and Inspection 1. Check all tubing connections to ensure they are firmly seated. CHECK TO SEE THAT THE CARTRIDGE RETAINER CLIP IS PROPERLY ENGAGED AND LOCKED. Failure to keep the retaining clip in place will result in accidental leaks and flooding. 2. Open the dispensing faucet at the sink. Close the tank shut-off valve. Make sure the feed valve for the incoming water is open. Open the small feed shut-off valve on the green feed line. 3.
Installation Checklist 1. System is located where it will not be subject to physical impacts or rough contact by heavy objects. 2. Feed water pressure to the unit is no less than 40 psi and no greater than 80 PSI. 3. Ensure the plastic retainer clip that holds the desalinator cartridge in place is fully engaged and locked in place. The slide locks must snap into place in the slots.
Maintenance Cartridge Replacement 1. Close the feed water shut-off valve. 2. Close the tank shut-off valve. 3. Open the dispensing faucet to relieve system pressure. Close dispensing faucet when flow has stopped. 4. Remove the cover from the front of the system. Remove the retaining clip. Pull the cartridge off the system evenly at top and bottom. Dispose of used cartridge. 6.