
Instructions / Assembly


9
Pelican Water Systems
877-842-1635, www.pelicanwater.com
1. Drill a 1 1/4" hole for installaon of the air-gap faucet on your
countertop. If you already have a hole large enough, please see
step 2.
2. Place the RO unit underneath the sink in the area you plan on
having it for the nal installaon.
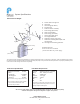
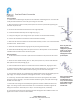
3. Place the rubber seal onto base of faucet, ng around the
faucet barbs.
4. Put the faucet stem down through the countertop hole.
5. From underneath the sink, slide the large washer, and the
white plasc spacer, open end up, onto the threaded faucet stem,
ng around the faucet barbs.
6. Place the lock washer onto the faucet stem. Thread the lock
nut onto the faucet stem.
7. Orient the faucet on the countertop and then securely ghten
the lock nut.
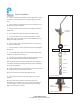
8. Push the 3/8" white tubing onto the 3/8" ng (larger barb)
located on the faucet base. See Fig. 2.
9. Push the 1/4" black drain tubing, aached to the system, onto
the 1/4" ng (smaller barb) located on the faucet base.
Note: Running the black and white tubing under warm water for
2-3 minutes will soen the tubing and allow for easier installaon
on the two air-gap barbs.
10. Thread the faucet quick-connect adapter, located in the system
parts bag, onto the end of the the faucet stem.
Note: This connecon should be hand-ghtened only.
11. Firmly push the end of the 3/8" blue tubing into this 3/8"
adapter.
Note: The white tubing provided is typically longer than is
required for your installaon. Be sure to cut the white tubing to
the proper length to reach the drain installaon (see following
page). Discard any excess tubing.
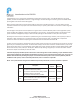
Escutcheon
(aached)
Rubber seal
Countertop
Spacer
Lock washer
Lock nut
Fig 1: Faucet and ngs
Fig 2: Closeup of faucet barbs
Large barb,
3/8” white tubing
Small barb,
1/4” black tubing
Countertop
Large
washer
Faucet
connector
Faucet Installaon