
Operating Guide

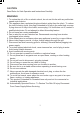


A
B
C
D
A
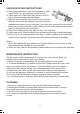
Fig. 4
B
C
A
1. Plug the cord into any standard 120-volt A/C outlet.
2. To turn the fan on, press the SPEED button (A) on the panel. Fan will start at low
speed.
3. Adjust speed to low, medium or high by pressing SPEED button. A light will turn
on for each speed selected (C). Stop the fan by pressing the SPEED button
successively.
4. To start and stop the temperature settings, press the TEMP button (B) to cycle
through the temperature setting. Minimum setting is 60º F; maximum setting is
80º F. The fan will operate only if the temperature you have set is less than room
temperature. A light will turn on indicating the selected temperature (C).
5. Set the individual fan motors on either IN (intake) or OUT (exhaust) using the
control lever (D).
OPERATING INSTRUCTIONS
4
4. If the fan still does not fit properly in the window, re-
adjust the expandable panel on right/left side of fan to
fill in remaining space between panel and window
frame until a secure fit is achieved.
1. Position the fan in the window with the power switch
(A) facing the center of the opening.
2. To adjust height, remove fan from window, extend the
expandable panel (B) until it matches the height of the window.
3. With the window fully open, position the fan in the window with power switch
facing the center of the opening.
4. Fan must fit securely against the inside edge of the window opening.
5. Slide the sliding window to meet the edge of the fan.
The side edge of the window must fit securely behind the lip of fan housing.
6. Adjust the expandable panel to fill in remaining space between fan and window
frame. Expandable panel locks into position by closing the locks once you establish
a fit.
FOR VERTICAL SLIDER-TYPE WINDOWS (Fig.4)