
Instruction Manual
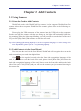
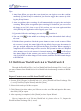

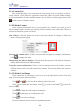
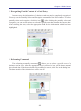
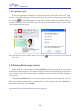
Table Of Contents
- Chapter 1 Getting Started
- 1.1 Installation
- Chapter 2 Add Contacts
- Chapter 3 Edit Contacts
- Chapter 4 Manage Contacts
- Chapter 5 Sync, Import, Export
- Chapter 6 Use Contact Information
- Chapter 7 Advanced Functions
- Chapter 8 Scan Manager
- Chapter 9
- Sync and Share WorldCard Contacts with Mobile Devices
- Appendix User Interface Introduction
2-2
WorldCard
Tips:
1. Auto Scan: When you open the scan wizard you can begin to scan the card im-
mediately. If [Auto Scan] is unchecked, you need to trigger the scanner by click-
ing the [Scan] button.
2. Auto recognition after scanning: It will automatically recognize the card after
scanning. When [Auto recognition after scanning] is unchecked, you can review
the image to see if it’s clear or not. If it’s unclear, you can scan again and then
click [Finish], the application will recognize your card.
3. If you don’t like the card image, you can click to delete it.
4. You can click in the middle to exchange the front side and the back side of
the card.
5. WorldocScan operations: Push the power button to turn on the scanner. When
the scanner is ready, the status light will stop blinks. Insert your documents in
face up, straight, aligned to the left into the Paper Feed Slot. When scanning is
completed, the scanned image will be saved to JPG format in either a USB ash
drive, memory card, or the scanner’s internal memory. Click , it will tell you
how many images in the scanner, you need to click [Recognize] button and de-
cide if you’d like to delete images in the scanner, and then it will transmit images
to WorldCard.
2.2 Shift from WorldCard v6.6 to WorldCard v8
Through the WorldCard File (*.wcf) or WorldCard Data Exchange File (*.wcxf), you
can move contacts from WorldCard v6.6 to WorldCard v8 and manage contacts in World-
Card v8.
Export Contacts as a wcxf le from WorldCard v6.6
1. Execute [File]/[Export] in WorldCard v6.6, select [WorldCard Data Exchange File
(*.wcxf)] from the [Export Wizard] and click [Next].
2. Select which cards you’d like to export.
3. Click [Browse] to select where you’d like to save the .wcxf le and input the le name,
then click [OK] to export.
4. After exporting is completed, click [Finish] to close Export Wizard.
How to import the wcxf file into WorldCard v8, please refer to 5.1, Import the
WorldCard Data Exchange File (*.wcxf).