
Instruction Manual
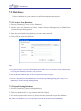

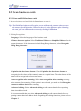
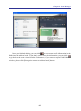
Table Of Contents
- Chapter 1 Getting Started
- 1.1 Installation
- Chapter 2 Add Contacts
- Chapter 3 Edit Contacts
- Chapter 4 Manage Contacts
- Chapter 5 Sync, Import, Export
- Chapter 6 Use Contact Information
- Chapter 7 Advanced Functions
- Chapter 8 Scan Manager
- Chapter 9
- Sync and Share WorldCard Contacts with Mobile Devices
- Appendix User Interface Introduction

7-6
7-7
Chapter 7 Advanced Functions
7.2.3 Save Database as a New File
For more convenience to manage contacts, you can save the database as a new le in
a different folder to distinguish from the original one.
1. Execute [Database]/[Save database as].
2. Select a folder.
3. Click [Save].
7.2.4 Rename Database
1. Open the database you’d like to rename and click [Database]/[Rename database].
2. Enter a new database name.
3. Click [OK] to change the database name.
7.2.5 Set Password or Change Password
1. Open the database you’d like to change its password setting, click [Database]/[Set
password/Change password].
2. Select [Cancel password] or [Open password] to change the password setting.
3. Click [OK] to change the password setting.
7.2.6 Create a Restore Point
To prevent the loss when the application encounters an error during the operation,
we suggest you to manually set the restore point to backup the database. If the application
encounters an error, you can restore the database from the backup database le.
1. Execute [Database]/[Create a restore point].
2. Enter a restore point name.
3. Click [Backup] and then you can nd the backup le in the [BackupFile] folder.
7.2.7 Restore Database
1. Execute [Database]/[Restore].
2. Select the restore point. You can also click [Browse Files] to check the backup le.
3. Click [Restore].
Note: If you’re currently working with a database or editing the contact information, it will clear
the current opened database and be overwritten by the backup le after you click [Restore].
If you’d like to keep the current contacts of the database, please save the database to an-
other le rst.