
Radiator Quick Installation Guide


5
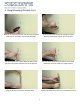
6. Mount The Radiator
Set the boom rear of the radiator in the grove at the
boom or each bracket and lt the radiator ll vercal
Slide the top clamp down ghtly onto the radiator.
The ngers of the clamp should t between grills.
Note: These radiators can be mounted so the supply / return
connecons are located on the boom right-hand side of the radiator
(as shown in the rough-in dimension illustraon) OR on the boom
le-hand side of the radiator. In either mounng conguraon the
SUPPLY connecon is ALWAYS located closest to the MIDDLE of the
radiator and the RETURN connecon is ALWAYS located closest to
the SIDE of the radiator.
If supply / return piping will be through the oor, It is best to
drill those holes prior to mounng the radiator. Use the rough-in
dimension illustraon for proper locaon. Once the supply / return
holes are made in the correct locaon, proceed to the steps below.
Align the Thermostac Valve Knob with the valve.
Do NOT allow the knob to cross-thread.
7. Install Thermostac Knob
Turn the knob onto the Thermostac Valve by turning
clockwise. Inially only turn the knob 1/2 to 1 turn.
Note: This knob provides manual ow control to the radiator. Tightening the knob will restrict ow. If it is
ghtened completely all ow to the radiator will be stopped. Once the radiator is lled this knob can be used
to adjust the ow to the desired seng.