
Radiator Quick Installation Guide

3
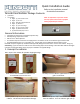
Unpack the radiator brackets. For wood stud mounng, use the lag bolts provided (or equivalent).
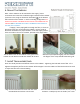
5. Hang Mounng Brackets - Bag C
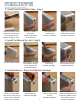
Hang the mounng brackets from the top slot.
Make sure the brackets are plumb and mark the
lower mounng hole.
Mark the locaon of the TOP slot on the mounng
brackets. Note: The boom of the installed radiator
should be mounted a minimum of 4” above the oor.
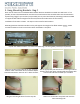
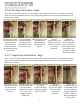
Note: For the most secure installaon BOTH radiator brackets should be mounted onto wall studs. If not
possible, at least 1 bracket MUST be mounted onto a wall stud and the second bracket must be mounted in
drywall using “toggle” style anchors (not provided). For any other wall material, mounng hardware suitable
to support FILLED radiator weight must be used (selected at the discreon of the installer).
Installaon of 1 bracket is shown. The steps are the same for both brackets.
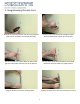
Mounng brackets should be installed so they will support the weight of the lled radiator evenly. Make
sure both brackets are level to each other when installaon is complete.
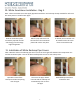
TOP
BOTTOM
Drill an appropriate pilot hole for the mounng hardware
selected. Insert the upper mounng bolt and ghten with
a wrench ll bolt head is about 3/4” from wall.