Installation and User’s Manual PENTAGRAM Cerberus ADSL2+ Lite (P 6311-07) The latest versions of manual, drivers and applications are available on www.pentagram.
NOTE! Any information and technical data are subject to change without prior notification and/or indication in this manual. © 2007 PENTAGRAM All rights reserved; copying and reproduction is strictly forbidden.
Cerberus ADSL2+ Lite (P 6311-07) INDEX INTRODUCTION ................................................................................................. 5 PACKAGE CONTENTS................................................................................... 5 FEATURES..................................................................................................... 6 PRODUCT OVERVIEW ....................................................................................... 7 IMPORTANT NOTES ......................
Cerberus ADSL2+ Lite (P 6311-07) 4
Cerberus ADSL2+ Lite (P 6311-07) Introduction Thank you for purchasing the Cerberus ADSL2+ Lite Modem/Router by PENTAGRAM. Your new router is an all-in-one unit that combines an ADSL modem, ADSL router and Ethernet network switch to provide everything you need to get the machines on your network connected to the Internet over an ADSL broadband connection.
Cerberus ADSL2+ Lite (P 6311-07) Features • A 4-port 10/100Mbps fast Ethernet switch is built-in with automatic switching between MDI and MDI-X for 10Base-T and 100Base-TX ports, with auto detection allowing you to use either straight or cross-over Ethernet cables. • Network Address Translation (NAT) allows multiple users to access outside resources such as the Internet simultaneously with one IP address/one Internet access account.
Cerberus ADSL2+ Lite (P 6311-07) • High Speed Internet Access: downstream rates of up to 24Mbps and upstream rates of up to 1Mbps. Cerberus ADSL2+ Lite is compliant with the following standards: ANSI T1.413 issue 2, ITU-T G.992.1 (G.dmt), ITU-T G.992.2 (G.lite), G.994.1 (G.hs, Multimode), ITU-T G.992.3 (ADSL2 G.dmt.bis), ITU-T G.992.4 (ADSL2 G.lite.bis), ITU-T G.992.5 (ADSL2+; Annex A, I, J, L & M), Reach Extended ADSL (RE ADSL).
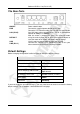
Cerberus ADSL2+ Lite (P 6311-07) The Rear Ports ON/OFF PWR LAN (RJ-45) DEFAULT USB LINE (RJ-11) Power switch button. Connect the supplied power adapter to this jack. Connect a UTP Ethernet cable (Cat-5 or Cat-5e) to one of the four LAN ports when connecting to a PC or an office/home network of 10Mbps or 100Mbps. After the router is powered on, press this recessed button using the end of paper clip or other small pointed object to reset the router or to restore it to factory default settings.
Cerberus ADSL2+ Lite (P 6311-07) Resetting router • • • Turn router on and wait for ADSL LED to lit or start blinking. Press and hold DEFAULT button on the back panel of router for 5-10 seconds and then release it. After reset LEDs will return to their normal behavior and all settings will be reset to their default value. You can login web configurator using default username and password: admin / trenchip. Connecting Cerberus to Computer.
Cerberus ADSL2+ Lite (P 6311-07) Windows Vista Note: Network configuration require administrator privileges. When User Account Control window pops up, either click Continue (Administrator user) or select Administrator user and enter valid password (Standard user). 1. Click Start → Control Panel. 2. Click View network status and tasks. 3. Click View status for appropriate connection. 4. On General tab, Click the Properties button. 5.
Cerberus ADSL2+ Lite (P 6311-07) Windows 2000/XP 1. Click Start → Settings → Control Panel. Double-click the Network Connections icon (2000/XP Classic view) or click Network and Internet Connections icon and then Network Connections icon (XP Default view). 2. Double-click the Local Area Connection icon. 3. On General tab, Click the Properties button. 4. On General tab, select Internet (TCP/IP) and click Properties. 5.
Cerberus ADSL2+ Lite (P 6311-07) Windows 95/98/Me 1. Click Start → Settings → Control Panel. Doubleclick the Network icon. 2. On Configuration tab, select TCP/IP for appropriate network adapter and click Properties. 3. On IP Address tab, select Obtain an IP address automatically. 4. On DNS Configuration tab, select Disable DNS 5. Click OK to save settings and close TCP/IP Properties window.
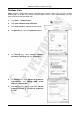
Cerberus ADSL2+ Lite (P 6311-07) Configure router via web browser Cerberus ADSL2+ Lite router can be configured via web browser, which is usually integrated with operating system. Router offers clear and simple interface. Login 1. 2. Launch the Web browser Enter the default IP address: 10.0.0.2 3.
Cerberus ADSL2+ Lite (P 6311-07) Navigation Steps to navigate the Web configuration from the Site Map are summarized below: • Quick Start – wizard that helps to configure your router, • Interface Setup – configure Internet and LAN functions, • Advanced Setup – configure advanced features, • Access Management – manage Internet access options, • Maintenance – set a new password, set the time zone, upgrade or reload firmware and run diagnostic tests on the router, • Status – router device information, system
Cerberus ADSL2+ Lite (P 6311-07) Quick Start Wizard Click Quick Start to guide you to configure the device to connect your ISP and have Internet access within minutes. This Quick Start will guide you step by step to configure the password, time zone, and WAN settings of you device. This Wizard is a helpful guide for first time uses to the device. It is strongly recommended to use Quick Start to configure your ADSL settings. Click on the RUN WIZARD button to start the Quick Start wizard.
Cerberus ADSL2+ Lite (P 6311-07) Setting a New Password This screen helps you set a new password, replacing the default password. Enter new password in New Password and Confirmed Password fields. Click on BACK to return to the previous screen, on NEXT to continue, or on EXIT to exit the wizard without saving. Choose your Time Zone Select the appropriate time zone for your location from the dropdown list.
Cerberus ADSL2+ Lite (P 6311-07) Set your Internet Connection Glossary: • • • • Multiplexing - Two conventions identify what protocols a virtual circuit (VC) is carrying. Be sure to use the multiplexing method your ISP requires: VC-Based Multiplexing – In VC-based multiplexing, by prior mutual agreement, each protocol is assigned to a specific virtual circuit. For example, VC1 carries IP, etc.
• Cerberus ADSL2+ Lite (P 6311-07) Dynamic IP Address A dynamic IP address connection requests a new IP address from your ISP each time you connect to it. Enter VPI (Virtual Path Identifier), VCI (Virtual Channel Identifier) and select your Connection Type from the dropdown list. Your ISP should provide the above information. Click on BACK to return to the previous screen, on NEXT to continue, or on EXIT to exit the wizard without saving.
• Cerberus ADSL2+ Lite (P 6311-07) PPPoE/PPPoA Configure connection based on PPPoE / PPPoA protocol. Enter Username, Password, VPI (Virtual Path Identifier), VCI (Virtual Channel Identifier) and select your Connection Type from the dropdown list. Note that you must enter the user name exactly as your ISP assigned it. If the assigned name is in the form of user@domain where domain identifies a service name, enter it exactly as given.
Cerberus ADSL2+ Lite (P 6311-07) Finishing the Wizard The Quick Start wizard now has all the information it needs. You MUST click NEXT, to save configuration! Click on BACK to make changes or correct mistakes. Click on NEXT to save the current settings. Click on EXIT to exit the wizard without saving. Your changes have been saved. Click on CLOSE. The Quick Start wizard window will close.
Cerberus ADSL2+ Lite (P 6311-07) Internet The Internet screen allows you to set up how your router connects to the Internet. If you already ran the Quick Start wizard, the information you provided to the wizard should be entered into the fields already. After you finish the changes, click on the SAVE button to save your changes.
Cerberus ADSL2+ Lite (P 6311-07) • ATM VC ATM settings are used to connect to your ISP. Your ISP provides VPI, VCI, settings to you. In this Device, you can totally setup 8 PVCs on different encapsulations if you apply 8 different virtual circuits from your ISP. You need to activate the VC to take effect. For PVCs management, you can use ATM QOS to setup each PVC traffic line’s priority. Virtual Circuit – Select the VC number you want to setup. VPI – Virtual Path Identifier.
Cerberus ADSL2+ Lite (P 6311-07) • Dynamic IP Address Select this option if your ISP provides you an IP address automatically. Please enter the Dynamic IP information accordingly. Encapsulation – Select your encapsulation type from the dropdown list. NAT – Select whether NAT (Network Address Translation) is Enabled or Disabled. Default Route – Select whether this PVC will be the default route for Internet data. TCP MTU Option – Enter TCP MTU (Maximum Transmission Unit) Value here.
Cerberus ADSL2+ Lite (P 6311-07) • PPPoA/PPPoE Select this option if your ISP requires you to use a PPPoA/PPPoE connection. Username – Enter your username for your PPPoE/PPPoA connection. Password – Enter your password for your PPPoE/PPPoA connection. Encapsulation – Select your encapsulation type from the dropdown list. Connection – Select whether your connection is always on or if it connects on demand. If on demand, specify how many minutes the connection may be idle before it disconnects.
Cerberus ADSL2+ Lite (P 6311-07) LAN There are the IP settings of the LAN Interface for the device. These settings may be referred to as Private settings. You may change the LAN IP address if needed. The LAN IP address is provided to your internal network and cannot be seen on the Internet. • Router Local IP IP Address – Enter the IP address of your ADSL router in dotted decimal notation, for example, 10.0.0.2 (default setting).
Cerberus ADSL2+ Lite (P 6311-07) • DHCP The DHCP Server gives out IP addresses when a device is booting up and request an IP to be logged on to the network. It must be set as a DHCP client to obtain the IP address automatically. By default, the DHCP Server is enabled. The DHCP address pool contains the range of the IP address that will automatically be assigned to the client on the network.
Cerberus ADSL2+ Lite (P 6311-07) Advanced Setup Tab Firewall Firewall – Select this option can automatically detect and block Denial of Service (DoS) attacks, such as Ping of Death, SYN Flood, Port Scan and Land Attack. SPI – Select this option to Enable or Disable the SPI feature. (NOTE: If you enable SPI, all traffics initiate from WAN would be blocked, including DMZ, Virtual Server, and ACL WAN side).
Cerberus ADSL2+ Lite (P 6311-07) Routing This table lists IP address of Internet destinations commonly accessed by your network. When a computer requests to send data to a listed destination, the device uses the Gateway IP to identify the first Internet router it should contact to route the data most efficiently. Select this option will list the routing table information. You can press ADD ROUTE to edit the static route. (As below screen) ADD ROUTE – click this button to set Static Routing information.
Cerberus ADSL2+ Lite (P 6311-07) propagated to other hosts through RIP broadcasts. If you choose No, this route is kept private and is not included in the RIP broadcasts. When you are done making changes, click on SAVE to save your changes, DELETE to delete the rule with the parameters you set, BACK to return to the previous screen or CANCEL to exit without saving.
Cerberus ADSL2+ Lite (P 6311-07) Server – This type allows you to specify inside servers of different services behind the NAT to be accessible to the outside world. The following table summarizes these types. TYPE One-to-One Many-to-One (SUA/PAT) IP MAPPING ILA1 IGA1 ILA1 IGA1 ILA2 IGA1 ... ILA1 IGA1 ILA2 IGA2 ILA3 IGA1 ILA4 IGA2 ... ILA1 IGA1 ILA2 IGA2 ILA3 IGA3 ILA4 IGA4 ...
Cerberus ADSL2+ Lite (P 6311-07) • DMZ A DMZ (de-militarized zone) is a host between a private local network and the outside public network. It prevents outside users from getting direct access to s server that has company data. Users of the public network outside the company can access only the DMZ host. DMZ setting for – Option selected in Number of IPs field in main NAT window. DMZ – Toggle the DMZ function Enabled or Disabled.
Cerberus ADSL2+ Lite (P 6311-07) • Virtual Server The Virtual Server is the server or server(s) behind NAT (on the LAN), for example, Web server or FTP server, that you can make visible to the outside world even though NAT makes your whole inside network appear as a single machine to the outside world. Virtual Server for - selected in Number of IPs field in main NAT window. Rule Index – The Virtual server rule index for this VC. You can specify up to 10 rules.
Cerberus ADSL2+ Lite (P 6311-07) • IP Address Mapping The IP Address Mapping is for those VCs that with multiple IPs. The IP Address Mapping rule is per-VC based. (only for Multiple IPs’ VCs). Address Mapping Rule – PVC to set. Rule Index – The Virtual server rule index for this VC. You can specify up to 16 rules. All the VCs with single IP will use the same Virtual Server rules. Rule Type – There are 4 types of One-to-One, Many-to-One, Many-to-Many Overload and Many-to-Many No-Overload.
Cerberus ADSL2+ Lite (P 6311-07) QoS QoS (Quality of Service) will provide better service of selected network traffic over various technologies. Deploying QoS management to guarantee that all application receive the service levels required and sufficient bandwidth to meet performance expectations is indeed one important aspect of modem enterprise network. QoS – Choose whether QoS will be Activated or Deactivated. Summary – Click on QoS Settings Summary button to open summary window.
Cerberus ADSL2+ Lite (P 6311-07) Source MAC – Enter source physical address (MAC). IP – Enter source IP address. Mask – Enter source subnet mask. Port Range – Enter source port range. Protocol ID – Select protocol: TCP/UDP, TCP, UDP, ICMP or IGMP. Vlan ID Range – Enter range of Vlan ID. IPP/DS Field – Select packet priority standard: IPP/TOS (IP Precedence Range / Type of Service) or DSCP (DiffServ Code Point). • IP Precedence Range – Select range of IPP/TOS values (0-7).
Cerberus ADSL2+ Lite (P 6311-07) VLAN Virtual LAN (VLAN) is a group of devices on one or more LANs that are configured so that they can communicate as if they were attached to the same wire, when in fact they are located on a number of different LAN segments. Because VLANs are based on logical instead of physical connections, it is very flexible for user/host management, bandwidth allocation and resource optimization.
Cerberus ADSL2+ Lite (P 6311-07) • PVID Assign In this screen you can assign PVID (VLAN ID) to each ATM VC or Ethernet (LAN) port. When you are done making changes, click on SAVE to save your changes, CANCEL to discard changes or NEXT to go to VLAN Group Setting screen.
Cerberus ADSL2+ Lite (P 6311-07) • VLAN Group Setting Based on each VLAN group, you can configure each group’s VLAN setting. You can configure up to 8 VLAN settings. Remember to select Tagged option only if device on the other side supports tagged packets, otherwise those packets will be dropped. VLAN Index – Select PVID you wish to change. Active – Select Yes to activate or No to deactivate selected PVID. VLAN ID – Frames will be assigned VLAN ID displayed here.
Cerberus ADSL2+ Lite (P 6311-07) ADSL Select this option to set ADSL Mode and ADSL Type information. ADSL Mode – Select which mode your ADSL connection uses from the dropdown list. The option has Auto Sync-up, ADSL2+, ADSL2, G.DMT, T1.413, G.LITE. ADSL Type – Select the ADSL type you use from the dropdown list: ANNEX A, ANNEX I, ANNEX A/L, ANNEX M, ANNEX A/I/J/L/M. When you are done making changes, click on SAVE to save your changes.
Cerberus ADSL2+ Lite (P 6311-07) Access Management Tab ACL Go to Access Management → ACL to enable remote management. Access Control Listing (ACL) is a management tool that acts as a filter for incoming or outgoing packets, based on application. You may use telnet or Web to remotely manage the ADSL Router. User just needs to enable Telnet or Web and give it an IP address that wants to access the ADSL Router. The default IP 0.0.0.0 allows any client to use this service to remotely manage the ADSL Router.
Cerberus ADSL2+ Lite (P 6311-07) IP Filter The Router provides extensive firewall protection by restricting connection parameters to limit the risk of intrusion and defending against a wide array of common hacker attackers. Go to Access Management → IP Filtering to set different IP filter rules of a given protocol (TCP, UDP, or ICMP) and a specific direction (incoming, outgoing, or both) to filter the packets. IP Filter is a more complex filtering tool, based more on IP and custom rules.
Cerberus ADSL2+ Lite (P 6311-07) Subnet Mask – Enter the subnet mask of the source IP address. Port Number – Enter the port number of the source IP address. Note that 0 means all that ports are allowed. Destination IP Address – Enter the destination IP address that you wish to deny access to your system. Subnet Mask – Enter the subnet mask of the destination IP address. Port Number – Enter the port number of the destination IP address. Note that 0 means that all ports are allowed.
Cerberus ADSL2+ Lite (P 6311-07) SNMP The Simple Network Management Protocol (SNMP) is used for exchanging information between network devices. It enables a host computer to access configuration, performance, and other system data that resides in a database on the modem. The host computer is called a management station and the modem is called an SNMP agent. The data that can be accessed via SNMP is stored in a Management Information Database (MIB) on the modem.
Cerberus ADSL2+ Lite (P 6311-07) Auto-Configured – UPnP network devices can automatically configure network addressing, announce their presence in the network to other UPnP devices and enable exchange of simple product and service descriptions.
Cerberus ADSL2+ Lite (P 6311-07) Maintenance Tab Administration There is only one account that can access Web-Management interface-Administration. Admin has read/write access privilege. In this web page, you can set new password for admin. New Password – Type the new password in this field. Confirm Password – Type the new password again in this field. Click SAVE to save your changes.
Cerberus ADSL2+ Lite (P 6311-07) • NTP Server automatically Current Date/Time – This field displays an updated Date and Time when you reenter this menu. Time Zone – Choose the Time Zone of your location. This will set the time difference between your time zone and Greenwich Mean Time (GMT). Daylight Saving – Choose “Enabled” or “Disabled” to use daylight savings time. NTP Server Address – Type the IP address or domain name of your timeserver.
Cerberus ADSL2+ Lite (P 6311-07) Firmware You can upgrade the firmware of the router and save/load configuration Romfile in this page. During firmware upgrade process all router setting are reset to default values. Thanks to Romfile it is possible to save router’s configuration to file and to load this file after upgrade process. Make sure the firmware you want to use is on the local hard drive of the computer. It might take several minutes, don’t power off it during upgrading.
Cerberus ADSL2+ Lite (P 6311-07) System Restart with – If you wish to restart the router using the factory default settings (for example, after a firmware upgrade or if you have saved an incorrect configuration), select Factory Default Settings to reset to factory default settings. Otherwise, you can select Current Settings. You may also reset your router to factory settings by holding the DEFAULT button on the back panel of your router in for 10-12 second while the router is turned on.
Cerberus ADSL2+ Lite (P 6311-07) Status Tab Device Info The Device Info screen is a tool that you use to monitor your ADSL Router. It shows the Firmware Version, WAN, LAN, and MAC address information. Note that these fields are readonly and are not meant for diagnostic purposes. Except the Virtual Circuit, click the drop-down list and select the name of the Virtual Circuit on which the system status is to be shown. • Device Information Firmware Version – This filed displays current firmware version.
Cerberus ADSL2+ Lite (P 6311-07) • LAN IP Address – The LAN port IP address. Subnet Mask – The LAN port IP subnet mask. DHCP Server – The status of DHCP Server (Enabled or Disabled). NAT – The status of NAT Service (Enabled or Disabled). • WAN Virtual Circuit – Click the drop-down list and select the name of the Virtual Circuit on which the system status is to be shown. Status – Connected or Not Connected. Connection Type – The WAN Connection Type.
• Cerberus ADSL2+ Lite (P 6311-07) Data Rate – This field displays the ADSL data rate. System Log The System Log displays data generated or acquired by routine system communication with other devices, such as the results of negotiations with the ISP's computers for DNS and gateway IP addresses. The device keeps a running log of events and activities occurring on the Router.
Cerberus ADSL2+ Lite (P 6311-07) Statistics The ADSL Router keeps statistic of traffic that passes through it. You are able to view the amount of packets that passes through the Router on both the WAN port & the LAN port. The traffic counter will reset if the device is rebooted. You can select Ethernet/ADSL to view the statistics report of LAN/WAN. • Ethernet The Ethernet screen gives you information on how much data your router has transmitted and received across the Ethernet connection.
Cerberus ADSL2+ Lite (P 6311-07) Help Tab Router’s online help.
Cerberus ADSL2+ Lite (P 6311-07) Troubleshooting If the router is not function properly, first check this session for simple troubleshooting before contacting your Internet service provider (ISP) for support. Using LEDs to Diagnose Problems The LEDs are useful aides for finding possible problem causes. Power LED The PWR LED on the front panel does not light up.: 1. Make sure that the power adaptor is connected to the router and plugged in to an appropriate power source.
4. 5. 6. 7. Cerberus ADSL2+ Lite (P 6311-07) For WAN access, you must configure remote management to allow server access from the WAN (or all); Your computer’s and the router’s IP addresses must be on the same subnet for LAN access; If you changed the router’s LAN IP address, then enter the new one as the URL; Remove any filters in LAN or WAN that block web service. The web Interface does not display properly: 1. Make sure you are using Internet Explorer 5.0 (or compatible) and later versions; 2.
Cerberus ADSL2+ Lite (P 6311-07) Frequent loss of ADSL line sync (disconnections): 1. The ISP provides the WAN IP address after authenticating you. Authentication may be through the user name and password, the MAC address or the host name; 2. The username and password apply to PPPoE and PPPoA encapsulation only. Make sure that you have entered the correct Service Type, User Name and Password (be sure to use the correct casing). Problems with the Internet Access I cannot access the Internet: 1.
Cerberus ADSL2+ Lite (P 6311-07) NOTES 57