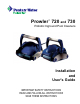
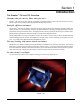
Prowler 720 and 730 ™ Robotic Inground Pool Cleaners Installation and User's Guide IMPORTANT SAFETY INSTRUCTIONS READ AND FOLLOW ALL INSTRUCTIONS SAVE THESE INSTRUCTIONS
Customer Service If you have questions about ordering Pentair replacement parts, and pool products, please use the following contact information: Customer Service (8 A.M. to 5 P.M. — Eastern and Pacific Times) Phone: (800) 831-7133 Fax: (800) 284-4151 Technical Support Sanford, North Carolina (8 A.M. to 5 P.M. — Eastern Time) Phone: (919) 566-8000 Fax: (919) 566-8920 Moorpark, California (8 A.M. to 5 P.M. — Pacific Time) Phone: (805) 553-5000 (Ext. 6312) Fax: (805) 553-5502 Web site visit www.pentairpool.
i Contents Important Safety Precautions .............................................................................................. ii Section 1: Introduction ..................................................................................................... 1 Prowler™ 720 and 730 Overview ............................................................................. 1 Prowler™ 720 and 730 Features ..............................................................................
ii IMPORTANT SAFETY PRECAUTIONS Important Notice: Attention Installer: This guide contains important information about the installation, operation and safe use of this product. This information should be given to the owner and/or operator of this equipment after installation of the pool cleaner. Attention User: This manual contains important information that will help you in operating and maintaining this pool cleaner. Please retain it for future reference.
1 Section 1 Introduction The Prowler™ 720 and 730 Overview Vacuums what you can see, filters what you can’t... Prowler™ 720 and 730 are the computer-controlled, programmed cleaners that scrub and vacuum your pool’s bottom, walls and steps and provides supplemental filtration of pool water. Powerful, efficient, and smart! The Prowler™ 720 and 730 features the patented Aqua Smart System.
2 General Features Two-way cleaning performance: • Powerful vacuum action removes fine particles and larger debris. • Integrated filtration system captures dirt and debris in handy collection bag. • Integrated filter reduces run time of your primary filtration system by 25% to save on pump energy use and normal wear and tear. • Works fast; thoroughly scrubs and vacuums pools up to 20 x 50 feet in just 60–90 minutes.
3 Section 2 Installation The following general information describes how to install the Prowler™ 720 and 730 robotic pool cleaners. Carefully read the following so that you are fully aware of all the capabilities and features this Prowler™ cleaner has to offer. NOTE: Before installing this product, read and follow all warning notices and instructions starting on page ii.
4 Operating the Prowler™ 720 and 730 Cleaners WARNING — Your Cleaner should not be used while people are swimming in the pool. The cable can trip or entangle swimmers which could result in drowning. WARNING — Risk of electrical shock or electrocution. A Ground Fault Current Interrupter (GFCI-USA) or a Residual Current Device (RCD-EUROPE) must be installed to protect your electric outlet and to prevent any possible electrical shock.
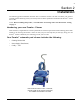
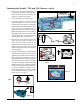
5 Operating the Prowler™ 720 and 730 Cleaners, cont’d. 1. Place the power supply, (transformer), at least ten feet / three meters from the pool as shown in Figure 2. The transformer will supply low voltage to the cleaner. 10 ft. / 3m 2. Uncoil the cable as shown in Figure 3. 3. For proper operation, lock the moveable handle diagonally across the top of the cleaner's body.
6 Setting Up the Standard Power Supply (Transformer) To plug the cable into the transformer socket on the power supply, follow these steps: 1. Prepare the plug with the key and three outside slots as shown in Figure 9. 2. Fit the key and the slots from cable plug exactly with the corresponding key and slots from the transformer socket. Transformer Socket Transformer Socket 3. Push the plug all the way into the socket of the transformer. 4.
7 Wireless Remote Control - only for Prowler™ 730 cleaners equipped with Remote Control Using Radio Remote Control Feature and Accessing Cleaning Modes The Remote Control Model is equipped with a multi-directional radio transmitter, see Figure 12. This feature will enable you to guide the pool cleaner directly to areas of the pool requiring additional cleaning attention or for quick clean-ups. When you press the Right or Left buttons, the cleaner will turn until the button is released.
8 Replacing the Remote Control Battery 1. Remove the top screw (see Figure 13, Step 1). 2. Pull the top of the cover away from the transmitter and then pull upwards (Step 2). 3. Replace the battery and make sure the polarity is the same as the existing battery (Step 3). 4. Push the cover downwards into the 2 slots (Step 4). 5. Push the top of the cover towards the battery until it snaps into place (Step 5). 6. Put the screw back into place. Figure 13.
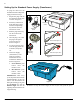
9 Section 3 Maintenance Maintaining the Prowler™ 720 and 730 Cleaner Clean the Filter Bag after every Cleaning Cycle 1. Unplug the power supply. (Keep the plug away from contact with water.) 2. If the unit is in the pool, gently pull the cleaner toward you using the cable until the handle is within reach. Use the handle (not the cable) to pull the cleaner out of the pool after allowing most of the water to drain from the unit. 3.
10 Changing the Drive Belts Depending on usage, the drive belts, (located behind the side plate), will stretch. When this happens, in order to maintain the optimum performance of the unit, these drive belts have to be changed. Figure 15. 1. Turn the robot upside down and remove the bottom lid assembly as shown on page 9, Figure 14, Steps 1-4. 2. Inside, locate four screws on drive motor side which hold the side plate in place, see Figure 15. 3.
11 Cable Care The cable may become twisted after a period of use. To correct this condition, simply lock the moveable handle on the top of the cleaner in the opposite diagonal direction. The pool cleaner will now travel in the opposite direction while cleaning your pool and the cable will uncoil. Check the cable periodically for external damage. If the problem persists, use the E-Z Swivel device. E-Z SWIVEL - Location Place the Robot on the ground and unplug the cable from the transformer.
12 Section 4 Replacement Parts Prowler™ 720 Model 2 4 11 35 46 34 10 8 1 9 5 6 7 33 20 42 15 17 31 3 16 12 14 13 32 40 30 22 26 29 41 23 24 21 47 20 25 28 27 45 44 18 43 19 39 36 38 37 Prowler™ 720 and 730 Installation and User’s Guide
13 Replacement Parts List for the Prowler™ 720 Model ITEM NO. PART NO. 1 2 3 4 5 6 7 8 9 10 11 12 13 14 15 16 17 18 19 20 21 22 23 24 25 26 27 28 29 30 31 32 33 34 35 36 37 38 39 40 41 42 43 44 45 46 47 P12100 P12101 P12102 P12103 P12104 P12105 P12106 P12107 P12108 P12122 P12109 P12133 P12110 P12111 P12112 P12113 P12114 P12116 P12117 P12106 P12118 P12119 P12120 P12121 P12115 P12123 P12124 P12125 DESCRIPTION 4 PIN PLUG CABLE ASSY. - INCLUDES P/N P12100, P12125 SEALING GROMMET HANDLE ASSY.
14 Prowler™ 730 Model 4 2 11 15 34 10 43 8 9 1 5 6 7 41 33 45 15 44 17 32 16 12 14 3 13 31 30 39 22 25 29 23 21 40 46 20 28 27 26 24 18 42 19 38 35 37 36 Prowler™ 720 and 730 Installation and User’s Guide
15 Replacement Parts List for the Prowler™ 730 Model ITEM No. PART No. 1 2 3 4 5 6 7 8 9 10 11 12 13 14 15 16 17 18 19 20 21 22 23 24 25 26 27 28 29 30 31 32 33 34 35 36 37 38 39 40 41 42 43 44 45 46 P12100 P12126 P12102 P12103 P12104 P12105 P12106 P12107 P12108 P12122 P12109 P12133 P12110 P12111 P12112 P12127 P12129 P12128 P12132 P12131 P12118 P12120 P12134 P12130 P12123 P12137 P12138 DESCRIPTION 4 PIN PLUG CABLE ASSY. - INCLUDES P/N’s P12100, P12123 SEALING GROMMET HANDLE ASSY.
16 Notes Prowler™ 720 and 730 Installation and User’s Guide
17 Notes Prowler™ 720 and 730 Installation and User’s Guide
18 Notes Prowler™ 720 and 730 Installation and User’s Guide
Prowler™ 720 & 730
P/N P12154 Rev.