
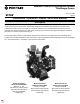
Instruction Manual

- 7 -
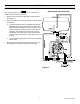
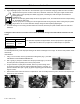
Discharge Manifold:
1. Using a 13 mm socket, remove (9) manifold mounting bolts. DO NOT USE IMPACT GUN ON MOUNTING BOLTS.
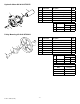
2. Pull or gently pry away the manifold from the pump heads (Fig. 6). Do this so the valve pilots are completely free from
the pump heads.
3. It should not be necessary to split the manifold to access the valves as was done with the inlet manifold.
4. Remove the discharge valves for service or replacement. This can usually be done by hand (Fig. 7) but use external
pliers if necessary.
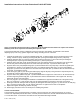
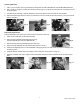
Diaphragm Replacement
Change diaphragms every 500 hours or three months, whichever comes rst.
1. Drain oil from crankcase as instructed previously.
2. Remove pump head bolts and heads (See Figure 8).
DO NOT USE IMPACT GUN ON HEAD BOLTS.
3. Remove the bolt securing the diaphragm (See Figure 9).
4. Remove the old diaphragm and the washer (See Figures 10 and 11).
5. Install a new diaphragm; then turn the crankshaft to bring the piston to its down-stroke and seat the diaphragm into
the sleeve groove.
6. Install the washer and bolts removed in steps 3 and 4. Reference torque specs on page 13.
7. Rell the crankcase with Hypro oil (part number 2160-0038). Rotate the shaft to distribute the oil, and ll to proper
level.
Fig. 7Fig. 6
Fig. 5
Fig. 8
Fig. 9
Fig. 11
Fig. 10
Form L-1385 (05/14)