
Instructions / Assembly

ENGLISH
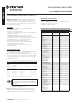
EVERPURE H-Series Water Filtration Systems • 5
DIMENSION Width Height Depth
H-54 5" 15" 5"
H-104 5" 20" 5"
H-300 5" 22" 5"
H-300-HSD 5" 22" 5"
H-300-NXT 5" 22" 5"
NOTE:
The head and cartridge must be mounted in the
vertical position, with the cartridge hanging down.
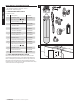
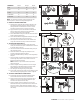
3. MOUNT FILTER HEAD UNDER SINK
A. Identify Filter Head and the two Elbow Fittings, and
note that the Outlet Fitting has a black band. This
tting includes a small restrictor insert to ensure
maximum ow at 0.5 gpm (1.9 Lpm) per minute.
B. Apply Plumbers Tape to the threads of each Elbow
Fitting. Wrap tape in direction of the threads to
ensure a tight t and avoid small leaks.
C. Screw Inlet Elbow Fitting into the left side of the lter
head, and hand tighten only.
D. Screw Outlet Elbow Fitting (black band) into the right
side of the lter head in the same manner.
E. Securely mount the lter head on the cabinet wall
using the enclosed mounting screws and washers.
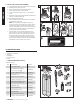
4. ATTACH INLET WATER SUPPLY
F. Locate and close the cold water Angle Stop Valve
under your kitchen sink. Open cold water line of faucet
to release water pressure.
G. Unscrew and disconnect the braided tubing on top of
the Angle Stop Valve.
H. Attach the bottom of Angle Stop Adaptor to the
existing cold water Angle Stop Valve.
I. Attach the braided tubing to the top of the Angle Stop
Adaptor.
J. Close side valve on Angle Stop Adaptor and open cold
water Angle Stop Valve to return water service to
kitchen sink. Check for leaks.
NOTE:
Plumbers Tape should not be required for
these next steps.
K. Measure length of tubing needed to connect Angle
Stop Adaptor to Inlet Elbow Fitting on Filter Head.
Allow adequate tubing to avoid sharp turns.
L. Cut tubing at a 90° angle using a sharp knife.
M. Insert ends of tubing into quick-connect ttings. Push
tube into tting and gently pull to conrm a tight t.
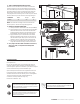
5. ATTACH FILTERED WATER TO SINK FAUCET
N. Install separate faucet for ltered drinking water.
Follow individual manufacturer’s instructions.
O. Attach Faucet Connector Fitting to bottom end of
threads on new faucet assembly. Plumbers Tape
should not be required for this step.
P. Measure length of tubing needed to connect the
Outlet Elbow Fitting on Filter Head to the new Faucet
Connector Fitting. Allow adequate tubing to avoid
sharp turns. Cut and insert each end of the tubing into
the ttings.
3
B
C
D
E
G
H
I
L
M
4
F
P
O
N
5