Installation and Operation Data Installation and Operation Manual Jandy® Slide Backwash Valve H0569400B FOR YOUR SAFETY - This product must be installed and serviced by authorized personnel qualified in pool/spa installation and maintenance. Improper installation and/or operation will void the warranty.
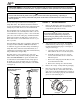
Page 3 FOR YOUR SAFETY: This product must be installed and serviced by authorized personnel qualified in pool/spa installation and maintenance. Improper installation and/or operation will void the warranty. WARNING Ensure that all electrical power to the system is turned off before approaching, inspecting or troubleshooting any leaking valves that may have caused other electrical devices in the surrounding area to get wet. This document gives instructions for installing the Jandy Slide Valve.
Page 4 Alignment Mark CAUTION The Slide Valve has molded labels on each port (see Figure 1). The ports on the SVLV8 are equipped with union connections that match the connections on the filter ports. Do not use pipe sealants on union nuts. To Filter Body (cut away view) To Pool (PORT A) Filter Outlet (PORT C) VersaCoupler p/n 8044 Figure 4. Jandy Versa-Coupler NOTE: For new installations other than Jandy DEL48 or DEL60, use the SVLV2 and the Versa Coupler Kit, p/n 8044 (See Figure 4).
Page 5 NOTE Refer to Figure 5 for Steps 6 and 7. 6. Handle Pulled Up (DE Filters) Plumb the Slide Valve outlet labeled PORT A to the heater or pool return lines. (Sand Filters) Plumb the Slide Valve outlet labeled PORT E to the heater or pool return lines. 7. To Waste (PORT A) (DE Filters) Plumb the Slide Valve outlet labeled PORT E to the waste line as needed. Filter Inlet (PORT C) (Sand Filters) Plumb the Slide Valve outlet labeled PORT A to the waste line as needed. 8.
Page 6 Section 4. 1. Backwash Mode Section 5. Turn off the system pump(s). WARNING To prevent equipment damage and possible injury, the pump must be turned off and the pressure relief valve on top of the filter must be opened. Wait for all air to evacuate the system Servicing WARNING To prevent equipment damage and possible injury, the pump must be turned off and the pressure relief valve on top of the filter must be opened. Wait for all air to evacuate the system 1. Turn off the system pump(s).
Page 7 Shaft Assembly Lid Union Nut Index Plate/Lid 10. Return the Slide Valve handle to the normal operating position (see Section 3). 11. Turn on system pump(s) and check for normal water flow. Section 6. Winterizing Lid O-ring Shaft O-ring, Top (Black) CAUTION If not properly winterized, damage to the Slide Valve will occur, which will increase the potential of injury. 1. Turn off the system pump(s). 2. Release all pressure from the system at the main filter. 3.
Page 8 Section 6. Jandy Slide Valve Exploded View and Replacement Parts List Key No.
Page 9 NOTES
Page 10 NOTES
LIMITED WARRANTY Thank you for purchasing Jandy® pool and spa products. Waterpik Technologies (manufacturer of Jandy products, including Laars® pool and spa heaters, Air Energy Heat Pumps, and Clormatic Electronic Chlorine Generators) warrants all parts to be free from manufacturing defects in materials and workmanship for a period of one year from the date of retail purchase, with the following exceptions: • AquaLink® RS units installed with Jandy Surge Protection Kits will be covered for two years.