DF400K D Zusatz Funk-Überwachungskamera Bedienungsanleitung Seite 2 F Caméra de vidéosurveillance sans fil additionelle Mode d'emploi page 6 NL Extra draadloze bewakingscamera Gebruiksanwijzingen page 9 GB Additional Wireless Observation Camera Operating instructions page 12 I Telecamera di videosorveglianza via radio addizione Instruzioni per funzionamento page 15
D Bedienungsanleitung 1. Einleitung Bitte lesen Sie diese Bedienungsanleitung vollständig und sorgfältig durch. Die Bedienungsanleitung gehört zu diesem Produkt und enthält wichtige Hinweise zur Inbetriebnahme und Handhabung. Lesen Sie auch die Bedienungsanleitung des Grundsets. Beachten Sie immer alle Sicherheitshinweise. Sollten Sie Fragen haben oder unsicher in Bezug auf die Handhabung der Geräte sein, dann holen Sie den Rat eines Fachmannes ein.
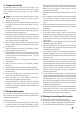
A 1 2 3 4 56 7 8 9 10 11 12 13 14 15 B 16 3 - D 17 18 2016/12/01
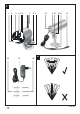
5. Ausstattung (s. Abb. A) 1 2 3 4 5 6 7 8 9 Bewegungssensor Power-LED Infrarot-LEDs Dämmerungssensor Objektiv Verbindungs-LED Antenne Halterung Feststellschraube 10 11 12 13 14 15 16 17 18 Antennenbuchse Buchse für Halterung Mikrofon Dreiecksmutter Pairing-Taste Netzgerät-Anschluss Dübel Netzgerät Schrauben 6. Sicherheitshinweise Die folgenden Hinweise dienen Ihrer Sicherheit und Zufriedenheit beim Betrieb des Gerätes.
Entfernung zu: Mikrowellenherden, Funktelefonen, Handys, Funk-Geräten im 2,4 GHz Bereich, elektrischen Motoren und Starkstromleitungen. 8. Montage und Anschluss der Kamera Die Kamera kann an der Wand oder an der Decke montiert werden bzw. aufgestellt werden. ! Für die Wand- oder Deckenmontage befestigen Sie die Halterung [8] mit den mitgelieferten Schrauben [18] und ggf. Dübeln [16] an einer geeignete Stelle. ! Drehen Sie das Gewinde der Halterung in das entsprechende Gewinde [11] am Kameragehäuse.
Mode d'emploi F 1. Introduction Veuillez lire intégralement et attentivement cette notice d'utilisation. Cette notice d'utilisation fait partie intégrante de ce produit et contient des informations importantes concernant la mise en service et la manipulation. Veuillez lire aussi le mode d'emploi d'ensemble de base. Respectez toujours les consignes de sécurité.
6. Consignes de sécurité Les informations suivantes ont pour but d'assurer votre sécurité et votre satisfaction lorsque vous utilisez l'interphone. Attention: si vous ne respectez pas ces consignes de sécurité, vous vous exposez à un risque considérable d'accident.
! Ajustez la caméra et tournez la vis de réglage latérale sur le support des écrous triangulaires [13] et de la vis d'ajustage [9]. ! Tournez l'antenne [7] sur la prise femelle d'antenne [10]. ! Tournez l'antenne avec précaution de sorte qu'elle est à la verticale vers le haut. ! Branchez la fiche mâle de petite tension de l'adaptateur [17] sur la prise de tension de service [15] de la caméra. ! Branchez l'adaptateur de secteur sur une prise électrique qui convient. ! La DEL POWER [2] s'allume en rouge. 9.
NL Gebruiksaanwijzing 1. Inleiding Lees deze gebruiksaanwijzing s.v.p. volledig en zorgvuldig door. De gebruiksaanwijzing behoort bij dit product en bevat belangrijke aanwijzingen voor de ingebruikneming en het gebruik. Lees ook het gebruiksaanwijzing van de basis set. Let steeds op alle veiligheidsaanwijzingen. Als u vragen hebt of onzeker bent over het gebruik van de apparaten, vraag dan advies aan een deskundige. Bewaar deze gebruiksaanwijzing zorgvuldig en geef die indien nodig door aan derden. 2.
17 Nettransformator 18 Schroef 6. Veiligheidsaanwijzingen De volgende aanwijzingen dienen uw veiligheid en tevredenheid bij het gebruik van het apparaat. Let erop dat het veronachtzamen van deze veiligheidsaanwijzingen tot aanzienlijke ongevalrisico's kan leiden. ! ! ! ! ! ! ! ! ! ! ! ! ! Gevaar! Bij veronachtzaming van deze aanwijzing bestaat er gevaar voor leven en gezondheid.
8. Montage en aansluiting van de camera Bij aflevering is de camera geschikt voor montage aan de muur en aan plafond. ! Voor muur- en plafondmontage bevestig de houder [8] van de camera m.b.v. de meegeleverde schroeven [18] en pluggen [16]. ! Draai de statiefdraad van de houder in de draad [11]. ! Richt de camera en draai de zijdelingse vastzetschroef aan de houder van de driehoekmoer [13] en de vastzetschroef [9] vast. ! Draai de antenne [7] naar de antennebus [10]. ! Draai de antenne s.v.p.
GB Operating instructions restricted physical, sensory or mental capacities, or a lack of experience and/or knowledge, unless they are supervised by, or receive instructions how to use the appliance from a person responsible for their safety. 1. Introduction Read through these operating instructions fully and carefully. The operating instructions belong to this product and contain important points concerning bringing the appliance into service and ist operation.
6. Safety instructions The following instructions are provided for your safety and satisfaction during operation of the device. Note that non-observance of these safety instructions results in significant risks of accident. Danger! If this point is not heeded life and health is endangered. ! Do not leave small children unsupervised with the device, packaging material or small parts. Otherwise there is a risk of fatal injury due to choking or suffocation.
9. Connection pairing The additional camera and the smart recorder DF400R must be paired with each other to establish the wireless connection. The cameras delivered in the DF400 Set are already paired with the smart recorder on channel 1 and 2. In order to connect an additional camera to the smart recorder (maximum 2 additional cameras) proceed as follows: ! Select “Pairing” ([49] - Camera Settings) using the direction buttons. ! Tap the camera channel number to which a new camera should be paired.
I Manuale di istruzioni 1. Introduzione seguite da una persona responsabile della loro sicurezza o non ricevano da essa indicazioni su come utilizzare l'apparecchio. I bambini devono essere controllati onde evitare che giochino con l'utensile. Leggere attentamente e completamente il presente manuale di istruzioni. Il manuale delle istruzioni fa parte di questo prodotto e contiene indicazioni importanti per la messa in funzione e la manipolazione.
6. Avvertenze di sicurezza 7. Posizionamento della telecamera Le seguenti istruzioni servono per la sicurezza e la soddisfazione dell'utente nell'utilizzo dell'apparecchio. Ricordare sempre che l'inosservanza delle istruzioni comporta pericoli di gravi incidenti. Prima di montare la telecamera, studiare il luogo di montaggio. Provare se in questo luogo la telecamera funziona correttamente e controllare la trasmissione radio.
8. Montaggio e collegamento della telecamera La telecamera è adatta al montaggio a parete oppure su un soffitta. ! Per il montaggio a parete o su soffitto fissi il supporto [8] della telecamera con l'aiuto delle viti fornite [18] e dei tasselli [16] sul posto desiderato. ! Avvitare la filettatura del sostegno [11] nel supporto. ! Orientare la telecamera e avvitare la vite di fissaggio laterale sul supporto del dado triangolare [13] e la vite di bloccaggio [9]. ! Avvitare l'antenna [7] sulla boccola [10].
Legal Notices This product or software may contain or make use of code under the GNU General Public License v2 e.g. the linux kernel, the GNU Lesser General Public License v2.1 or the Apache licence v2.0. For further information regarding license terms and – where required by license – source codes please send an email to copyrequest@indexa.de to get them free of charge. Some licenses, however, require the provision of physical copies of the source code.
Software Foundation. If the Program does not specify a version number of this License, you may choose any version ever published by the Free Software Foundation. 10. If you wish to incorporate parts of the Program into other free programs whose distribution conditions are different, write to the author to ask for permission. For software which is copyrighted by the Free Software Foundation, write to the Free Software Foundation; we sometimes make exceptions for this.
source code from the same place satisfies the requirement to distribute the source code, even though third parties are not compelled to copy the source along with the object code. 5. A program that contains no derivative of any portion of the Library, but is designed to work with the Library by being compiled or linked with it, is called a "work that uses the Library". Such a work, in isolation, is not a derivative work of the Library, and therefore falls outside the scope of this License.
the Work and Derivative Works thereof. "Contribution" shall mean any work of authorship, including the original version of the Work and any modifications or additions to that Work or Derivative Works thereof, that is intentionally submitted to Licensor for inclusion in the Work by the copyright owner or by an individual or Legal Entity authorized to submit on behalf of the copyright owner.