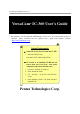
VersaCam IC-360 Manual Version 1.4 VersaCam® IC-360 User’s Guide * This manual is for VersaCam IC-360 Firmware version 1.2.1. If you have later version of firmware, please download the last updated user’s guide from Pentax’s website (http://www.pentaxtech.com).
©2002 Pentax Technologies Corporation. All Rights Reserved. Specifications subject to change without notice. P/N 205255-551 Printed in USA. Pentax is a registered trademark of Asahi Optical Co., Ltd. VersaCam is a registered trademark of the Asahi Optical Co., Ltd. Windows is a registered trademark of the Microsoft Corporation. Netscape is a registered trademark of the Netscape Corporation. Internet Explorer is a trademark of the Microsoft Corporation.
FCC Compliance Statement Caution: Any changes or modifications not expressly approved by the Pentax could void the user’s authority to operate this equipment. Note: This equipment has been tested and found to comply with the limits for a Class A digital device, pursuant to part 15 of the FCC Rules. These limits are designed to provide reasonable protection against harmful interference when the equipment is operated in a commercial environmental.
Important Notice 1. The VersaCam IC-360 is for indoor use. Note that the CCD (charged coupled device) inside the product can be damaged permanently if the camera lens is exposed to direct sunlight. If your application demands prolonged exposure to sunlight, you should consider equipping it with a sun visor. 2. The VersaCam IC-360 is not weatherproof. You should consider the environmental specifications that are included in this manual.
CONTENTS I. Introduction .......................................................................................................................... 1 II. Product Descriptions............................................................................................................ 3 A. Camera Kit Contents..............................................................................................................3 B. VersaCam IC-360 Overview and Description..................................................
Appendix 2 - Frequently Asked Questions .............................................................................. 41 1. Frequently Asked Questions................................................................................................ 41 1.1. VersaCam IC Series Features .....................................................................................41 1.2. VersaCam IC Series Installation .................................................................................43 1.3.
I. Introduction • What is a VersaCam IC-360? The VersaCam IC cameras are Internet-based digital network cameras, which provide high-resolution imaging and use image compression via a network. They connect directly to an Ethernet network and provide live motion color pictures over the Internet or individual frames by E-mail or FTP.
User’s Programmable Space – VersaCam IC Series cameras contain user-programmable and user-configurable spaces that are about 6MB out of 8MB total Flash Memory. This means you can create your own web server, with your own homepage using your VersaCam. Embedded Linux Operating System – VersaCam IC Series adopts cutting-edge technologies of digital image processing & networking.
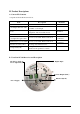
II. Product Descriptions A. Camera Kit Contents * Unpack and check all the items below. Item VersaCam IC-360 AC Adapter & Power cable Lens Manual Ethernet standard (straight-through) Cable Description Remarks Web Camera Server 100-250VAC, 0.5A, 50/60 Hz 12VDC, 3.5A Output Optical 16x: 3.9mm ~ 62.
Connector Name Description Remarks BNC connector Output internal video signal through a coaxial cable. Power connector To supply power from the provided power supply unit (12VDC, 1.5A) RS-232 Connector To connect external devices such as a device for audio transmission. Digital Input Terminal To connect external sensors. RJ-45 Ethernet port To connect 10 Base-T Ethernet cable. C.
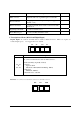
D. Description of LEDs Data LED: This LED indicates the status of data transmission. After power is supplied, it is on for the first 4-5 seconds and then it goes off. It blinks continuously when a user accesses the VersaCam and is transmitting data. Network Status LED: This LED indicates the status of the network. After power is supplied, it is on for the first 1-2 seconds, and then it blinks every two seconds as long as the network is connected. Malfunction Indications 1.
III. VersaCam IC Series Installation Summary, Connection, & Placement Summary • • • • • • • Connect an Ethernet cable between the VersaCam IC-360 Ethernet Port and your local network. Connect the Power Supply to your VersaCam IC-360. Status LED blinks Confirm that the Network Install the setup program for the VersaCam IC-360 on a PC on your local network. Assign an IP address to the VersaCam IC-360 and configure the administrator’s data. Configure the users’ data.
IV. Assigning IP Address and Configuring the Administrator’s Data * Important * To access a VersaCam, you first have to assign an appropriate IP address. When you assign an IP address to a VersaCam, make sure to use an unassigned IP address – do not use the default or example IP address. Terminology IP Address An IP address is an identification code for computers and devices on a TCP/IP network. Networks using TCP/IP protocol route messages based upon the IP address of the destination.
A. Connecting a VersaCam IC Series to a PC 1) Connecting a VersaCam IC-360 to the Internet or a LAN. • You may use a standard Ethernet cable (white colored connectors) to connect a VersaCam IC-360 to the Internet or a LAN. With this connection, a remote user may not access a VersaCam IC-360 before the local user configures their network settings. 2) Connecting a VersaCam IC Series to a PC. • You may use a crossover cable (red colored connectors) to directly connect a VersaCam to a PC.
IP Address Assigning Methods • With the setup program - Assemble and place the VersaCam. - Assign an IP address to the VersaCam using the setup program on a local network. - If it is impossible to assign an IP address with the setup program, try assigning it with the DOS ARP command. • With an ARP command - Assemble and place the VersaCam. - Assign an IP address using the DOS ARP command on a local network.
B. Assigning an IP address and configuring administrator’s data with the setup program 1) Starting the VersaCam IC Series Setup Program Click the file ‘Setup.exe’ on your PC. When the setup program is executed, the setup program detects and shows every VersaCam IC Series connected to the local network. Among the VersaCams, choose the one to which you want to assign a new IP address. (The default address in the figure is 211.53.133.223). To choose a VersaCam, click on its MAC address or IP address.
C. Assigning an IP Address with the ARP Command 1) Using ARP in Windows When the PC’s operating system is Windows 98, 2000, Me, XP, or NT, follow the steps below. • Open a DOS window and type the following commands. Arp -s Ping • Example Arp -s 192.168.1.3 Ping 192.168.1.3 00-40-8c-10-00-86 2) Using ARP in Windows 95 When the PC’s operating system is Windows 95, follow these steps.
Data loss number may be from 0% to 99%. This is a normal reply. If the statistic shows ‘100% loss’, you should check to see if the network lines and connection status are stable, if the IP address which is assigned to VersaCam is available, and whether the PC you are using has the same local network’s IP address as the VersaCam. The same local IP address on a “C” grade network means that the first 3 sets of numbers are same but the fourth is different. For example, 192.168.1.2 and 192.168.1.
V. Accessing a VersaCam IC Series Homepage & Monitoring Real-Time Images After assigning the VersaCam an IP address, you can configure the VersaCam from within its own web pages by using any standard Web browser on a local or remote network. A. Starting a Web Browser Start your web browser by entering your VersaCam’s IP address. Then you can see the built-in homepage of the VersaCam. • Example http://200.243.232.178/ VersaCam IC Series simultaneously supports up to 100 users.
3) VersaCam IC Series Plug-in for Netscape Users To see the VersaCam image using a Netscape browser, the user should first install the VersaCam Plug-in by clicking the VersaCam Plug-in menu. When you connect the VersaCam for the first time or you have an old Plug-in version, you will have to download the current Plug-in by clicking ‘Download VersaCam Plug In Now!’ You then click the ‘Grant’ and ‘Install’ buttons respectively.
C. Viewing With The VersaCam IC-360 There are 3 real-time viewers available on the VersaCam homepage: the “Default Viewer”, the “720×468 Viewer” and the “Server Push Viewer.” An administrator may set any viewer as a first user interface. A connected user may monitor real-time images through the administrator-selected main viewer or select another.
is similar to the high-quality area. If you select ‘Level 5’, the image outside of the high-quality area is created at a very low contrast. Focus sensitivity Users may configure the zoom range with one click. The setting is from Level 0 to Level 9. By selecting ‘Level 9’, a user zooms in or out at the maximum range. Image quality Users may select the compression level of the image. If the user chooses ‘Level 9’, VersaCam sends the best quality image.
depends on the network line’s capacity, the user’s PC’s performance, and the number of users viewing the images. (3) Pan/Tilt/Preset Control Pan/Tilt: You can adjust the position of the camera by locating your mouse cursor on the control panel and pressing the left mouse button. The nearer the center of the panel you click, the more slowly the VersaCam IC-360 moves, while the further from the center you click on the panel, the faster the VersaCam moves.
3) Server Push Viewer If the VersaCam IC-360 is installed on a network where a firewall is located and which blocks certain ports, you may still access the camera through the server-push viewer to monitor real-time images. If you have information on the network as to which port is blocked with the firewall, you may access the camera with the default viewer by changing the camera’s http (web) TCP port or video TCP port.
images, click the button again. (2) PTZ mechanism control ‘Preset’ is not supported. Pan and Tilt If you click these buttons, you can move the direction of VersaCam. Zoom You may use these buttons to zoom in and zoom out. Focus You may control the camera manually to optimize the image’s focus. Acceleration Rate You may choose the speed of the Pan/Tilt/Zoom mechanism: fast, normal and slow. (3) Pop-up Menu ‘Image Quality’ control, ‘Quality Box’ creation, and ‘Focus Sensitivity’ controls are not supported.
VI. Configuring Administrator’s Data at Homepage This page allows the VersaCam Administrator to login and configure the camera remotely. This page may also be accessed by keying in the VersaCam’s IP address and clicking the ‘Start Configuration’ button from the Setup program. A. Administrator Login 1) Accessing through the Setup Program First, click on the MAC address to select the desired VersaCam. Then key in its administrator’s password and click the ‘Start Configuration’ button.
B. Configuring Administrator’s Data at the Homepage 1) System Configuration You can set the date & time, name, location, and description on your VersaCam. The model and serial number appear automatically. Date & Time: There are three date & time menus. In the ‘VersaCam Current Date & Time’ panel, the current date and time of the VersaCam’s clock is displayed. In ‘System (PC) Current Date & Time’ panel, the date and time of the clock in the administrator’s PC is displayed.
2) User Configuration IDs and passwords can be established for an administrator and up to 5 classes of users. If you want to open your VersaCam to everyone, leave the default as “guest.” However, you should change the administrator’s ID and password to unique ones. It is very important to compose any ID or password with no more than 9 letters and numbers. Note: Both are case sensitive.
3) Network Configuration This page defines network types and how to set network addresses for a VersaCam. (1) Network Configuration DHCP Client Protocol: DHCP (Dynamic Host Configuration Protocol) establishes IP addresses for network devices automatically. With this protocol, a device obtains its address from the network’s DHCP server from a pool of addresses held on that server. This occurs when the device is turned on, and for some networks, at other times as well.
(2) Ethernet Interface: An administrator may configure the IP address, subnet mask, broadcast address, gateway address, and DNS addresses of a VersaCam. The administrator may set the broadcast address automatically by clicking the ‘Get From Netmask’ button after assigning an IP address and subnet mask. An administrator may also, depending on the network type, set the data packet size with ‘Select MTU Size’ to utilize the network more effectively.
4) Security Configuration This page allows you to control accessibility to the VersaCam with IP addresses. If ‘IP/Subnet Filtering Mode’ is enabled, access can be granted or denied to users based upon their IP addresses. By specifying unique addresses (e.g., 204.131.189.217), access from those addresses may be controlled. If a user’s IP address is not included specifically to “allow” access, even a correct user name and password will be insufficient to gain access.
5) Video Configuration This page allows configuration of every channel with various conditions. (1) Video Channel State Control The administrator decides whether to utilize the video signal from a particular video channel of the VersaCam. For the IC-360 model, there is only a single video channel available, so this button serves only to enable or shut down this channel. (2) Camera Color Type This button is used to define whether the camera internal to the IC-360 is a color or black & white camera.
Black and White selection sets, respectively, black print on a white background, or white print on a black background. If “Time Information” is enabled, the currently stored VersaCam date and time (to within 1/100 second) are transmitted with each image in the form MM/DD/YY HH:MM:SS:ss. If “Channel Information” is enabled, the date/time stamp will be preceded by “CH#n” where ‘n’ is the currently selected video channel. For the IC-360 model, there is only one video channel available, so this has no real use.
6) Application Configuration This page allows configuration of the E-mail and FTP functions. (1) Recipient E-mail Address This page allows you to designate a person to receive E-mail with the images attached. (2) Sender’s E-mail Address This page allows you to enter the E-mail address of the sender. The E-mail sender’s address is nothing more than a reference as to the identity of the sender, or the administrator, since the camera cannot receive E-mail in return.
year). Note that any or none of these event types can be specified. If none are specified, no E-mail messages will be sent by the camera. When more than one event type is specified, E-mail will be sent whenever any of the selected events occurs. File name: If E-mail event handling is enabled as noted above, the administrator must decide how to name the resulting image files. There are three naming conventions that may be employed. The ‘DATETIME’ method creates files in the format: IMG-CHnn-yyyyddd-hhmmss.
(5) FTP Configuration FTP Directory Configuration: In order to make use of the FTP transmission method, the administrator must define the FTP server address, FTP user account name, the FTP user password, and the FTP file path. The ‘FTP server address’ is the address of the target FTP server that will hold the transferred images. This needs to be an IP address in the form xxx.xxx.xxx.xxx.
7) Pan/Tilt/Zoom Configuration The IC-360 has various special functions including 64 PTZ Presets, auto-pan between two different monitoring areas, or group mode swing between eight different positions. Using these functions, users can obtain the effect of a multi-camera system with only one VersaCam installation. To use the VersaCam efficiently, users should have a good understanding of these functions.
New Preset: Users can select up to 64 preset points whereby one click will send the camera to the predefined position. First, move the camera to the desired preset location. Then, click “New Preset” button. The preset configuration pop-up window will be activated. In this window, select the number that you wish to assign to this preset position, or change the existing preset, and type the nickname you prefer for this point.
Mode: The Main purpose of this menu is to utilize the above preset and grouping functions. When you click the “Mode” button, the “Mode Setting Dialog” will be activated. Mode Selection - Normal Mode: When a user is using PTZ control, another user would normally wait indefinitely until the first user relinquished control. To prevent this, the administrator can select the “Give/Take Mode Enable” and set the time limit for control by each user by checking the left checkbox.
8) Serial Port Configuration The VersaCam IC-360 has an RS232C interface port for an audio device. Note: As of the date of printing of this manual, this audio device was not available. when it is available, the following instructions will apply. The VersaCam IC-360 supports a specialized Audio Device for the VersaCam series called “Sound Messenger.” This is physically connected to the Audio Device port and enabled using this menu.
9) Digital I/O Configuration This feature allows users to control the effect of the state of any sensors that may be attached to the VersaCam. The camera may then be programmed (See Application Configuration and Alarm Configuration) to send E-mails and/or to transfer files by FTP in response to these external triggers. Device Type for Input Port 1 and Port 2: The administrator may define the active state of two optional input devices connected to two camera input ports.
10) Alarm Configuration This feature allows the administrator to set parameters that affect the manner in which the triggers (both internal and external) will cause the VersaCam to respond. Motion Detection Threshold: This value is used to set the threshold for the motion detection function. During operation with this feature enabled (See Application Configuration) changes in the video image are perceived by the camera as motion and cause E-mail or FTP files to be sent.
11) Custom Configuration Web Server TCP Port: The TCP ports used by a VersaCam IC-360 are assignable by the administrator. It is through this “Web Server” port that users can access a VersaCam IC-360 and through which the camera will send its web page and configuration data. Normally, the 80 port is assigned by the network administrator as a Web Server TCP port like other ordinary Web Servers on a network.
- Background Color and Foreground Color: The background and foreground colors of the default viewer cannot be changed with this revision of software. 12) Goto Viewer Page Users can return to the “Default Viewer Page” by clicking on this menu item. * Caution: To save the changes, you have to click the ‘Apply’ button on every page.
Appendix 1 Appendix 1 - Detailed Specifications of VersaCam IC-360 1. General CPU Flash memory RAM OS Video Channel Image Resolution Control Image Compression Compression Rate Transfer Rate Decoding Rate Compression rate Security Alarms and I/O Misc. functions Power Supply Sensor input 32bit RISC Embedded processor 8Mbyte 16Mbyte Embedded Linux NTSC or PAL video formats are supported 1 Channel of External Video Output 720x486, 720x243, 360x243, 180x121, 90x60 pixels Wavelet 10:1 ~200:1 Max 120 fps ([4.
3. Lens Specification Focal Length Digital Zoom Max. Relative Aperture Min. Focus Distance Min. Illumination F3.9mm to 62.4mm 16x Optical Lens 8x (Total 128x possible) Wide 1:1.4, Tele 1:2.7 40” (1,000 mm) (Tele End) 3.0/0.5 Lux (Slow Shutter Mode) 4. Pan/Tilt Specification Pan Rotation Pan Speed Manual Preset Tilt Rotation Tilt Speed Manual Preset Preset Positions 360º continuous 0.8 to 120 /sec. (adjustable in 64 steps) 0.8 to 240 /sec. (adjustable in 64 steps) 0 to 90º 0.8 to 120 /sec.
Appendix 2 Appendix 2 - Frequently Asked Questions This is the FAQ document for VersaCam IC Series products. This document provides answers to questions that often arise in the process of installing and operating the VersaCam Internet camera. Table of Contents 1. Frequently Asked Questions 1.1. VersaCam Features 1.2. VersaCam Installation 1.3. Control and Utility Programs 1.4. Inserting Images into HTML Pages 1. Frequently Asked Questions 1.1.
Active-X controls of only 300KB, requiring a much shorter download time, especially over a dial-up connection. • Q: Can VersaCam IC Series support multiple users with different resolutions at the same time? A: The VersaCam IC Series can support up to 100 users with different resolutions at the same time. Moreover, VersaCam has progressive mode (image quality builds slowly over time) and gray mode.
• Q: Does the VersaCam IC Series support Pan/Tilt/Zoom functions? A: The VersaCam IC-360 model, being a dome camera, has its own pan/tilt/zoom mechanism. The other cameras in the VersaCam IC Series family support stand-alone pan/tilt/zoom mechanisms that respond to ASCII motion commands over an RS-232 or RS-485 serial connection using the DB-15 connector on the rear of the camera.
A: If the VersaCam IC Series is to be used as a Web server, it cannot be assigned a private IP address unless it will be viewed only from within the virtual private network, or pointed to as a server by the network's router. Private addresses cannot be directly "seen" from the outside world. A virtual private network that presents a single static IP address is normally equipped with such a router and is comprised of a local network with various private IP addresses.
Access VersaCam using Netscape by addressing the assigned IP address (e.g., 1. camera's http://168.192.1.1/) 2. Set up the VersaCam Plug-in using the Netscape Smart Update The VersaCam plug-in for Netscape is stored and downloaded from the VersaCam itself. Accessing the camera, Netscape can download and install the plug-in quickly and easily.
• Q: The viewer loads correctly, and no message occurs indicating that a problem has occurred, but no video is visible for the VersaCam's own built-in CCD camera. What could the problem be? o A: (For VersaCam IC-4 and IC-R20 models with external camera input) Since no error or "loading" message is visible, it is likely that the video from the VersaCam's internal CCD module is not being transmitted, but rather, that of an unused external video input.
at all. If you encounter this condition, check if the BNC cable is defective or improperly connected. Often, the user will neglect to fully twist the BNC connector after installation to lock it into place. • Q: Which pan/tilt/zoom mechanisms can be installed with the VersaCam? A: While the IC-360 contains its own pan/tilt/zoom mechanism, the other members of the VersaCam IC Series family also have the ability to control external pan/tilt/zoom devices on-line.
address to the camera). If your PC or notebook has a "non-local" IP address (any of the first 3 sets of digits are different) compared to an IP address that you are attempting to assign to VersaCam, you will be unsuccessful. For example 204.131.189.213 and 204.131.189.214 are part of the same local Class C network. Addresses 203.131.189.213 and 204.131.189.214 are not.
1. 2. • The problem is that the user's PC does not contain the Winsock2 library. Download the Winsock2 library, which is available on numerous public sites. Install it into your system, and then rerun your web browser. Q: I can't see the images in the VersaCam Java Applet view page. I am using the Netscape browser on a Macintosh computer. A: You need to install MRJ (Macintosh Runtime for Java) and MRJ Plugin for your Netscape browser. Please take the following steps for installing them: 1. 2.
• Q: I can't run the setup program delivered with my VersaCam IC Series. A: The setup program is an MFC-based windows program. So, if MFC42.DLL is not installed or an incompatible version is installed in your computer, the setup program may fail to start. If the program shows a message like "...MFC42.DLL...not found...", you must install MFC42.DLL. The installation procedure is the following: 1. Download MFC42.CAB from www.versacam.com 2. Unzip the .cab file into your temporary folder. 3.
|