
User's Manual


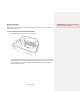
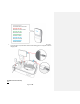
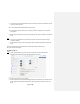

Table Of Contents
- All-In-One Headset with Software Application
- Headset Controller
- Large Sensor
- Small Sensors
- Sensor Charger (charging station)
- REAL Sensor Bands
- Headset
- Plug the headset power cord into wall outlet and the headset to charge device.
- Press power button to power on or off headset. The power button is on top of the headset.
- Headset Controller
- • Buttons on the controller are used to access settings.
- Sensor Charger
- Plug sensor charger power cord into wall outlet and sensor charger to power on device to charge sensors.
- Large Sensor and Small Sensors
- • Activate or charge sensor devices by removing or placing back into the sensor charging station.
- Place sensor devices into the sensor bands.
- Sensor Bands
- See Section 3 in Operating Procedures on instructions to put on sensor bands.
- User Portals
- Access the User Portal through the Headset to perform the following:
- o Logging in
- o Selecting the activity
- o Initializing and syncing to sensors
- o Starting, modifying, or ending therapy session
- o Viewing data
- o Logging out
- o Selecting the application
- o Logging in
- o Adding or selecting patient
- o Initializing and syncing to sensors
- o Selecting, starting, modifying, or ending therapy session
- o Viewing data
- o Logging out
- SECTION 1: GETTING STARTED AND CHARGING COMPONENTS
- SECTION 3: START UP
- USER:
- 1. Using a personal device, log into the user portal using your username and password.
- 2. Select the activity assigned by your therapist within the user portal
- Section 4: ACTIVITY NAVIGATION
- Section 5: SYSTEM REMOVAL

Page 10 of 29
4. Once sensors are placed in the bands, put each band onto its corresponding body part (see
image below). Connect hook and loop fasteners of the torso band if desired. Adjust bands for
comfortable fit, if necessary.
5. Be in a seated position away from metal components and remain seated at all times for the
duration of the therapy session.
6. Initiate the session by pressing “Start Session”.
7. Put on the headset per in the sequence numbered below and begin visually interacting with the
environment.