
User's Manual


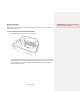
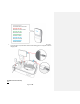
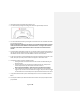
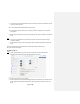

Table Of Contents
- All-In-One Headset with Software Application
- Headset Controller
- Large Sensor
- Small Sensors
- Sensor Charger (charging station)
- REAL Sensor Bands
- Headset
- Plug the headset power cord into wall outlet and the headset to charge device.
- Press power button to power on or off headset. The power button is on top of the headset.
- Headset Controller
- • Buttons on the controller are used to access settings.
- Sensor Charger
- Plug sensor charger power cord into wall outlet and sensor charger to power on device to charge sensors.
- Large Sensor and Small Sensors
- • Activate or charge sensor devices by removing or placing back into the sensor charging station.
- Place sensor devices into the sensor bands.
- Sensor Bands
- See Section 3 in Operating Procedures on instructions to put on sensor bands.
- User Portals
- Access the User Portal through the Headset to perform the following:
- o Logging in
- o Selecting the activity
- o Initializing and syncing to sensors
- o Starting, modifying, or ending therapy session
- o Viewing data
- o Logging out
- o Selecting the application
- o Logging in
- o Adding or selecting patient
- o Initializing and syncing to sensors
- o Selecting, starting, modifying, or ending therapy session
- o Viewing data
- o Logging out
- SECTION 1: GETTING STARTED AND CHARGING COMPONENTS
- SECTION 3: START UP
- USER:
- 1. Using a personal device, log into the user portal using your username and password.
- 2. Select the activity assigned by your therapist within the user portal
- Section 4: ACTIVITY NAVIGATION
- Section 5: SYSTEM REMOVAL

Page 3 of 29
Large Sensor and Small Sensors
• Activate or charge sensor devices by removing or placing back into the sensor charging
station.
• Place sensor devices into the sensor bands.
Sensor Bands
• See Section 3 in Operating Procedures on instructions to put on sensor bands.
User Portals
• Access the User Portal through the Headset to perform the following:
o Logging in
o Selecting the activity
o Initializing and syncing to sensors
o Starting, modifying, or ending therapy session
o Viewing data
o Logging out
• HCP Portal
o Selecting the application
o Logging in
o Adding or selecting patient
o Initializing and syncing to sensors
o Selecting, starting, modifying, or ending therapy session
o Viewing data
o Logging out
There is no preventive inspection, calibration, and maintenance necessary for the REAL System 2 besides
the initial set up procedure. During the three-year product lifespan of the REAL System 2, the device will
continue to perform safely without any routine maintenance. No parts within the REAL System 2 will
require inspection nor maintenance by a service personnel to ensure basic safety during the three-year
product lifespan. Circuit diagrams and calibration instructions are not provided because service in parts
repair is not necessary.
If the system no longer stays powered on and connected through the entire recommended duration of a
therapy session, dispose of the device through an environmentally safe electronic waste recycle system.
If the sensor bands no longer adequately hold the sensors nor stay strapped to your body, dispose of the
sensor bands and reorder through the REAL website.
Supply mains are electrically isolated in medical equipment to maintain basic safety.