
User's Manual


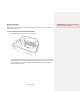
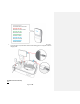
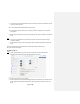

Table Of Contents
- All-In-One Headset with Software Application
- Headset Controller
- Large Sensor
- Small Sensors
- Sensor Charger (charging station)
- REAL Sensor Bands
- Headset
- Plug the headset power cord into wall outlet and the headset to charge device.
- Press power button to power on or off headset. The power button is on top of the headset.
- Headset Controller
- • Buttons on the controller are used to access settings.
- Sensor Charger
- Plug sensor charger power cord into wall outlet and sensor charger to power on device to charge sensors.
- Large Sensor and Small Sensors
- • Activate or charge sensor devices by removing or placing back into the sensor charging station.
- Place sensor devices into the sensor bands.
- Sensor Bands
- See Section 3 in Operating Procedures on instructions to put on sensor bands.
- User Portals
- Access the User Portal through the Headset to perform the following:
- o Logging in
- o Selecting the activity
- o Initializing and syncing to sensors
- o Starting, modifying, or ending therapy session
- o Viewing data
- o Logging out
- o Selecting the application
- o Logging in
- o Adding or selecting patient
- o Initializing and syncing to sensors
- o Selecting, starting, modifying, or ending therapy session
- o Viewing data
- o Logging out
- SECTION 1: GETTING STARTED AND CHARGING COMPONENTS
- SECTION 3: START UP
- USER:
- 1. Using a personal device, log into the user portal using your username and password.
- 2. Select the activity assigned by your therapist within the user portal
- Section 4: ACTIVITY NAVIGATION
- Section 5: SYSTEM REMOVAL

Page 6 of 29
OPERATING PROCEDURE
Note: These rehabilitation exercises are intended to be conducted in a seated position. Be seated at all
times when the system is in use.
SECTION 1: GETTING STARTED AND CHARGING COMPONENTS
1. Remove REAL System 2 components from the product box.
2. Connect sensor charger base to its power cable supplied in the Accessories box. The wire will go
through the grommet hole supplied in the box. Plug into a wall outlet. Ensure sensors with white
sides facing forward are in their corresponding size slots on the sensor charger. LED lights on
sensors will show the following.
Commented [PG1]:
Images in this section will be changed
to reflect REAL2 (Xavier 2) configuration.