
User's Manual


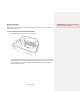
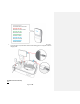
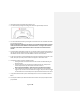
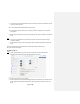

Table Of Contents
- All-In-One Headset with Software Application
- Headset Controller
- Large Sensor
- Small Sensors
- Sensor Charger (charging station)
- REAL Sensor Bands
- Headset
- Plug the headset power cord into wall outlet and the headset to charge device.
- Press power button to power on or off headset. The power button is on top of the headset.
- Headset Controller
- • Buttons on the controller are used to access settings.
- Sensor Charger
- Plug sensor charger power cord into wall outlet and sensor charger to power on device to charge sensors.
- Large Sensor and Small Sensors
- • Activate or charge sensor devices by removing or placing back into the sensor charging station.
- Place sensor devices into the sensor bands.
- Sensor Bands
- See Section 3 in Operating Procedures on instructions to put on sensor bands.
- User Portals
- Access the User Portal through the Headset to perform the following:
- o Logging in
- o Selecting the activity
- o Initializing and syncing to sensors
- o Starting, modifying, or ending therapy session
- o Viewing data
- o Logging out
- o Selecting the application
- o Logging in
- o Adding or selecting patient
- o Initializing and syncing to sensors
- o Selecting, starting, modifying, or ending therapy session
- o Viewing data
- o Logging out
- SECTION 1: GETTING STARTED AND CHARGING COMPONENTS
- SECTION 3: START UP
- USER:
- 1. Using a personal device, log into the user portal using your username and password.
- 2. Select the activity assigned by your therapist within the user portal
- Section 4: ACTIVITY NAVIGATION
- Section 5: SYSTEM REMOVAL

Page 8 of 29
1. Unplug power cords from headset when ready for use.
2. Turn on headset by pressing and holding power button for approximately 2 seconds.
3. Turn on the headset controller by pressing the small circular button. The controller will vibrate
once it has been turned on.
Note: If the headset controller does not vibrate, press and hold both the headset controller’s
small circular button and the headset’s Volume Down button – the singular dot on the left
underside of the headset. Hold both buttons down at the same time until the controller
vibrates.
4. Once the headset and headset controller are on, hold the controller’s Volume Down button on
the right side and the headset controller’s trigger at the top of the backside. This will decrease
the headset’s volume as well as switch the headset to the HTC Vive environment.
5. In the Vive environment, an Android Settings (AS) menu will be viewable. If the AS menu is not
visible, slowly turn your body around until the menu appears in the headset viewer.
6. The headset controller is used to navigate the menu.
i. Pressing the small circular button will cause the controller to vibrate and bring the
pointer into view.
ii. Using the controller, point the pointer at the desired menu item, then press the
circular trackpad at the top of the headset controller to select it.
Note: If the pointer disappears, repeat the process until the pointer reappears.
iii. If the trackpad button causes the menu to scroll undesirably, use the controller’s
trigger to open the menu instead. Hold down the trigger, then press and move trigger
to select. Make sure the controller pointer is pointed at the desired text in the menu.
7. Using the headset controller’s pointer and trackpad, select ‘ Wi-Fi’ in the headset’s Android
Menu.
8. Connect your headset to your desired wireless home network. You may be prompted to enter
your password.