PePLink Surf User’s Manual Document Version : 2.6 Firmware Version : 6.0.
PePLink Surf User’s Manual v2.6 Table of Content 1 Copyright 3 2 Disclaimer 3 3 Product Description 4 3.1 Features 4 3.2 Hardware Setup 5 3.3 LED Description 6 4 Using the PePLink Surf 7 4.1 First Time Setup 8 4.2 Settings Details 11 4.3 Advanced Settings: Port Forward 13 4.4 WPA/WPA2 with 802.1x Authentication 14 4.5 Test the Setup 17 4.6 Firmware Upgrade 18 4.7 Debug Page 19 4.8 Restore to Factory Defaults 20 4.
PePLink Surf User’s Manual v2.6 1 Copyright Copyright © 2006 by PePLink Ltd. The content of this documentation may not be reproduced in any part or as a whole without the prior written permission of PePLink Ltd. 2 Disclaimer PePLink does not assume any liability arising out of the application or use of any products, or software described herein. Neither does it convey any license under its patent right nor the patent rights of others.
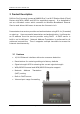
PePLink Surf User’s Manual v2.6 3 Product Description PePLink Surf, formerly known as MANGA Surf, is a Wi-Fi Station Mode (Client) Router with WPA, WPA2 and 802.1x supplicant support. It is designed to act as a Wireless router which connects to Wireless Broadband Internet Service and allows LAN users to access the Internet via it. It associates to a service provider and authenticates using 802.1x (if needed) on start up.
PePLink Surf User’s Manual v2.6 3.2 Hardware Setup 1. Attach the provided antenna to the left most antenna connector 2. Connect the LAN port to the computer’s Ethernet port with an Ethernet cable. 3. Connect the end of the included power adapter to the power socket (labeled “DC 5V”) on PePLink Surf. 4. Power on the power adaptor. Copyright © 1999-2006 PePLink Ltd.
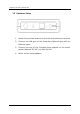
PePLink Surf User’s Manual v2.6 3.
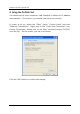
PePLink Surf User’s Manual v2.6 4 Using the PePLink Surf You should set up your computer’s LAN interface to obtain an IP address automatically. If you do so, you should have set it up correctly. In order to do so, select the “Start” menu, “Control Panel” and then “Network Connections”. Right click on the “Local Area Connection” icon, choose “Properties”, double click on the item “Internet Protocol (TCP/IP)” from the list. On the screen, just set it as follows: Click the “OK” button to confirm the change.
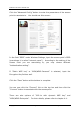
PePLink Surf User’s Manual v2.6 4.1 First Time Setup On your PC, start a web browser, e.g. Internet Explorer, Mozilla Firefox, etc. Visit an Internet web site. If you are not associated to an access point, you should be redirected to a logon page. Or you can go also go to this URL http://192.168.20.1/ The page will look like this. Once it is associated to an access point, you can also access the page from this URL: https://wan.ip.addr.here:8000/ Login ID and password are “admin” and “MSurf000”.
PePLink Surf User’s Manual v2.6 Click the “Advanced Config” button to enter the parameters of the access point to associate to. You should see this screen: In the field “SSID” under Wireless Settings, input the access point’s SSID (sometimes it is called “network name”). According to the setting of the Access Point you are associating to, you may choose different “Authentication setting”. If “Static WEP key” or “WPA/WPA2-Personal” is selected, input the Encryption Key field as well.
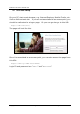
PePLink Surf User’s Manual v2.6 At this point, you are associated with the access point. You may now close the web browser and open a new one to start web browsing. Copyright © 1999-2006 PePLink Ltd.
PePLink Surf User’s Manual v2.6 4.2 Settings Details LAN Interface: To configure the LAN interface’s IP address and subnet mask. DHCP Server: To configure to enable the built-in DHCP server or not. enabled, the IP address range can be configured. If Wireless Settings: SSID: To configure the SSID / ESSID / Network Name of the wireless network to associate to. Radio Mode: It allows the user to choose between radio modulations support. E.g. 802.11b/g, 802.11g only, 802.11b, etc.
PePLink Surf User’s Manual v2.6 Bit Rate: To fix the 802.11 transmit bit rate. Available options depend on the Radio Mode chosen. If “auto” is chosen, the device will choose the best bit rate dynamically and automatically. Authentication: Available options are Open, Static WEP Key, 802.1x with dynamic WEP key, WPA/WPA2-Enterprise and WPA/WPA2-Personal. The selection should be according to the setting of the access point you are associating to.
PePLink Surf User’s Manual v2.6 4.3 Advanced Settings: Port Forward The PePLink Surf supports forwarding inbound TCP and UDP connections to servers on the LAN. For example, if your PC is hosting a web server and you want to let Internet users access it, you should define a rule on a role. Enter “80” and “80” for the Port Range. Select “TCP” for the protocol. Enter the PC’s IP address to the “IP Address” field. Click the “Save” button to save and apply the changes. Copyright © 1999-2006 PePLink Ltd.
PePLink Surf User’s Manual v2.6 4.4 WPA/WPA2 with 802.1x Authentication The PePLink Surf supports authentication and encryption methods of “802.1x with dynamic WEP key encryption” and WPA/WPA2-Enterprise. A radius server can be used to perform authentication based on the IEEE standard 802.1x with EAP-TTLS. To set it up, you have to configure the PePLink Surf, the access point and a radius server. By default, EAP-TTLS/CHAP is used as the EAP authentication method.
PePLink Surf User’s Manual v2.6 4.4.2 Access Point Access point set up procedure is different from one brand to the others. Here are some necessary configuration parameters to be configured in the access point: - Enable WPA2 with 802.1x authentication - Enter the radius server IP address, port number and the secret (for the provided radius server config mentioned in 4.4.3 , the secret is “testing123”) 4.4.3 Radius Server The commercial radius server, Radiator, is used in the set up.
PePLink Surf User’s Manual v2.6 AuthPort 1812 AcctPort 1813 LogDir /var/log/radius DbDir /etc/radiator Trace 4 Secret testing123 DupInterval 0 Filename /etc/radiator/users EAPType TTLS EAPTLS_CAFile /etc/radiator/cacert.pem EAPTLS_CertificateFile /etc/radiator/server_cert.pem EAPTLS_CertificateType PEM EAPTLS_PrivateKeyFile /etc/radiator/server_key.
PePLink Surf User’s Manual v2.6 4.5 Test the Setup To test to setup, you can now go to the PePLink Surf’s Main page, enter the user name and password. The realm (the text box next to the “@” sign) value can be left empty. Then click the Connect button. After connected, you should see: Copyright © 1999-2006 PePLink Ltd.
PePLink Surf User’s Manual v2.6 4.6 Firmware Upgrade The PePLink Surf is able to check whether a newer firmware (the software running on the PePLink Surf) is available. To do so, click the link “Firmware Upgrade” on the top bar. You will see this screen: Click the “Check for new firmware” on the screen. If there is a firmware available, you can simply click a “Download and Upgrade” button. During an upgrade, please do not interrupt the process. Copyright © 1999-2006 PePLink Ltd.
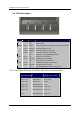
PePLink Surf User’s Manual v2.6 4.7 Debug Page A debug page is provided for advanced network troubleshooting. This page shows the unit’s firmware version, hardware version, serial number, LAN MAC address, Wi-Fi MAC address, supported Wi-Fi modes, scanned access points’ information and WAN connection information. For the Scanned AP section, the scanned result may not be up to date. You can click the “Scan again” button to update the scanned AP list.
PePLink Surf User’s Manual v2.6 4.8 Restore to Factory Defaults To restore the PePLink Surf to factory defaults, there are two methods. If you are able to access the web admin interface, go to the “CPE Setup” page, and click the “Restore and Reboot” button. Otherwise, you can also power up the unit and wait for about 1 min. Then press the Reset button at the rear side of the unit using a pin and then hold it for 5 secs. The unit will restore the settings to factory defaults and reboot.
PePLink Surf User’s Manual v2.6 4.9 System Settings Some system settings are hidden from the end users. They are for the service provider to change some system specific settings To access the page, type this URL on your browser: http://192.168.20.1/ss/ The page’s login ID and password are “admin” and “MSurf000”. The page is like this: Copyright © 1999-2006 PePLink Ltd.
PePLink Surf User’s Manual v2.6 4.9.1 Web via WAN with HTTPS This is to enable or disable the secure web administration server to be accessible from WAN (wireless side) or not. If enabled, the HTTPS port number is entered here. It must be between 1024 and 65535. The default port number is 8000. 4.9.2 Web Administration Password This is to change the web administration interface’s access password when accessing to http://ip.addr/ss/ (from LAN) or https://wan.ip.addr/ (from WAN). The login name is “admin”.
PePLink Surf User’s Manual v2.6 4.9.4 SNMP Settings The unit has a built-in SNMP agent. It allows the administrator to get some basic system information and to toggle the unit’s Status LED for troubleshooting. The agent can only be accessed from administration network only. Please refer to chapter 4.9.5 . This section is for configure the SNMP agent’s access permission. Toggling the LED The unit’s Status LED can be toggled by using SNMP.
PePLink Surf User’s Manual v2.6 4.9.5 Admin Network Settings This section is for configuring which network’s IP addresses are allowed to access the ssh server and the SNMP agent. 4.9.6 PePLink Management System settings The Surf units can be managed by the PePLink Management System (PMS). The PMS is divided into several sub systems. This section is for configuring which sub system the Surf should communicate to. They include Firmware server, Status Server, Configuration Server and Custom Message Server.
PePLink Surf User’s Manual v2.6 4.9.7 Wireless Settings The CTS/RTS threshold value 2347 means this setting is disabled. If the packet that the Surf is transmitting is larger than the threshold, it will initiate the CTS/RTS function. The up stream and down stream bandwidth are for controlling the maximum up link and down link bandwidth that the user can consume. The unit is bit per second. Setting them to “0” will disable the bandwidth control. The default value is “0”. Copyright © 1999-2006 PePLink Ltd.
PePLink Surf User’s Manual v2.6 5 Appendix - Demo CA and Server Certification Generation Instructions 5.1 Prerequisite OpenSSL v0.9.7a or above Note: The illustration below is based on Linux. 5.2 Create your own Certificate Authority (CA) 1. Create a working directory (e.g. ~/demoCA) mkdir ~/demoCA chmod 700 ~/demoCA cd ~/demoCA mkdir private certs newcerts echo -n 01 > serial touch index.txt 2. Create a private key for your CA, for example: openssl genrsa -des3 -passout pass:democa -out private/cakey.
PePLink Surf User’s Manual v2.6 There are quite a few fields but you can leave some blank For some fields there will be a default value, If you enter '.', the field will be left blank.
PePLink Surf User’s Manual v2.6 3. Create the certificate singing request of your server, for example: openssl req -new -key server_key.pem -passin pass:demoserver -out server_req.pem Then a series of questions will be asked: You are about to be asked to enter information that will be incorporated into your certificate request. What you are about to enter is what is called a Distinguished Name or a DN.
PePLink Surf User’s Manual v2.6 openssl ca -policy policy_anything -passin pass:democa -in ~/myCert/server_req.pem -days 8000 -out ~/myCert/server_cert.pem Then a series of questions will be asked (details will vary in your case): Using configuration from /usr/share/ssl/openssl.
PePLink Surf User’s Manual v2.6 This device complies with part 15 of the FCC Rules. Operation is subject to the following two conditions: (1) This device may not cause harmful interference, and (2)This device must accept any interference received, including interference that may cause undesired operation. Caution: Changes or modifications to this unit not expressly approved by the party responsible for compliance will void the user’s authority to operate the equipment.