
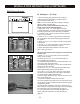
Instructions / Assembly

4. Prepare the wall sleeve for installation of the new unit per the following brand instructions:
Brand Depth Refer to Page
#1 Emerson 15″ deep 11
#2 Fedders 19
3
/
4″ deep 12
#3 Fedders or Friedrich 16
3
/
4″ deep 13
#4 General Electric/Hotpoint 16
7
/
8″ deep 14
#5 Sears or Carrier (51S Series) 18
5
/
8″ deep 15
#6 Whirlpool 17
1
/
8″ deep 16
#7 Whirlpool 23″ deep 17
#8 Perfect Aire, Frigidaire 16″ & 17
1
/
2″ deep 18
White-Westinghouse,
Carrier (52F Series)
#9 White-Westinghouse, 22″ deep 19
Frigidaire
5. Identify your wall sleeve’s brand and install new unit into wall sleeve using the applicable instructions on the
following pages.
6. To attach ground wire to the new unit, remove the screw from the left side front.
7. Assemble and install the Trim Frame (see instructions).
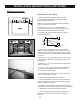
IMPORTANT
• The unit’s increased performance characteristics result from having two rear air intakes.
• It is very important that these installation instructions are followed to ensure that your unit can operate at
maximum efficiency.
• If this is an existing sleeve, and there is an existing rear grille, it needs to be replaced by one that has been
shipped with the unit in the accessory kit.
For increased efficiency, utilize the provided louvered rear panel.
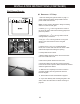
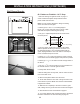
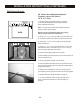
Installation of new grille provided with unit:
1. Remove the existing grille.
2. Place the grille included with the new air conditioner
towards the rear of the sleeve.
3. Mark the hole positions.
4. Drill through the sleeve’s flanges with a 1/8″ drill bit.
5. Attach the new grille with self-threading screws and
washers (not included).
6. It is VERY IMPORTANT that the grille is placed exactly
as shown in the picture on the right.
7. Most decorative exterior grilles may be left in place as
long as the proper interior air direction grille is installed.
INSTALLATION INSTRUCTIONS (CONTINUED)
10