
Installation Guide


0721_Lam_MF_Install P.1
Laminate 4-in-1 Molding Installation
STEP 1
•
REVIEW INSTALLATION CHECKLIST
• Donotpushpartsintotrackuntilreadytoinstallinnalposition.
• Donotremovefromtrackonceinstalled.
• Useanewsawbladeforbestcuttingresults.
• Dependingonmoldingtype,allpartsmayNOTbeused.
• Alwaysinstallscrewsinendholesoftrackandtheneveryotherhole.
• Forconcreteoors,drillholeusing
3
⁄
16
"(5mm)diameterdrill,insertplasticanchor,
thenusescrew.
• Attachthetrackdirectlytothesuboor(removeanypaddingorunderlayment).
• LaminateooringinstallationsrequiretheuseofT-Moldingsindoorways4feet
(1.22meters)orlessandinrooms40feet(12.2meters)orlargerinlengthorwidth.
• Thisproducthasbeennishedforyou;donotsandorpaint.
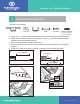
STEP 2
•
CHOOSE YOUR TRANSITION TYPE
Kitallowsassemblyoffourdierentmoldingoptionsfromonesingleproduct
A. T-Molding
Transitionsbetweenhardsurfaceoorsofequalheight
B. Carpet Transition
Finishesahardsurfaceoorwhereitmeetscarpet
C. Hard Surface Reducer
Transitionsbetweenhardsurfaceoorsofdierentheights
D. End Molding
Finishesahardsurfaceooratslidingdoors,replacesandotherxededges
STEP 3
•
INSTALL YOUR MOLDINGS
Eachindividualpackageincludesthefollowing:
Part#1 Part#2 Part#3 Track Shim
Screws PlasticAnchors