
Use And Care Manual


Page 15
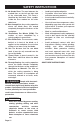
INTENDED USE
This miter saw is designed for wood cutting
applications. DO NOT use under wet
conditions or in presence of flammable
liquids or gases. DO NOT let children come
into contact with the tool. Supervision is
required when inexperienced operators use
this tool.
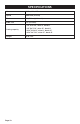
BENCH MOUNTING (FIG.1)
FIG. 1
Mounting
Hole
This tool should be bolted with four bolts to a
level and stable surface using the mounting
holes provided in the tool’s base. This will
help prevent tipping and possible injury.
WARNING:
Ensure that the
tool will not move on the supporting
surface. Movement of the miter saw on
the supporting surface while cutting
may result in loss of control and serious
personal injury.
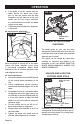
INSTALL THE WORK CLAMP
(FIG.2)
There are two mounting holes for the work
clamp. These are located just behind the
fence on the left and right side of the base.
1. Loosen the screw (1) counterclockwise.
2. Place the work clamp in the desired
mounting hole.
3. Tighten the screw (1) to lock the work
clamp.
4. Rotate the clamp knob clockwise to
clamp the workpiece and rotate the
knob counterclockwise to release the
pressure. Lock the screw (2) before
working.
FIG. 2
Screw(2)Screw(1)
Clamp
Knob
Work
Clamp
INSTALL/REMOVE THE SLIDING
FENCE (FIG.3)
FIG. 3
Lower
Fence
Locking
Screw
Slot
Sliding
Fence
1. Loosen the locking screw to clear the
slot on the lower fence.
2. Insert the sliding fence into the slot and
slide it to the desired position.
3. Tighten the locking screw securely.
4. To remove the sliding fence, just loosen
the locking screw and then slide the
fence out.
OPERATION