
Use And Care Manual


Page 20
OPERATION
To lock: Place the cutting head at the
lowest position. Secure the position and
push the lock-down pin into the locking
position. Please note, if there is any cutting
depth setting, the lock-down pin may not
work. Release the cutting depth limitation
by rotating the depth adjustment screw
counterclockwise, and then lock the cutting
head.
UNLOCK THE SLIDE RAIL (FIG.9)
The slide-rail lock knob is located on
the upper side of the slide rail. Loosen
the slide rail by rotating the lock knob
counterclockwise, and then you can move
the slide rail freely. If you want to lock the
slide rail, just rotate the lock knob clockwise.
When transporting or storing the miter saw,
the slide rail should always be locked in
position.
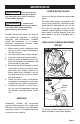
LED WORKLIGHT (FIG.10)
FIG. 10a
Lock-off
Lever
Led Worklight
Switch
On/off Trigger
Switch
FIG. 10b
Blade
Shadow
Your miter saw has a LED worklight, located
in the upper guard for the saw blade.
1. Mark your workpiece with a pencil line
at the point to be cut.
2. Press the LED worklight switch to the
“ ” position to turn on the light. Align
your pencil line with the straight light
line.
3. Fully clamp your workpiece in place.
Follow all of the cutting instructions for
the type of cut to be performed.
4. Press the LED worklight switch to the
“OFF” position to turn off the light.
TRIGGER SWITCH (FIG.10a)
To turn the saw on, push the lock-off lever
to the left, then depress the on/off trigger
switch. To turn the tool off, release the trigger
switch. When the trigger switch is released,
the blade will be stopped within 10 seconds.