
Use And Care Manual


Page 23
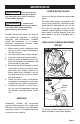
COMPOUND CUTS (FIG.15)
FIG. 15
A “compound cut” is a cross-cut made
with the blade both at a miter angle and at
a bevel angle. Because it may take several
tries to obtain the desired compound angle,
perform test cuts on scrap material before
making your cut.
1. If the cutting process is interfered by
the sliding fence, just remove the sliding
fence (refer to “INSTALL/REMOVE THE
SLIDING FENCE” section).
2. Properly position workpiece. Make sure
workpiece is clamped firmly against the
table or the fence.
3. Set miter and bevel angles according to
the instructions for miter and bevel cuts.
4. Follow the procedures for chop cuts or
slide cuts.
5. Wait until blade comes to a complete
stop before returning head assembly
to the raised position and/or removing
workpiece.
CUTTING GROOVES (FIG.16)
The depth-stop adjustment is a feature used
when cutting grooves in the workpiece. The
depth adjustment is used to limit the blade
depth. A groove should be cut as a slide cut.
1. Loosen the lock nut. Rotate the depth
adjustment screw to the desired cutting
depth, and retighten the lock nut.
Rotate the depth adjustment screw
anticlockwise to raise and hide the
lower tip of the depth adjustment screw
can cut off the workpiece totally.
2. Plug the saw into an electrical socket.
3. Cut the two outside edges of the groove.
4. After cutting a groove, turn off the saw
and wait for blade to stop.
5. To create the groove, use a wood chisel
or make multiple passes with the router
to remove the material between the
outside edges.
FIG. 16a
Depth-stop
Platform
Depth
Adjustment
Screw
Lock Nut
FIG. 16b
Workpiece
Outside
Grooves
Chisel Cut
OPERATION