
Use And Care Manual


Page 27
1. First unplug the saw before inspecting
or replacing brushes.
2. Replace both carbon brushes when
either has less than 1/4” (6 mm) of
carbon remaining, or if the spring or wire
is damaged or burned.
3. Using a slotted screwdriver, remove the
black plastic cap on each side of the
motor housing, and carefully withdraw
the spring-loaded brush assemblies.
Keep brushes clean and sliding freely in
their guide channels.
NOTICE: To reinstall the same brushes,
make sure the brushes go back in the same
way they came out. This will avoid a break-
in period.
4. Insert new brush assemblies into guide
channels, with the carbon part going in
first, being certain to fit the two metal
“ears” into their slots in the channel.
5. Remember to replace both end caps
after inspecting or servicing brushes.
Tighten the caps snugly, but do not
over-tighten.
6. The saw should be allowed to “RUN
IN” (run at no-load without a blade) for
5 minutes before use to seat the new
brushes properly.
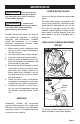
REMOVE THE BLADE (FIG.21)
FIG. 21a
Arbor Guard
Screw
Lower Blade Guard
Arbor
Guard
FIG. 21b
Outer Flange
Arbor
Screw
1. Unplug the tool.
2. Raise the saw head, lift and hold lower
blade guard to expose the arbor guard
screw.
3. Loosen the arbor guard screw with a
phillips screwdriver (included) to a point
that the arbor guard can be lifted.
4. Lift and hold the lower blade guard up,
and rotate the arbor guard to expose the
arbor screw.
5. Press and hold the spindle-lock button,
and rotate the blade at the same time
until it locks into position.
6. Use the blade phillips screwdriver
(included) to turn the arbor screw
clockwise, and then remove the arbor
screw.
7. Remove the outer flange and the blade.
Wipe the flanges and spindle to remove
any dust and debris.
INSTALL THE BLADE (FIG.22)
WARNING:
ONLY USE 10” (254
mm) SAW BLADES WITH 5/8” (15.9 mm)
ARBOR HOLES. SPEED RATING MUST BE
AT LEAST 5000 RPM.
1. Unplug the miter saw before changing/
installing the blade.
2. With the arm raised, and the lower blade
guard raised, place the blade onto the
arbor shaft. Match the arrow on the
blade with the arrow on the upper blade
MAINTENACE