
Assembly Instructions

Assembling the Trailer Dolly
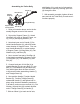
1. Refer to illustration above and to the As-
sembly Diagram at end of this manual.
2. Set out the Support Frame (3). Attach
Hitch Ball (10) to top of Support Frame, us-
ing Nut (11) and Spring Washer (12).
center bracket of Support Frame. First con-
nect Handle Bracket (6) to center bracket
of Support Frame (3) using Bolts (22), Flat
Washers (18), and Nuts (20)
4. Next, connect front part of Link Bar (4)
to horizontal crossbrace of Support Frame
(3) using Bolt (13), Flat Washer (14), and
Nut (16).
5. Connect back part of Link Bar (4) to
Handle Bracket (6) using one Bolt (17), one
Bolt (21), Flat Washers (18) and Nuts (20).
Only hand tighten Nuts as Nuts will need
to be removed when assembling Handle (7)
and Triangle Stand (5).
6. Now position Handle (7) inside Handle
Bracket (6). Position Triangle Stand (5)
underneath Handle (7) and tigthen both in
place using the above hardware mentioned
in #5 above, and use one more Bolt (21), Flat
Washer (18) and Nut (20) to attach another
end of Triangle Stand (5) to Handle (7).
7. Slide on Wheel (1) at each end of axle;
Support
Frame (3)
Hitch Ball (10)
Handle (7)
Handle
Bracket (6)
Triangle Stand (5)
Link Bar
(4)
add Washer (2) to each end of axle and se-
cure Wheels in place by inserting Split Pins
(9) through the axle.
7. With assembly complete, tighten all hard-
ware and roll the Trailer Dolly to make sure it
functions properly.
Support Frame
Center Bracket
3. Note how lower end of Handle (7) fits.
inside Handle Bracket (6), which fits inside