
Installation Guide


(
1
⁄2 inch) around each bolt or fastener as required for walls,
pillars, pipes and other fixed objects.
Commercial flooring transitions that accommodate a
1
⁄2"
expansion space are strongly recommended.
18. INSTALLING PERGO FLOORING ON STEP DOWN
AND STAIR TREAD APPLICATIONS — Pergo Stair
Nosing is used to finish stair edges or step down
applications. Prior to beginning the installation, any
loose or damaged treads or risers should be repaired
or replaced. The stairs must be cleaned thoroughly
from any loose paint, debris, or old adhesives.
Due to the many varieties of stairs available in North
America, a professional stair contractor may be required
for certain installations. Check local building codes
before altering dimensions of stair tread, riser and nosing.
Should there be any questions regarding the application
of Pergo on stairs, please call our Customer Help line at
1-800 33-PERGO (1-800-337-3746).
STAIR NOSING
■ Step down from a floating floor
Cut the Pergo stair nosing to the desired length. The
nosing must be fastened with screws (ie. finishing
screw #6 by at least 1
1
⁄8"). A quality construction
adhesive should also be used. A
1
⁄4" expansion space
must be maintained between the nosing and the
floating floor. For Step Down (from a floating floor ) to
a lower level or at the top of a flight of stairs: Adhere
the stair nosing with a quality construction adhesive
and with #6 finishing screws 1
1
⁄8" in length. Place
screws 2 inches from each end of the nosing and
space additional screws at intervals no greater than
8 inches along the length of the nosing.
a. For
5
⁄16" (8mm) plank thickness use the thin shim
beneath the stair nosing. Adhere the shim to the nos-
ing with construction adhesive and adhere the shim
and nosing to the subfloor with construction adhesive
and fasten with screws
b. For
3
⁄8" (9-11mm) plank thickness use the thick shim
beneath the stair nosing. Adhere the shim to the
nosing with construction adhesive and adhere the
shim and nosing to the subfloor with construction
adhesive and fasten with screws
Stair Treads only: Adhere the stair nosing with a quality
construction adhesive and fasten with #6 finishing screw
1
1
⁄8" in length. Place screws 2 inches from each end of
the nosing and space additional screws at intervals no
greater than 8 inches along the length of the nosing.
■ For
5
⁄16" (8mm) plank thickness do not place any shim
beneath the stair nosing. Adhere the stair nosing
directly to the tread with construction adhesive and
fasten with screws
■ For
3
⁄8" (9-11mm) plank thickness use the thin shim
beneath the stair nosing. Adhere the shim to the
nosing with construction adhesive and adhere the
shim and nosing to the tread with construction
adhesive and fasten with screws
■ For
5
⁄16" (8mm) plank thickness with an attached
underlayment foam use the thin shim beneath the
stair nosing. Adhere the shim to the nosing with con-
struction adhesive and adhere the shim and nosing
to the tread with construction adhesive and fasten
with screws
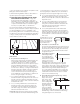
This illustration shows the
step down from a float-
ing floor. The step down
shows the tread flush or
even with the riser.
■ Tread flush or even with the riser
The riser must be installed before the stair nosing is fit
into place. If installing from a floating floor, follow the
above instructions. When installing on a stair tread,
the nosing will be installed after the tread and riser
are glued into place.
■ Tread with an extended
round edge nosing
The rounded portion
of the extended nosing
will need to be squared.
Leave as much of the
extending nose of the
tread as possible, removing only the radius (the
rounded portion). On the edge of the squared
nosing, glue a narrow strip of Pergo. This will finish the
exposed edge of the tread. After installing the tread
and riser the nosing will be installed, finishing the
nose of the tread. The illustration shows a step with
an extended round edge nosing. On the illustration
a dotted line will show where to cut the rounded
portion of the extended nosing.
■ Tread with extended and square edge nosing
On this style of tread
simply cut a narrow
strip of Pergo and
glue it on the edge
of the existing tread.
Install the tread and
riser and finish the
edge with a Pergo
nosing. The illustra-
tion at right shows a
square edge nosing with Pergo on the edge, and
installed Pergo on the tread and riser with a Pergo
nosing finishing the nose of the tread.
1
3
/4"
2
3
/8"
1
/4"
3
/4"