
Horizontal Installation Instructions


brad
nail
4
stagger
8-12"
5
remove
6
Plank 3 Row 2
7
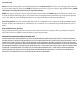
Drive a brad nail into each plank at each wall stud through the shallow
area of the extended groove (see inset diagram). Take care that the brad
nail heads are not raised, but also don’t force them all the way through
the groove. This will allow easy connection of the next row of planks.
You must also place drywall screws every 16” into the wall studs or sill
plate along the bottom edge of the rst row of planks where they will be
covered by the wall base. (Figure 4)
Start the second row from the right side. Cut and glue with silicone
adhesive caulk the rst plank. Fit plank by angling tongue into groove
and wiggle into place. Use tapping block as needed. Drive a brad nail into
each plank through the shallow area of the extended groove at each wall
stud. (Figure 5)
NOTE: A joint “stagger” of 8 to 12 inches looks most natural. Avoid
allowing plank ends to align.
Plank 2 of row 2 (and each plank thereafter in row 2) will be modied by
removing the short end tongue. Score the tongue with a utility knife 3 –
4 times to remove. You will now have a square end. (Figure 6)
Apply silicone adhesive caulk in an “S” pattern and install modied boards
by tilting into place. Tighten joints as needed with a tapping block or
pull bar. Drive a brad nail into each plank through the shallow area of the
extended groove at each wall stud. (Figure 7)