
Installation Instructions

INSTRUCTIONS:
1) Be sure the fl oor is clean and dry before installing underlayment.
Pretest substrate for moisture emissions prior to installation
of underlayment. Ensure that the underlayment seams will run
perpendicular to the fl ooring seams.
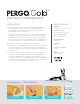
2) Starting in a corner, install the fi rst row of underlayment with the
non “lip and tape” side up against the wall and the overlapping
“lip and tape” side towards the open side of the room. The gold
moisture barrier must be facing upward. Install the underlayment
to the far wall and cut around any obst
acles using a utility knife.
3) Align the second row of underlayment to the fi rst row.
4) Flip the fi rst row’s overlapping lip onto the second row and secure
it using the adhesive tape strip located on the overlapping lip. To
activate the adhesive, remove the liner and apply hand pressure to
seal the seams.
5) Repeat this process until the entire fl oor is covered and sealed.
Ensure that all foam seams without the overlapping lip tape are
sealed with underlayment seam tape (sold separately). It is not
necessary to tape the outer perimeter of the room’s underlayment.
Aft
er underlayment installation is complete, install your fl ooring
according to the manufacturer’s instructions.
Premium Underlayment
SPECIFICATIONS:
Dimensions:
3mm thick x 4 ft wide x 25 ft long
Moisture Protection:
0.01 pounds/24 h/1,000 sq ft
Impact Sound Insulation:
IIC 71/STC 66/Delta 21
Thermal Insulation:
R-Value 0.53
Smoothing:
2.5mm
Compression Strength:
> 15 PSI
Safety:
Odorless, non-toxic,
100% recyclable
Easy to seal with
pretaped sides
Easy to install
fan fold
Easy to cut with
a grid pattern
— LIMITED —
LIFETIME
WARRANTY
www.pergo.com | 1-800-33-PERGO