(PXDP) Instruction Manual PROFESSIONAL INSTALLATION STRONGLY ADVISED IMPORTANT NOTE iPod Firmware MUST be updated BEFORE any other step is taken. Otherwise, the iPod will not operate properly. See page 1 for further details. Peripheral Electronics®, a division of AAMP of America™ 13160 56th Court Clearwater, Florida 33760 866-788-4237 in the US or 727-572-9255 ext.262 for international calls support@peripheralelectronics.com ©2005 AAMP™ of Florida, Inc. rm02.21.
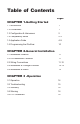
Table of Contents CHAPTER 1-Getting Started Pages 1.1 Introduction 1 1.2 Precautions 1 1.3 Configuration & Harnesses 2 1.4 Compatibility Notes 2-3 1.5 Application Guide 4-9 1.6 Programming the iPod2car 10 CHAPTER 2-General Installation 2.1 Installation Location 11 2.2 Pre-Installation Checklist 11 2.3 Wiring Connections 11-12 2.4 Installation at Changer Location 12-13 2.4 Installation at Radio 13 CHAPTER 3 -Operation 3.1 Operation 14 3.2 Troubleshooting 15 3.3 Warranty 16 3.
Chapter 1- Getting Started 1.1 Introduction Thank you for purchasing Peripheral Electronics’® iPod2car interface. The iPod2car is designed to provide endless hours of listening pleasure through most vehicles’ factory radios. To ensure that your iPod performs correctly in your car or truck, we recommend that you read this entire manual before attempting installation of the iPod2car interface.
iPod2car interface Docking cable Vehicle specific harness 1.3 Configuration and Harness Selection This section will instruct you on how to properly identify and/or confirm the proper interface dip-switch configuration and vehicle specific harness selection. On the following pages you will find our vehicle application guide. This guide will inform you of the proper dip-switch configuration and vehicle specific harness for your particular vehicle.
1.4.5 DODGE- See Chrysler 1.4.4 1.4.6 EAGLE- See Chrysler 1.4.4 1.4.7 FORD- The iPod2car is not compatible with factory radios with built-in 6-disc CD changers. 1.4.8 GMC- See Chevrolet 1.4.3 1.4.9 HONDA- Starting in 2003 Honda introduced a new series of radios that use different software that is currently incompatible with the iPod2car. In 2005 all Honda radios use this softwaremaking them incompatible. 1.4.10 HUMMER- See Chevrolet 1.4.3 1.4.11 JEEP- See Chrysler 1.4.4 1.4.
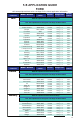
1.5 APPLICATION GUIDE ASIAN IMPORT visit www.peripheralelectronics.
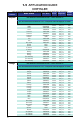
1.5 APPLICATION GUIDE FORD visit www.peripheralelectronics.
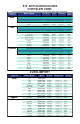
1.5 APPLICATION GUIDE CHRYSLER visit www.peripheralelectronics.
Ram Pickup Ram Pickup Ram Pickup Spirit Sprinter Stratus Van (Fullsize) Van (Fullsize) visit www.peripheralelectronics.com/apps Van (Fullsize) Manufacturer Model / Modèle / Fabricant 1995-1999 1999-2001 2002-2004 1995 2004 2002-2004 1995-2003 1995-2003 for the latest 1995-2003 PXHCH1 Config. # 1 Radio PXHCH2 Config. # 3 Radio PXHCH3 Radio Config. # 1 Radio Config. # 3 Radio 1.5 APPLICATION GUIDE CHRYSLER CONT. Eagle Config. # 3 PXHCH1 PXHCH3 PXHCH3 Config. # 3 Radio PXHCH1 Config.
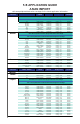
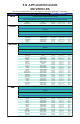
1.5 APPLICATION GUIDE GM VEHICLES visit www.peripheralelectronics.com/apps for the latest application information Manufacturer / Fabricant Model / Modèle Buick Year / Année Harness Configuration Interface Location NOTE: 1995-1999 NOT Compatible with In-dash CD Player Nota : Non Compatible Avec Le Lecteur De CD Intégré Au Tableau De Bord Des Modèles 1995-1999 LeSabre Rainier Rendezvous Cadillac 1999-2002 2005 2003-2005 PXHGM3 Config. # 7 Radio PXHGM3 Config. # 7 or 8 Radio PXHGM3 Config.
1.5 APPLICATION GUIDE GM VEHICLES CONT. visit www.peripheralelectronics.com/apps for the latest application information Manufacturer / Fabricant Model / Modèle Year / Année Harness Configuration Interface Location Hummer H2 2003-2004 PXHGM3 Config.
1.6 Programming the iPod2car Now that you have identified the correct harness and dip-switch configuration using the application guide, it is now time to program the interface. To program the interface, set the dip-switches located on the side of the interface (see Fig.1 below) to the congfiguration listed for your vehicle in the Application guide. Switches are in their default setting of “off” in the up position and are turned “on” when switched down. Refer to the chart on the bottom of this page.
Chapter 2- General Installation 2.1 Installation Location Most installations will require you to remove the factory radio in order to plug in the vehicle specific harness. Some vehicles may require you to connect the interface to a factory prerun CD changer cable. The location of these CD changer cables will vary by vehicle. Some common locations of these cables are in the trunk, behind the glove box, and in or under a center console. ( see Fig.
Make these connections only after verifying the proper circuit on your radio harness with a voltmeter. With the key OFF and the negative test lead of the voltmeter firmly touching a bare metal chassis part of your car, begin probing the wires in the main radio harness with the positive test lead. The constant 12V+ circuit should read a continuous 12 volts or higher. Once you’ve identified the constant 12V+ circuit, strip back about 1/8” of the insulation.
4. Decide on a convenient location to mount your iPod. 5. Run the white docking cable from the interface to the desired mounting location. Use caution to not cut, pinch, or crimp the cable during this step. Avoid moving parts, vehicle wiring harnesses and areas of excessive heat when routing the cable. 6. Secure the interface in the vehicle using; double sided tape, Velcro or wire ties. Make sure to check for proper clearance and avoid moving parts.
Chapter 3- Operation 3.1 Operation SELECTING THE IPOD To select the iPod from the radio, press the button that would normally activate the factory CD changer. This button varies by vehicle manufacturers. In some applications (using config.#8) the iPod2car is accessed like an XM reciever, In these cases you will press the appropriate activation button. Some radio models require pressing the “Seek >” button once, after pressing the CD button.
3.2 Trouble Shooting Symptom Cause Remedy No Power Blown fuse in vehicle fuse block. Replace fuse with same amp rating. If the fuse blows again, call tech support. No Power Bad connection Check cable and wiring connection. Alternator noise is heard (Changes with Engine RPM) Improper wiring creates a ground loop Install a Ground loop isolator or seek professional service from a local car audio shop. You can hear music from the iPod but you cant control it from the radio.
3.3 Warranty One Year Limited Warranty The quality controls used in the manufacture of this product will ensure your satisfaction. This warranty applies only to the original purchaser of this product from an authorized Peripheral Elecronics dealer. This warranty covers any supplied or manufactured parts of this product that, upon inspection by Peripheral Electronics authorized personnel, is found to have failed in normal use due to defects in material or workmanship.
Please check out our other products including: Aux2car (PXDX) Programmable auxiliary input device CD2car (PCD10) Complete universal CD changer that connects to most factory stereos www.peripheralelectronics.com Peripheral Electronics®, a division of AAMP of America™ 13160 56th Court Clearwater, Florida 33760 866-788-4237 in the US or 727-572-9255 ext.262 for international calls support@peripheralelectronics.com ©2005 AAMP™ of Florida, Inc.