Expand Your Factory Radio add iPod ® PXAMG Automotive Media Gateway GM Owner’s Manual Owner’s Manual Media Gateway PXAMG Media Gateway PGHGM1 PXAMG Peripheral Electronics®, a division of AAMP of America™ 13160 56th Court Clearwater, Florida 33760 Ph. 800-477-2267 866-788-4237 ext. 230 support@peripheralelectronics.com ©2007 AAMP of Florida, Inc. ©2008 rev.
Table of Contents 1. 2. 3. 4. Introduction Precautions Compatibility D ipswitch Settings 2 2 3 3 5. Installation 6. i Pod Operation Pages 4 (Non-Navigation) 7. HD Radio Operation (if equipped) 5-8 9 8. Selecting AUX Input 10 9. Selecting Factory Satellite 10 (if equipped) 10. 11. 12. 13. i Pod Operation (Navigation) 10-13 HD Radio Operation (if equipped) 14 Selecting Aux Input 15 Selecting Factory Satellite (if equipped) 15 14. Troubleshooting 16 15.
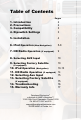
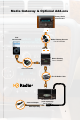
Media Gateway & Optional Add-ons Factory Radio Not Included iPod Not Included Media Gateway Harness Part #: PGHGM1 Media Gateway Part #: PXAMG 11Ft. iPod Cable 3Ft.
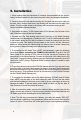
1. Introduction Thank you for purchasing the Peripheral Electronics® Media Gateway. The Media Gateway is designed to provide endless hours of listening pleasure from your factory radio. To ensure that your iPod performs correctly with your radio, we recommend that you read this entire manual before attempting installation of the Media Gateway. The Media Gateway allows connectivity for iPod and the HD Radio tuner (HDRT sold separately), enabling full control of these devices from the factory installed radio.
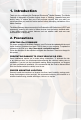
3. Compatibility Please visit www.peripheralelectronics.com/apps to verify your vehicle’s compatibility. 4. Dipswitch Settings All 4 dipswitches MUST be set in the OFF (up) position for proper operation. OFF ON Fig.
5. Installation 1. When making electrical connections it is always recommended that the vehicle’s battery be disconnected from the electrical system before performing the installation. 2. Carefully remove the trim panels covering the 7mm bolts that secure the radio into the dash cavity. Remove these bolts, and carefully pull the radio from the dash of the vehicle. This will provide access to the factory radio connectors where you will connect the Media Gateway harness. 3.
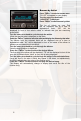
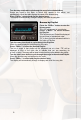
6. iPod Operation (Non Navigation) Entering Mode Select Menu Leave and re-enter the SAT mode to enter the mode select menu. This can be accomplished by pressing the “BAND” button a few times until XM is displayed on the screen. Once in the Mode Select Menu, turn the rotary knob in the top right hand corner to scroll through available sources. Once “IPOD” is displayed, press the “FWD>>” button to select the displayed mode.
Browse by Artist Press “FWD>>” to enter the browse menu. ”PL:LIST” will appear on your display. Turn the rotary tune knob until “AR:ARTIST” is displayed. Press “FWD>>” to select browse by Artist. The list of Artists on your Pod will be displayed one at a time in alphabetical order. “AR” will be displayed in front of the artist’s name to indicate that you are searching for an artist. Turn the rotary tune knob to cycle through the artists.
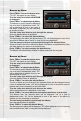
Browse by Album Press “FWD>>” to enter the browse menu. ”PL:LIST” will appear on your display. Turn the rotary tune knob until ALBUM is displayed. Press “FWD>>” to select browse by Album. The Albums on your iPod will be displayed one at a time in alphabetical order. “AL” will be displayed in front of the name of the album to indicate you are searching in the album folder. Turn the rotary tune knob to cycle through the albums. Once the desired album is displayed, Press “FWD>>” to select the desired Album.
Turn the rotary tune knob to cycle through the songs in the selected album. Songs are listed in the order in which they appear in the album, not alphabetically. When the radio displays the name of the desired song, Press “FWD>>” to select and play the desired song. The display will automatically change to display and scroll the song title. Browse by Playlist Press the “FWD>>” button to enter the browse menu. ”PL:LIST” will appear on your display. Press “FWD>>” to select browse by Playlist.
7. HD Radio Operation Entering Mode Select Menu Leave and re-enter the SAT mode to enter the Mode Select Menu. This can be accomplished by pressing the “BAND” button a few times until XM is displayed on the screen. Once in the Mode Select Menu, turn the rotary knob in the top right hand corner to scroll through available sources. Once “HD RADIO” is displayed, press the “FWD>>” button to select the mode.
Press the “►I” button to seek up to the next available station. 8. Selecting AUX Input Entering Mode Select Menu Leave and re-enter the SAT Mode to enter the Mode Select Menu. This can be accomplished by pressing the “BAND” button a few times until XM is displayed on the screen. Once in the Mode Select Menu, turn the rotary knob in the top right hand corner to scroll through available sources. Once “AUX” is displayed, press the “FWD>>” button to select the displayed mode.
“►I SEEK” again to resume play. Menu Down / Select Press the “►” button on the screen to make a selection or move down one folder in the “BROWSE”menu. Menu Up Press the “◄” button on the screen to move up one folder or exit the menu. Steering Wheel Controls Press the “▲” button to advance to the next track. Press the “▼” button to return to the previous track. Press the “►I” button to enter the browse menu. Press the “▲” or “▼” buttons while in the browse menu to scroll through the menus.
Browse by Album Press the “►” button on the screen to enter the browse menu. ”PL:LIST” will appear on your display. Turn the rotary tune knob until ALBUM is displayed. Press “►” to select browse by Album. The Albums on your iPod will be displayed one at a time in alphabetical order. “AL” will be displayed in front of the name of the album to indicate you are searching in the album folder. Once the desired album is displayed, Press “►” to select the desired Album.
Press “►” to select the desired Album. The first song in the album will be displayed. “TR” will be displayed in front of the song title to indicate that a “track” or song title is being displayed. Turn the rotary tune knob to cycle through the songs in the selected album. Songs are listed in the order in which they appear in the album, not alphabetically. When the radio displays the name of the desired song, Press “►” to select and play the desired song.
11. HD Radio Operation Entering Mode Select Menu Leave and re-enter the SAT mode to enter the Mode Select Menu. This can be accomplished by pressing the “FM” button then pressing the “XM” button. Once in the Mode Select Menu, turn the rotary tune knob in the top right hand corner to scroll through available sources. Once “HD RADIO” is displayed, press the “►” button on the screen to select the displayed mode.
12. Selecting AUX Input Entering Mode Select Menu Leave and re-enter the SAT mode to enter the Mode Select Menu. This can be accomplished by pressing the “FM” button then pressing the “XM” button. Once in the Mode Select Menu, turn the rotary tune knob in the top right hand corner to scroll through available sources. Once “AUX” is displayed, press the “►” button on the screen to select the displayed mode.
14. Troubleshooting Symptom Cause Remedy Radio shows iPod not connected iPod cable is not Verify the docking cable is connected connected to iPod or to the Media Gateway, and the iPod Gateway. I can not correctly control the iPod through the radio. The iPod firmware may be out of date. Update iPod firmware for free at http:// www.apple.
15. Warranty One Year Limited Warranty The quality controls used in the manufacture of this product will ensure your satisfaction. This warranty applies only to the original purchaser of this product from an authorized Peripheral Electronics dealer. This warranty covers any supplied or manufactured parts of this product that, upon inspection by Peripheral Electronics authorized personnel, is found to have failed in normal use due to defects in material or workmanship.
www.peripheralelectronics.com Peripheral Electronics®, a division of AAMP of America™ 13160 56th Court Clearwater, Florida 33760 Ph. 800-477-2267 ext. 230 support@peripheralelectronics.com ©2008 AAMP of Florida, Inc.