
Door Reversal Instructions

SUPPORT
-Plastic Putty Knife
NOTE: Changing the door mount is not advisable if you have a door with custom wood overlay.
-Hinge Kit from Perlick
-Regular Phillips-Head Screwdriver
PROCEDURE FOR SWITCHING DIRECTION OF DOOR SWING
ON PERLICK C-SERIES, 15 INCH, AND SIGNATURE SERIES CABINETS
doing so may result in having a handle that is in an undesirable position.
Required:
-Large Flat-Head Screwdriver
HINGE KITS
Part number 67439R to switch to Right Hinging
Part number 67439L to switch to Left Hinging
SCALE
1:24
3/28/2011DAS
SW
COPYRIGHT 2001 PERLICK CORPORATION. ALL RIGHTS RESERVED.
Milwaukee, WI 53223
DRAWN
Perlick Corporation
67439
OR MECHANICAL, INCLUDING PHOTOCOPYING, RECORDING, OR USED IN ANYINFORMATION STORAGE, TRANSMISSION, OR RETRIEVAL SYSTEM, WITHOUT WRITTEN PERMISSION FROM THE PERLICK CORPORATION
REVERSAL
THIS DOCUMENT/PUBLICATION/SOFTWARE/DRAWING CONTAINS PROPRIETARY INFORMATION WHICH IS THE PROPERTY OF THE PERLICK CORPORATION. IT MAY NOT BE REPRODUCED OR TRANSMITTED IN ANY FORM, ELECTRONIC
DOOR HINGE DATE
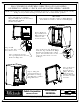
Step 1: Support door in
the open position as shown.
Remove Hinge Pin.
Step 2: Pull
door to the side,
then lower door.
Step 3: Remove
Top and Bottom
Hinge Brackets
and save the
screws for later.
Step 4: Remove the Hole Plugs
from the Top and Bottom Hinge
Bracket mounting holes. Then
place them in the holes on the
opposite side made vacant
in Step 3.
Step 5: Using the
screws from Step 3,
install the new Top
and Bottom Cabinet
Hinge Brackets.
Save the screws
for later.
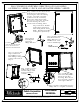
Plunger Bracket.
Step 6: Remove
the Top and
Bottom Door
Hinge Brackets
and the Push