
Planning Guide


INSTALLING PERLICK COLUMN REFRIGERATION
Designed specifically to be integrated into cabinetry, Perlick column refrigeration brings
commercial-grade performance and preservation to any style of kitchen. Columns can be installed
separately, or in side-by-side installations to create custom modular refrigeration.
The following diagrams show various ways to install Perlick column refrigeration and provide
information on producing custom overlay panels.
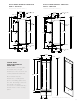
ADJACENT WALL MINIMUM
CLEARANCE REQUIREMENTS
48
27-3/4
ADJACENT WALL
OR STRUCTURE
4-1/8
27-13/16
STRUCTURE
CLEARANCE
90° OPEN
STRUCTURE
CLEARANCE
115° FULLY OPEN
If installing column next to adjacent wall,
take care to observe minimum required
clearances to avoid inteference when
opening the door. Please note the clearances
indicated are based on a standard 3/4” thick
door panel and Perlick Two Tone Pro Handle
(CR-PRO-HANDLE). Varying door depths
and dimensions of customer-provided
handle may change the required dimensions.
A 90° hinge stop pin (included with unit)
can be installed to prevent the door from
opening beyond 90°. Pin must be installed
prior to full integration. See installation
manual for instructions.
13-13/16
Measurements shown in inches (“)
6