Installation & Operation Manual Commercial Back Bar Models BBRN & BBSN Series Model BBRN40 Shown Form No.
Models BBRN/BBSN Installation & Operation Manual Table of Contents General Information.................................................................................................................................. 2 Safety....................................................................................................................................................... 2 Prior To Installation............................................................................................................
Models BBR/BBS Installation & Operation Manual Prior To Installation Uncrating and Inspection bottom, of the unit. Both drain ports come plugged from the factory and can be removed if needed. NOTE: Remote units require evaporator condensate to be plumbed to an external drain. Remove all crating material. Carefully inspect cabinet for hidden damage. If damage is discovered, file your claim immediately with the transport company. Perlick is not responsible for damage in transit.
Models BBRN/BBSN Installation & Operation Manual Installation General Information Installing the Unit • If unit has been laid on its back or sides, place unit upright and allow minimum of 24 hours before connecting power. • For units equipped with a power cord, the cord and plug may be aligned with a recess in the back panel to allow the unit to be pushed closer to the wall. For correct alignment, the wall outlet must be located 4” - 10” above the floor. CAUTION 1.
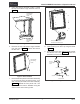
Models BBR/BBS Installation & Operation Manual Sealing Cabinet to Floor Cabinet For units without casters or legs, it may be necessary to seal the base of the cabinet to the floor. This can be accomplished by laying a bead of silicone sealant between the base of the cabinet and the floor (Figure 1). Bead Silicon Sealer (RTV) Floor Figure 1. Sealing Cabinet to Floor Faucet and Dispensing Head Installation Refer to the instructions included with the Faucet and Dispensing Head Kit.
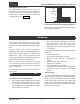
Models BBRN/BBSN Installation & Operation Manual Digital Temperature Control To change the Setpoint: 1. Press the SET button for more than 2 seconds. 2. The value of the setpoint will be displayed and the “C” or “F” LED starts blinking. C F SET 3. To change the Set value, press the or button within 10 seconds. Figure 2. Digital Temperature Controller 4. To memorize the new setpoint value, press the SET key again, or wait 10 seconds. Adjustments Changing Door Swing Direction 1.
Models BBR/BBS Installation & Operation Manual 5. Using the screws removed in step 3, install the top and bottom hinge brackets from kit (Figure 5). Front panel Hinge brackets and mounting screws Hinge brackets and mounting screws Corner screws need not be removed to remove front panel Figure 5. Hinge Installation Figure 7. Removing Front Panel 6. Remove the top and bottom hinge brackets from the door (Figure 6). Retain the screws for later use. 8.
Models BBRN/BBSN Installation & Operation Manual 10. Attach the top and bottom door hinges using screws removed in step 6 (Figure 9). 11. Place lower V-block into lower cabinet hinge with notch parallel to cabinet (Figure 10). Top hinge and screws Insert top pin into bearing Bottom hinge and screws Figure 9. Door Hinges Insert and tighten hinge pin Figure 11. Installing Door Shelving Adjustment See Figure 12. CAUTION Completely empty shelf or drawer before removing. 1. Open the door.
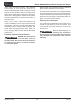
Models BBR/BBS Installation & Operation Manual Maintenance Never attempt to repair or perform maintenance on the unit until the main electrical power to the unit has been disconnected! the metal is passive and stainless. If the passive film of stainless steel has been broken, equipment starts to corrode and rust. DANGER There are three basic things which can break down stainless steel’s passive layer and allow corrosion to occur: LED Light Replacement (Figure 13). • • • 1.
Models BBRN/BBSN Installation & Operation Manual Glass panels may be cleaned using any standard glass cleaner available on the market. Keep food equipment clean. Use alkaline chlorinated or non-chloride cleaners at recommended strength. Clean frequently to avoid build-up of hard, stubborn stains. The single most likely cause of damage is chlorides in the water. Remember, adding heat to cleaners that contain chlorides dramatically increases their effect on stainless steel.
Models BBR/BBS Installation & Operation Manual Recommended Cleaners for Specific Situations Job Cleaning Agent Comments Routine cleaning. Soap, ammonia, detergent Apply with sponge or soft cloth. Fingerprints and smears. Areal 20, Lac-O-Nu, Lumin Wash, O’Ceder Cream Polish Provides barrier film to minimize fingerprints. Can be used on all finishes. Rub the surface with a cloth as directed on the package. Stubborn stains and discolorations.
Models BBRN/BBSN Installation & Operation Manual Troubleshooting Before Calling For Service If the unit appears to be malfunctioning, read through the Operation section in this manual first. If the problem persists, check through this troubleshooting section. Locate the problem and refer to the cause and remedy before calling for service. The problem could be something that can be solved without a service call.
Models BBR/BBS Installation & Operation Manual Problem Cause Solution System runs for long period of time. Condenser dirty or obstructed. Door kept open for long time or opened more frequently. Warm product place in cabinet recently. Hot day and warm room temperature. Clean condenser and clear obstruction. Wait 24 hours and recheck temperature. Reset preset temperature if necessary. Normal for system to run more frequently. Condensation forms inside the compartments.
Models BBRN/BBSN Installation & Operation Manual Dimensions Printed in USA 14 0213
Models BBR/BBS Installation & Operation Manual Printed in USA 15 0213
Printed in USA Models BBRN/BBSN Installation & Operation Manual 16 0213
Models BBR/BBS Installation & Operation Manual Wiring Diagrams Printed in USA 17 0213
Printed in USA Models BBRN/BBSN Installation & Operation Manual 18 0213
Models BBR/BBS Installation & Operation Manual Printed in USA 19 0213
Models BBRN/BBSN Installation & Operation Manual Warranty The terms and conditions set forth below together with those appearing on the face of the Acknowledgement (the “Order”) constitute the complete and exclusive agreement between Perlick Corporation and the Buyer pertaining to the goods and/or services identified in the Order. If there is a discrepancy or conflict between any exhibit or supplement to the Order and these terms and conditions, these terms and conditions shall control.
Models BBR/BBS Installation & Operation Manual ONE YEAR LABOR WARRANTY charge for un-assembled, freestanding underbar stainless steel modules is 20%. Assembled under bar modules are considered custom products and are not returnable for credit. The restocking charge on the item returned is either a percentage of the value of the item or $35.00, whichever is greater.
Models BBRN/BBSN Installation & Operation Manual Notes Printed in USA 22 0213
Models BBR/BBS Installation & Operation Manual Notes Printed in USA 23 0213
8300 West Good Hope Road • Milwaukee, WI 53223 • Toll Free 800.558.5592 • Fax 414.353.7069 • www.perlick.