
installation guide


PERLICK RESIDENTIAL COLUMN REFRIGERATION INSTALLATION INSTRUCTIONS
16 | perlick.com/residential
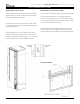
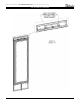
DOOR PANEL INSTALLATION
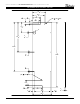
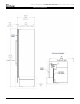
Typical panel dimensions are based on 84” (2134) nished
height with 1/8” (3) reveals. Template must be adjusted for
panels exceeding typical dimensions.
Place panel face down on a protected work surface. Aach
six clips to the back of overlay in locaons indicated in wood
overlay drawing below.
Use provided #10 x 1/2” screws to aach clips to overlay.
Overlay then slides onto door face. Aach overlay to door
adjustment brackets using remaining #10 x 1/2” screws. Once
mounted, adjust overlay to match adjacent cabinetry.
INSTALLING DOOR OVERLAY PANELS
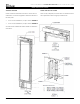
DOOR OVERLAY PANEL ADJUSTMENT
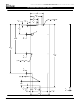
Close the door to make adjustments to align panels and reveals.
For up and down adjustments, turn the height adjustment
screws in the top bracket (see Top of Door illustraon on page
17) in and out. Adjust the screws as needed to achieve an even
reveal on each side of the door overlay.
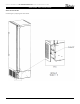
Once nal adjustments are made to the posion of the door
overlay, secure the overlay in place by installing the boom
overlay brackets as shown in Boom of Door illustraon below.
BOTTOM OF DOOR